Areas
An area in Home Assistant is a logical grouping of devicesA device is a model representing a physical or logical unit that contains entities. and entitiesAn entity represents a sensor, actor, or function in Home Assistant. Entities are used to monitor physical properties or to control other entities. An entity is usually part of a device or a service. [Learn more] that are meant to match areas (or rooms) in the physical world of your home. Areas allow you to target an entire group of devices with an action.
For example, the “Living room” area groups devices and entities in your living room. This allows you to turn off all the lights in the living room with a single action. Areas can be assigned to floorsA floor in Home Assistant is a logical grouping of areas that are meant to match the physical floors in your home. Devices & entities are not assigned to floors but to areas. Floors can be used in automations and scripts as a target for actions. For example, to turn off all the lights on the downstairs floor when you go to bed. [Learn more]. Areas can also be used to automatically generate cards, such as the Area card.
Creating an area
Follow these steps to create a new area from the Areas view.
-
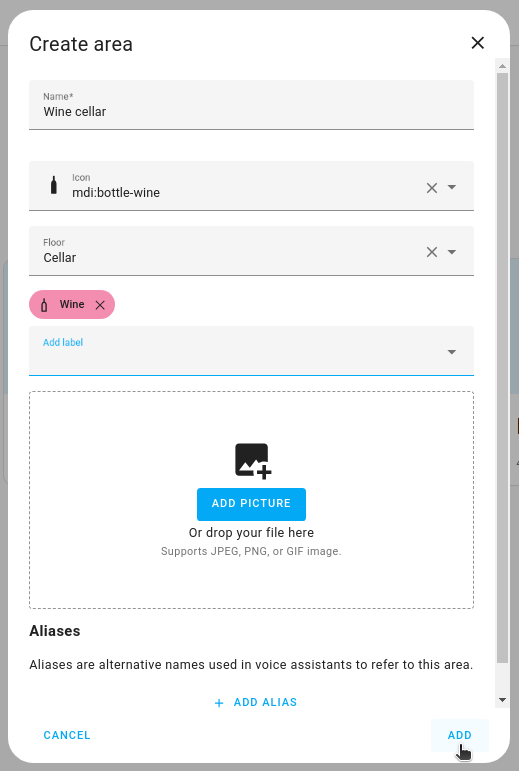
Go to Settings > Areas, labels & zones and select Create area.
-
In the dialog, enter the area details:
- Give the area a Name (required).
- Add an icon (use Material Design Icons (MDI)).
- Assign the area to a floor.
- If you have not created floors yet, you can create a new floor.
- The number can be negative. For example, for underground floors.
- This number can later be used for sorting.
- Add an image representing that area.
- Add an Alias.
- Aliases are alternative names used in voice assistants to refer to an area, entity, or floor.
-
Select Create.
Result: A new area is created.
Assigning areas to floors and adding labels
If an area has not yet been assigned to a floorA floor in Home Assistant is a logical grouping of areas that are meant to match the physical floors in your home. Devices & entities are not assigned to floors but to areas. Floors can be used in automations and scripts as a target for actions. For example, to turn off all the lights on the downstairs floor when you go to bed. [Learn more], it is shown in the Unassigned areas section. Follow these steps to assign an area to a floor.
- Go to Settings > Areas, labels & zones.
- Drag and drop the area card to the target floor.
- Alternatively, on the area card, select the edit
button and assign the floorA floor in Home Assistant is a logical grouping of areas that are meant to match the physical floors in your home. Devices & entities are not assigned to floors but to areas. Floors can be used in automations and scripts as a target for actions. For example, to turn off all the lights on the downstairs floor when you go to bed. [Learn more] and labelsLabels in Home Assistant allow grouping elements irrespective of their physical location or type. Labels can be assigned to areas, devices, entities, automations, scenes, scripts, and helpers. Labels can be used in automations and scripts as a target for actions. Labels can also be used to filter data. [Learn more].
- Alternatively, on the area card, select the edit
Assigning an area to multiple items
You can assign an area to multiple items at once in the automationAutomations in Home Assistant allow you to automatically respond to things that happen in and around your home. [Learn more], sceneScenes capture the states you want certain entities to be. For example, a scene can specify that light A should be turned on and light B should be bright red. [Learn more], scriptScripts are components that allow you to specify a sequence of actions to be executed by Home Assistant when turned on. [Learn more], and deviceA device is a model representing a physical or logical unit that contains entities. pages.
-
Depending on what you want to assign, go to one of the following pages:
- For automations, scripts, or scenes Settings > Automations & scenes and open the respective tab.
- For devices, go to Settings > Devices & services > Devices.
-
In the list, select all the items you want to assign to an area.

-
In the top right corner, select Move to area and select the target area from the list.
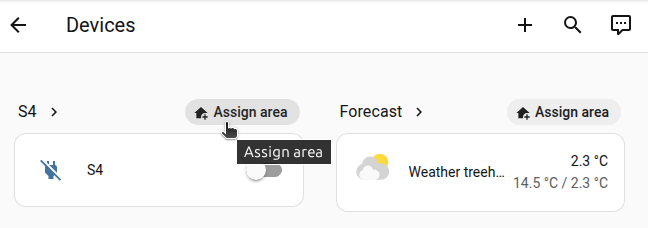
Assigning an area to a device from the devices dashboard
The Overview (built-in) dashboard has a dedicated Devices section that shows all devices that are not assigned to an area.
-
Go to Settings > Dashboards and select the Overview (built-in) dashboard.
-
Scroll down to the Other areas section and select the Devices card.
-
For your device, select Assign area and choose the target area from the list.
Editing an area
Follow these steps to edit an area.
- Go to Settings > Areas, labels & zones and on the area card, select the edit
button. - In the dialog, adjust the area details you want to change:
- Edit the area Name.
- Add an icon (We use Material icons).
- Assign the area to a floor.
- If you have not created floors yet, you can create a new one.
- The number can be negative. For example for underground floors.
- This number can later be used for sorting.
- Add an image representing that area.
- Add an Alias.
- Aliases are alternative names used in voice assistants to refer to an area, entity, or floor.
Editing an area from the area dashboard
You can also edit the area details when you’re on the area dashboard.
- Go to Settings > Dashboards and select the Overview (built-in) dashboard.
- Select the area.
- In the top-right corner, select the edit
button. - In the Update area dialog, edit the area details.
Reordering areas on built-in dashboards
Follow these steps to rearrange floors and areas on the built-in dashboards (such as Overview, Lights, and Security).
- Go to Settings > Areas, labels & zones.
- There are 2 options to rearrange items:
-
Option 1: Use drag-and-drop.
-
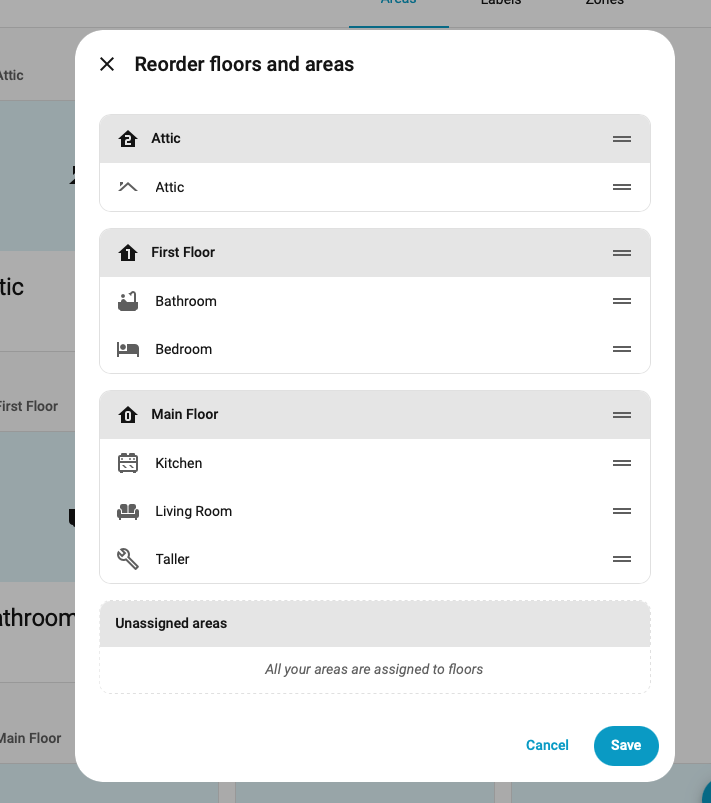
Option 2: In the top-right corner, select the three dots
menu and select Reorder floors and areas. - In the dialog, move the floors or areas you want to rearrange:
-
Sending a vacuum to a dedicated area
If you have a vacuum that supports area cleaning, you can set up an automation to send the vacuum to a specific area.
Deleting an area
Follow these steps to delete an area. It will be removed from all the floors it was assigned to. All the devices that were assigned to this area will become unassigned. If you used this area in automations or script as targets, or with voice assistant, these will no longer work.
-
Go to Settings > Areas, labels & zones and select the area card.
-
In the top right corner, select the three dots
menu. Then, select Delete. 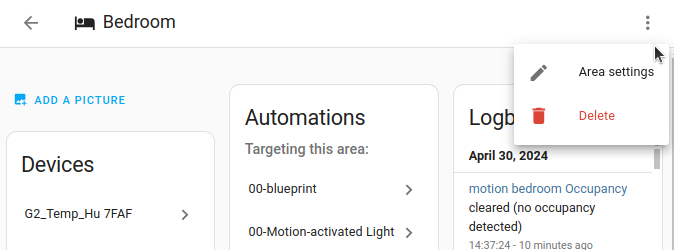
-
If you used this area in automations or script as targets, or with voice assistant, they will no longer work.
- You can adjust or delete the related scripts or automations.
-
If you still had devices in that area, they are no longer assigned to any room.
- If you have moved the devices, you can now reassign them to a new area.