Blog
0.28: Reload automation and groups, API documentation, car tracking, Pi-Hole stats
It’s already time for 0.28 thanks to our super short release cycles. Now, it’ official…we hit 4000 stars on Github. That’s amazing. Sorry, not as amazing as all the stuff that was going on for 0.27 but still pretty awesome.
Reload automation rules
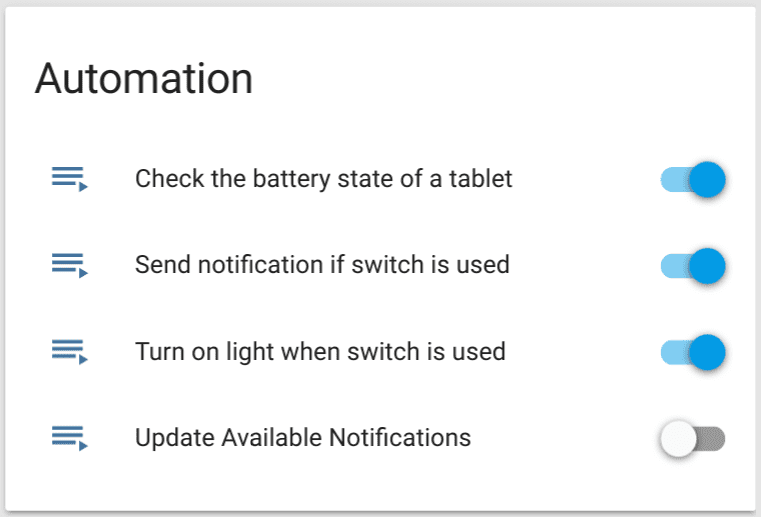
This release brings you a huge improvement of the automation and group handling. Both can be reloaded without a Home Assistant restart by calling their new reload services. The automations can be controlled directly from the frontend.
Raspberry Pi installation guide
Singleboard computers are very popular to run Home Assistant. To support this fact, the installation documentation for the Raspberry Pi devices was re-written to get users started as quickly as possible. @Landrash took the lead with on this tasks with help from @kellerza and @MartinHjelmare.
Climate and cover
There are countless bugfixes included in this release which will make your experience with the climate and the cover platforms better. Two week ago was the biggest merger of implementations released that ever happened in the history of Home Assistant. Thanks to @turbokongen, @pvizeli, @djbanks, @danielperna84, and others the improvements on the code and the frontend side is continuing…
API documentation
The Home Assistant API Documentation is a great addition to the already existing user documentation. The focus is not end-users but developers who want to get details about the code without actually browsing the code on Github.
Configuration validation
The validation of the configuration is still on-going. Approximately 80 % is done. This means that we will propably talk about this topic in the next release notes again. To align the configuration of components and platforms we needed to break some. Please refer to the Backward-incompatible changes section to check if you need to update your configuration or simple check your log for configuration validation errors. Thanks to @kellerza, @fabaff, @Teagan42, and @pvizeli for your effort!
All changes

![]()

- Light: Added bitfield to Flux LED since we are supporting effects (@tchellomello)
- Device tracker: Owntracks waypoint import (@pavoni)
- Climate: A lot of bugfix (@turbokongen, @pvizeli, @djbanks)
- Notify: Improvement of the title handling (@lwis)
- RFXtrx: Sensor cleanup (@turbokongen)
- Device tracker: Fix for BLE device tracker (@open-homeautomation)
- Device tracker: Allow ‘None’ MAC addresses to be loaded from
known_devicesfile (@kellerza) - Cover: Bugfixes (@turbokongen, @danielperna84)
- Sensor: Support for displaying details about crypto currencies (@fabaff)
- Device tracker: Support for automatic to track your vehicles (@Teagan42)
- Devie tracker: Add exclude option to Nmap device tracker (@danieljkemp)
- Device tracker: Improved login errors for Asus device tracker (@kellerza)
- Sensor: Support for displaying the status of Xbox Live accounts (@mKerix)
- Notify: Adding
link_namesfor sending Slack message (@salt-lick) - Binary sensor: Add the occupancy sensor class (@robbiet480)
- Fan: Add supoort for MQTT fans (@robbiet480)
- Docs: Add Sphinx API doc generation (@bbangert)
- Core: Allow reloading automation without restart (@balloob)
- Sensor: Added scale and offset to the Temper sensor (@mKerix)
- Sensor: New support for [Trend] sensor (@pavoni)
- Device tracker: Keep looking for new BLE devices (@Bart274)
- Switch: Added device state attributes and support for legacy firmware for D-Link switches (@LinuxChristian)
- Sensor: Improve 1-Wire device family detection (@Ardetus)
- Modbus: Update to be thread safe (@persandstrom)
- Camera: FFMpeg is abale to get the images (@pvizeli)
- Core: Reload groups without restart (@balloob)
- Core: Fix remove listener (@balloob)
- Sensor: Support for monitoring your battery on a Linux host (@fabaff)
- Core: Add support for complex template structures to
data_template(@pvizeli) -
check_config: Improve yaml fault tolerance and handle border cases (@kellerza) - Core: Add additional template for custom date formats (@lwis)
- Sensor: Support for getting stats from Pi-Hole systems (@fabaff)
- Modbus: New
write_registersModbus service (@persandstrom) - Device tracker: Fix TP-Link Archer C7 long passwords (@snikch)
Hotfix 0.28.1 - September 12
- Fix: Simplisafe alarm control panels accept any string for code (@tchellomello)
- Fix: Z-Wave would sometimes not detect all thermostats (@turbokongen)
- Fix: Automatic device tracker when 2 or more cars are tracked (@teagan42)
- Fix: Group ordering is now based on config again (@balloob, @kellerza)
Hotfix 0.28.2 - September 13
- Light - pilight: Fix send RF code (@DavidLP)
- Recorder: Fix specifying SQLite (@pvizeli)
- Wink: Fix garage door detection (@turbokongen)
- Climate - Ecobee: Fix inverted high and low temperatures (@turbokongen)
- Allow changing covers using scenes (@nvella)
- Device tracker - Automatic: Fix polling (@teagan42)
Backward-incompatible changes
-
OpenweatherMap entity IDs are now like
sensor.owm_temperature. Previously they were likesensor.weather_temperature. Apologies for this change, but we needed to make OpenWeatherMap more generic now that we have many weather platforms. - Updates of configuration variables due to configuration check or alignment with other platforms. Please update your configuration entries according to the documentation:
- Custom components extending
BaseNotificationServiceneed to be aware thatkwargs.get(ATTR_TITLE)will now returnNoneif a title has not been set, and will need to specifykwargs.get(ATTR_TITLE, ATTR_TITLE_DEFAULT)if they always require a title.
If you need help…
…don’t hesitate to use our Forum or join us for a little chat.
ESP8266 and MicroPython - Part 2
 So, part 1 of [ESP8266 and MicroPython](/blog/2016/07/28/esp8266-and-micropython-part1/) was pretty lame, right? Instead of getting information out of Home Assistant we are going a step forward and create our own sensor which is sending details about its state to a Home Assistant instance.
Read on →
So, part 1 of [ESP8266 and MicroPython](/blog/2016/07/28/esp8266-and-micropython-part1/) was pretty lame, right? Instead of getting information out of Home Assistant we are going a step forward and create our own sensor which is sending details about its state to a Home Assistant instance.
Read on →
0.27 is here to break eggs and take names: notifications, Hue fakery, safety and unification come to Home Assistant
This week’s blog post could only be possibly described by exactly one hashtag:
#Amazing
or maybe#supersized
Keep reading to see what #Amazing things we have in store for you this week 😄! And make sure you read all the way to the end, because I left a present down there for those committed few among you :)
But first…
Some general housekeeping
Paulus (@balloob) is on vacation in Europe this week, so you will all have to deal with me, Robbie (@robbiet480) for this release blog post. Don’t worry, Paulus will be back to tearing apart your pull requests in no time 😈.
Special thanks to my awesome helpers for this week’s release who are looking over my shoulder to make sure I’m crossing my t’s and dotting my i’s: @Teagan42, @infamy and @fabaff.
For my next trick, let’s hand out some…
Trophies
I felt that I had to 1-up Paulus (@balloob) somehow with his 500,000 pageviews stat he shared in the 0.26 blog post, so I pushed myself and our development community as a whole super hard the last two weeks to put a lot of love into Home Assistant to bring you not just one, but six #Amazing stats for this release. As of 0.27, we have now surpassed the following milestones:
- 10,000 builds on Travis (congrats to @BluGeni)
- 3,000 issues and pull requests (thanks @kellerza!)
- 2,000 pull requests alone (awesome @fabaff!!)
- 900 forks on Github!
In addition,
- We are very close to 4,000 stars on Github!
- I’m now #5 contributor by most commits!!! Hey wait, how’d this get in here 😳…
Now that we have that great news out of the way, onto this week’s release which is going to keep the #Amazing gravy train rolling right along and get to the stuff you all really are here for.
0.27
While this release is #Amazing, we had to break a few eggs (now you understand the title reference!) to make a beautiful omelette (using home automation obviously) so some platforms and components have needed to introduce backward-incompatible changes. Please make sure to read the Backward-incompatible changes section below.
Hue Bridge Emulation
Thanks to @mgbowen we now have the functionality previously provided by @blocke’s ha-local-echo built right into Home Assistant! This means that for those of you with devices that either lack or have a subpar integration with Home Assistant (looking at you Amazon Echo) you can now have a better experience by having your Home Assistant pretend to be a Hue Bridge. Personally, I have used @auchter’s Haaska previously but found that it was slow to respond and sometimes failed entirely. With the new emulated_hue component, you can have local control of entities through Amazon Echo.
Notification improvements
We have some excellent upgrades to the notification system coming to you in 0.27, courtesy of me, @robbiet480.
HTML5 Push Notifications
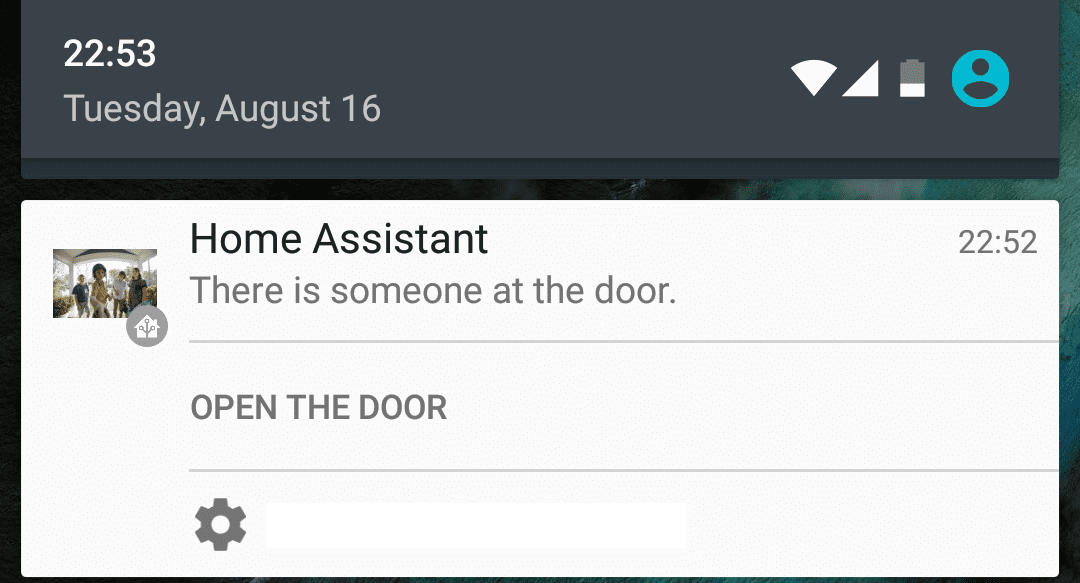
This release adds support for HTML5 push notifications on Chrome/Firefox/Opera on both desktop and Android devices. This means that you can send a notification to your phone even when your Home Assistant is not open in your mobile browser. When using Chrome you can even include 2 action buttons so that you can control your Home Assistant from your phone’s lock screen, allowing you to do things like sound alarms or unlock your front door, all without leaving the notification. Thanks again to me (@robbiet480) and Paulus (@balloob) for all the hard work on this!
Notification Groups
Using the new notify group platform allows you to cut down a lot of duplicate automation logic by combining multiple notification platforms and targets into a single notify service. Check out the documentation for more info.
target is no longer needed
For platforms that support it, starting with the new HTML5 platform, any targets that are available will be exposed as individual services, so no more having to remember which targets to use. Please note that the existing services also still exist so you can keep using target if you wish.
Validate configuration before restarting Home Assistant
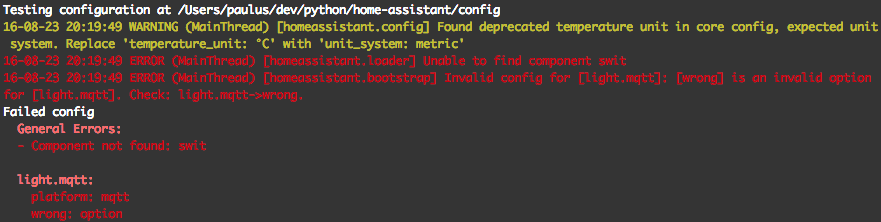
Ever restarted Home Assistant to test a configuration change just to find out there is a validation error? Well, not anymore! @kellerza has added a command line script that will validate your configuration as if you started Home Assistant.
hass --script check_config
Configuration validation
This release includes a big push on making sure all platforms contain proper configuration validation. This should help in getting your configuration right. Thanks to @fabaff, @pavoni, @pvizeli, @nkgilley for all the hard work on this, you all rock!
FFMpeg motion/noise sensing
It’s now possible to use FFMpeg to monitor a video stream and detect motion thanks to a new binary sensor platform by @pvizeli.
Component clean up - Thermostat & HVAC -> Climate. Rollershutter & Garage Door -> Cover
Due to our wild growth we ended up with a few components that had a lot of overlapping functionality. @turbokongen took on the hard job on merging them. Thermostat and HVAC platforms are now combined under the new Climate component. Rollershutter and Garage Door platforms are now combined under the new Cover component. You can easily upgrade by just swapping out the name. For example replace thermostat with climate. The old components have been deprecated and will be removed in the near future.
A new fan component
Along with the new climate component, @Teagan42 and I (@robbiet480) decided we needed something simpler to just control a fan. Currently it has support for controlling Insteon fans. MQTT support will appear in 0.28.0. I tried to get it implemented before 0.27.0 but spent too long writing this blog post 😢.
All changes


- Merge thermostat and HVAC components into new climate component (@turbokongen)
- Merge rollershutter and garage door components into new cover component (@turbokongen)
- Alarm Control Panel - Manual: Allow returning to previous state after trigger (@tobiebooth)
- Sensor - DHT: Allow range checking (@open-homeautomation)
- Light entities will now expose their features (@shmuelzon)
- Sensor: Monitor HP ILO sensors on HP servers (@Juggels)
- Sensor: Monitor Fritzbox Calls (@DavidMStraub)
- Notify: LlamaLab Automate is now supported (@danielperna84)
- Sensor: Serial CO2 sensors now supported (@open-homeautomation)
- Sensor: MQTT room presence detection (@mKerix)
- Notify: New group platform allows grouping notify targets across platforms (@robbiet480)
- HTML5 push notifications (@robbiet480, @balloob)
- Weather: Wunderground now supported (@arsaboo, @Teagan42)
- New check config script to test validity before restarting HA (@kellerza)
- Binary Sensor: Allow monitoring a camera feed using FFMpeg (@pvizeli)
- Cover: Z-Wave platform now supports positions (@nunofgs)
- Device tracker: allow using Gravatar for entity picture (@robbiet480)
- Notify: platforms with known targets will expose them as standalone services (@robbiet480)
- Camera: MJPEG and Generic camera’s can now authenticate using digest auth (@meatz)
- Weather: Forecast.io now can show daily temp/precip forecast values (@DavidMStraub)
- Media Player: WebOS TV now allows customizing the sources (@roidayan)
- Device tracker: Allow tracking devices using Bluetooth Low-Energy (@open-homeautomation)
- Notify: Ensure Slack messages appear as correct user (@technicalpickles)
- YAML: Secrets will look for values in all parents folders up to the config root folder (@Teagan42)
- Camera: Generic camera now supports template support (@balloob)
- Slack: Allow sending attachments (@technicalpickles)
- Device Tracking: TP-Link Archer C7 5 GHz devices will now also be found (@dpford)
- Z-Wave: New rename node service added (@jnewland)
- Wink: Bug fixes (@w1ll1am23)
- Homematic: new device and controller variable support (@danielperna84, @pvizeli, @mcdeck)
- Allow emulating a Hue bridge to control entities (@mgbowen)
- New Fan component (@Teagan42, @robbiet480)
Backward-incompatible changes
- Ecobee3 occupancy sensors have moved from sensor platform to binary sensor platform.
- Forecast.io entity IDs are now like
sensor.forecastio_temperature. Previously they were likesensor.weather_temperature. Apologies for this change, but we needed to make Forecast.io more generic now that we have many weather platforms. - The Loop Energy sensor configuration format changed slightly, please reformat based on the revised documentation.
- The configuration for the SABnzbd sensor has slightly changed. The prefix
type:is no longer required for monitored variables. - The IMAP sensor now uses
usernameinstead ofuser. - The NZBGet sensor has had so many changes I can’t list them all. Please refer to the documentation for more info.
Deprecations
- Using the
thermostatandhvaccomponents has been deprecated. Please migrate to the newclimatecomponent. (just change the component name, the configurations are compatible) - Using the
rollershutterandgarage_doorcomponents have also been deprecated. Please migrate to the newcovercomponent. (just change the component name, the configurations are compatible)
Finishing up
Thanks all for sticking with me to the end. I’ll be taking over a lot of Paulus’s (@balloob) work while he is gone, but as I said, don’t worry because he’ll be back well before 0.28.0 comes out. Hopefully you didn’t find this jovial blog post too jarring from our standard style, I just wrote a lot of this at 2am after being awake for almost 20 hours, so I’m a little loopy hahaha 😴.
Also, thanks as always to our developer contributors, documentation contributors, but most of all our users! This would’ve just been a script that Paulus (@balloob) used to control his lights at home if we didn’t have your enthusiasm.
Feel free to let me know what you thought of this blog post and release on Discord or my Twitter, or even the Home Assistant Twitter. Did I mention we have a brand new Facebook page that you should absolutely Like? There’s a convenient Facebook Like and Twitter follow button right on the sidebar.
I almost forgot about your 🎁 for reading all the way to here: a 🍪! Hope you enjoy it in good health 😄.
Talk to you soon on Discord and in your pull request comments!
– Robbie
(p.s. To those of you that scrolled directly to the bottom to get your present, just know that you didn’t earn it like the others did. 😄)
Hotfix 0.27.1 - August 30
- Migrate APCUPSd to voluptuous (@fabaff)
- Ecobee operation mode fix (@turbokongen)
- update ha-ffmpeg version to 0.9 (@pvizeli)
- Device tracker component & platform validation. No more home_range. (@kellerza)
- Added option to use effect:random for Flux Led light bulbs (@tchellomello)
- Use voluptuous for smtp (@pvizeli)
- Upgrade sendgrid to 3.2.10 (@fabaff)
- Upgrade TwitterAPI to 2.4.2 (@fabaff)
- Fix bug in wemo discovery caused by voluptuous addition. (@pavoni)
- Bug fix for asuswrt device_tracker. (@Danielhiversen)
- Remove units for humidity in Wundeground sensor (@arsaboo)
- Fix media_player descriptions and select_source (@MartinHjelmare)
- Allow user to configure server id to perform speed test against (@Teagan42)
- Bug fix for asuswrt device_tracker. (@Danielhiversen)
- More Ecobee operation mode fixes (@turbokongen)
- Map Modes to setpoint indexes (@turbokongen)
- fix voluptuous and cover autodiscovery (@pvizeli)
- Fixes wrong statevalue and problem with zwave setpoint (@turbokongen)
Hotfix 0.27.2 - September 3
home-assistant
- Ble fix (#3019) - (@open-homeautomation)
- Reset insteon hub (#3062) - (@Teagan42)
- Host should be optional for apcupsd component (#3072) - (@Danielhiversen)
- Zwave climate Bugfix: if some setpoints have different units, we should fetch the o… (#3078) - (@turbokongen)
- Bugfix unit fix (#3083) - (@turbokongen)
- Ecobee humidity slider (#3088) - (@turbokongen)
- Zwave Climate Bugfix: If device was off target temp was null. Default to Heating setpoint (#3091) - (@turbokongen)
- Climate and cover bugfix (#3097) - (@turbokongen)
- Add missing docstrings (fix PEP257 issues) (#3098) - (@fabaff)
- Allow None MAC to be loaded from known_devices (#3102) - (@kellerza)
- fix homematic climate implementation (#3114) - (@pvizeli)
- Fixed Homematic cover (#3116) - (@danielperna84)
- Bugfix. climate and covermqt (#3130) - (@turbokongen)
home-assistant-polymer
- Fix missing attributes on the climate and HVAC more info cards (7e455e2) - (@robbiet480)
- Add a default icon for the fan component (#101) - (@robbiet480)
Github-style calendar heatmap of device data
Thanks to Anton Kireyeu we are able to present another awesome Jupyter notebook. I guess that you all know the graph which Github is using to visualize your commits per day over a time-line. It’s a so-called heatmap. If there are more commits, it’s getting hotter. The latest notebook is capable to do the same thing for your devices. To be more precise, for the hours your devices are home.
 Heatmap
We Have Apps Now
I have been working on a new subsystem to complement Home Assistant’s Automation and Scripting components. AppDaemon is a python daemon that consumes events from Home Assistant and feeds them to snippets of python code called “Apps”. An App is a Python class that is instantiated possibly multiple times from AppDaemon and registers callbacks for various system events. It is also able to inspect and set state and call services. The API provides a rich environment suited to home automation tasks that can also leverage all the power of Python.
0.26: Foursquare, Fast.com, FFMPEG and GPSD
 Paulus Schoutsen
It’s time for 0.26 and it’s again full of new features and fixes. First I want to highlight that we are now having 500 000 monthly pageviews on the website. A big milestone for us! It’s been an amazing journey. Big thanks to the Home Assistant community for being such a delightful bunch.
This release includes code contributed by 31 different people. The biggest change in this release is a new unit system. Instead of picking Celsius or Fahrenheit you’ll have to pick imperial or metric now. This influences the units for your temperature, distance, and weight. This will simplify any platform or component that needs to know this information. Big thanks to @Teagan42 for her hard work on this!


![]()
- Core: Introduce notion of unit system (deprecates temperature unit option) (@Teagan42)
- Front end: Speed improvements (@balloob)
- Front end: Improve layout of state dev tool (@balloob)
- Proximity: Allow definition of unit of measurement (@Teagan42)
- Flux: Add mired and kelvin mode (@HBDK)
- Thermostat - Proliphix: Support for cooling (@sdague)
- Media Player - LG Netcast TV: Show screenshot of what is currently playing (@shmuelzon)
- Z-Wave improvements (@jnewland, @turbokongen)
- Thermostat - heat control: now also able to control an AC (@mtreinish)
- Thermostat - heat control: allow specifying a minimum duration before switching (@mtreinish)
- InfluxDB: Whitelist entities option added (@tchellomello)
- Sensor: Serial particulate matters sensors now supported (@open-homeautomation)
- Sensor - Fitbit: Fix unit system (@tchellomello)
- Light - Flux LED: Add support for [color and brightness][color] (@Danielhiversen)
- Media Player - Plex: Now able to report on music (@abcminiuser)
- Alarm Control Panel - Verisure: Now able to see who changed the alarm (@persandtrom)
- Thermostat - Honeywell: Add option to read and control HVAC mode (@Teagan42)
- Foursquare component to receive instant notifications of checkins (@robbiet480)
- Camera: New FFMPEG platform allows to stream anything through front end (@pvizeli)
- Manage secrets with new command line script (@kellerza)
- Notify - SMTP: Allow embedding of images (@partofthething)
- Sensor: OhmConnect is now supported (@robbiet480)
- panel_custom component allows the registering of new panels (@balloob)
- Light: New mqtt_json platform for working with JSON payload (@corbanmailloux)
- Sensor: New Fast.com platform to measure network bandwidth performance (@nkgilley)
- New pilight component to control 433 Mz devices (@DavidLP)
- Sensor: GPSD now supported (@fabaff)
Hotfix 0.26.1 - August 14
- Fix serial_pm config validation (@open-homeautomation)
- Check for existence of system mode on Honeywell thermostats (@mKeRix)
- Fix unknown unit of measurement for hvac and thermostat component (@turbokongen)
Hotfix 0.26.2 - August 15
- Fix Wemo: have PyWemo play nicely with the latest Requests (@pavoni)
Hotfix 0.26.3 - August 19
- Media Player cover art would not work when an API password was set. Thanks to @maddox for reporting it and @balloob for the fix.
Backward-incompatible changes
- A new unit system has superseded the temperature unit option in the core configuration. For now it is backwards compatible, but you should update soon:
# Configuration.yaml example
homeassistant:
  # 'metric' for the metric system, 'imperial' for the imperial system
  unit_system: metric
Optimizing the Home Assistant mobile web app
This blog post will go into detail about the recent performance optimizations that went into the Home Assistant front end. For people not familiar with the app, check out the demo and the source.
TL; DR: Don’t hack the framework, separate responsibilities, ship less, use service workers, use (future) web standards.
This year at Google I/O I saw Monica from the Polymer team talk about web components and performance. In her talk she mentions a mantra that they use in the Polymer team to make things fast: Do less and be lazy.
Do less and be lazy. It sounds so obvious and it took a while before it started to dawn on me. I think most of the code I write is pretty fast, but I don’t often stop to take a harder look at how and when it runs in practice. When do we need the result, can it be postponed?
And thus started my journey to take a critical look at how the Home Assistant app was working and how to make things faster. Below is the list of the different things that I did to make it fast.
I hope this list can be useful to other people, as a guide for optimizing their own apps or for avoiding pitfalls when building a new one.
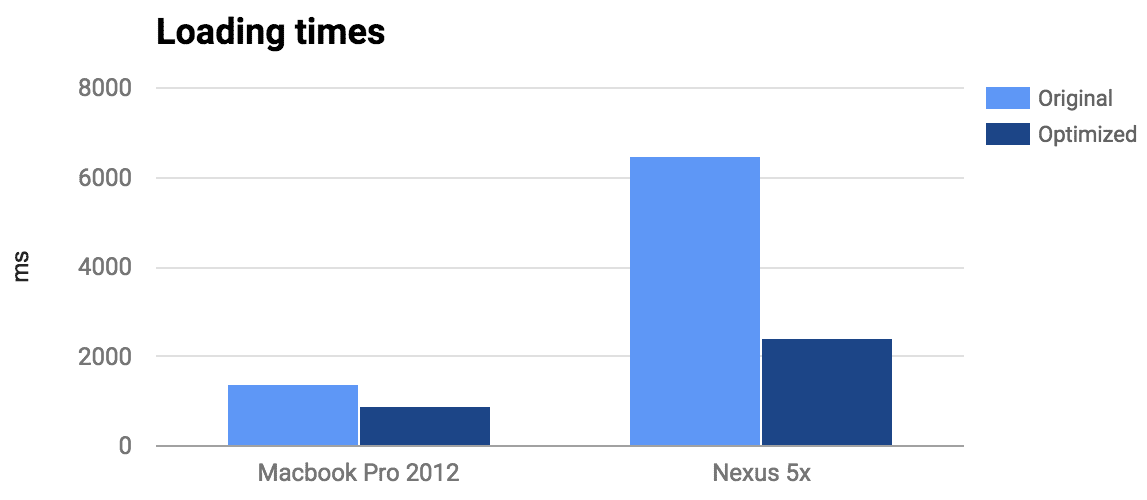
The first thing to do is to measure. The Home Assistant front end is a mobile web app, so we shouldn’t measure this on a machine with 8 cores and gigabytes of ram but instead measure on devices you expect a mobile web app to run: phones. Below are two timelines recorded with Home Assistant 0.18.2 (pre-optimizations) and Google Chrome 53. On my Mac the app starts in 1400 milliseconds and on my Nexus 5x in ~6500 milliseconds (~4.5 times slower!).
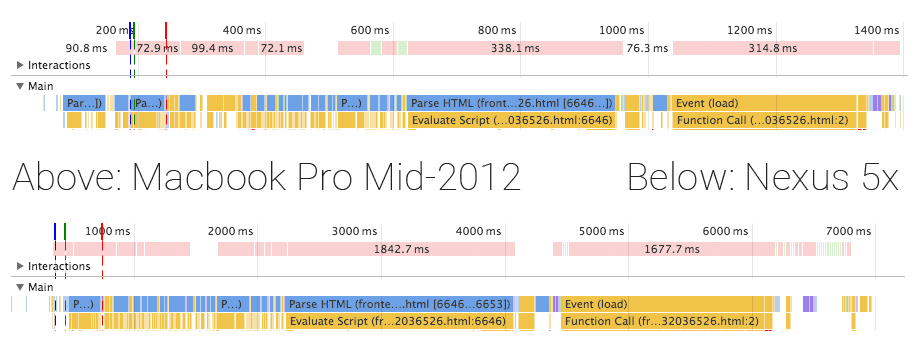
Although the app takes 6500 milliseconds to load on my phone, it would perform well afterwards. Still, that initial load is unacceptable. You expect to open an app on your phone and be able to use it, quickly. After I applied all the changes described below, I managed to reduce startup time to 900 milliseconds (-35%) on my Mac and 2400 milliseconds (-63%) on my Nexus 5x. Check out the demo here.

Laundry Sensors with NodeMCU and Home Assistant
This is a guest post by Home Assistant user and contributor Nolan Gilley.
Today I’ll show you how I used Home Assistant, a NodeMCU (ESP8266), and a couple of accelerometers to automate our laundry room. This is a rewrite of an old post where I did the same thing using a Moteino & Raspberry Pi. This version only requires a NodeMCU.
We have an older washer and dryer which doesn’t have any form of notification when cycles complete. Home Assistant was the obvious solution, I just needed to create sensors for the washer and dryer. I tried using sound sensors but found them unreliable. I ended up using an accelerometer attached to the back of each appliance. I also added magnetic reed switches on the doors of the washer and dryer to detect whether they’re open or closed. I connected the accelerometers and reed switches to an NodeMCU which will relay the data to my MQTT broker.
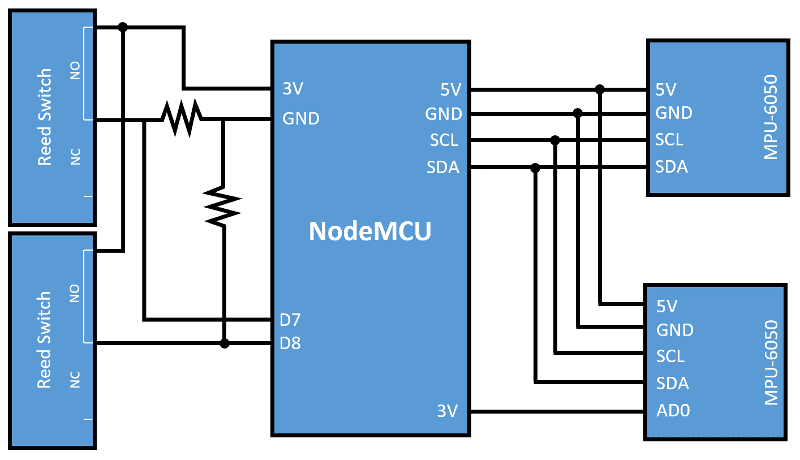 Block diagram of schematic
0.25: Custom frontend panels, Jupyter notebooks, DirecTV.
When Home Assistant started the focus has always been on making a great developer experience. Allowing anyone to add support for their favorite devices to Home Assistant easily. This focus has been a great success since we now have 339 components and platforms!
Starting with this release, we are extending our extensibility to the frontend. Starting this release, any component can add its own page to the frontend. Examples of this today are the map, logbook and history. We are looking forward to all the crazy panels you’ll come up with!
We have also seen an exciting trend of people starting to visualize their Internet of Things data using Jupyter Notebooks, which are a great way to create and share documents that contain code, visualizations, and explanatory text. In case you missed it, the blog post by @kireyeu shows an advanced usecase while our Notebooks in the Home Assistant Notebooks repository cover the basics.
This release also includes a bunch of new integrations, among others three new media player platforms. This means that today Home Assistant can talk to 26 different media players!
The brand-new iFrame panel component allows you to add other websites as pages in the Home Assistant frontend. They will show up in the sidebar and can be used the same way as you open the frontend in your browser but all within one view.
I would like to do a shoutout to @fabianhjr. He has started adding typing data (PEP484) to the Home Assistant core. This will help us identify issues before they are released.


![]()
- Frontend: Support for iFrame panels to adding other sites to sidebar (@balloob)
- Allow components to register custom frontend panels (@balloob)
- Add example custom_component react_panel showing custom panels (@balloob)
- Light: MagicLight/Flux WiFi Color LED Light support (@Danielhiversen)
- Script: Specify a delay using templates (@Teagan42)
- Media player: Russound RNET integration (@laf)
- Remote: Option specifying custom timeout when calling Home Assistant API (@n8henrie)
- Thermostat: Integration of KNX thermostats (@open-homeautomation)
- Thermostat: Support for HVAC mode of Nest devices (@vladonemo)
- InfluxDB: Option to specify additional tags (@open-homeautomation)
- Input slider: Support for float value (@ngraziano)
- Template: New filters (
timestamp_localandtimestamp_utc) (@fabaff) - Binary sensor - Wink: Water leak sensor support added (@w1ll1am23)
- Sensor - Tellduslive: Support for luminance of Fibaro Motion Sensor (@PetitCircuitLab)
- Switch - RPi GPIO: Fix when inverted logic (@zeroDenial)
- Z-Wave: Rollershutter update (@turbokongen)
- RFXtrx: Fire events when receiving signals from sensors and tests added (@Danielhiversen)
- Core: Add type checking using mypy to the core (@fabianhjr)
- Remote: Support for getting the Configuration through the Python API (@fabaff)
- Media player: Support for DirecTV (@cbulock)
- Use browser timezone for frontend logbook and history dates (@armills)
- Light: New support for X10 lights (@fotoetienne)
- Sensor: Support for observing IMAP accounts (@danieljkemp)
- Media Player: Integration for MPC-HC (Media Player Classic - Home Cinema) mediaplayer (@abcminiuser)
- Notify:
locationextension for Telegram and photo bug fixed (@keatontaylor and @pvizeli) - Groups: Lock states will now be properly grouped (@jwl17330536)
- Media Player: Added tests for Sonos to improve code quality (@americanwookie)
- Device Tracker: iCloud stability fixes (@kellerza)
- Sensor: Speedtest with improved error handling and state restoring (@nkgilley)
- Recorder: Stability fixes (@kellerza)
- Qwikswitch: Stability fixes (@kellerza)
- Light: Hyperion keeps now track of active color (@schneefux)
Hotfix 0.25.1 - August 1
- Light - Z-Wave: Bring back delayed value update behavior (@jnewland)
- Recorder: Properly close session after execute (@kellerza)
- Media Player - Kodi: No longer block startup if connecting to wrong port (@shoekstra)
- Downgrade voluptuous to 0.8.9 as it blocked the upgrade for some (@balloob)
Hotfix 0.25.2 - August 2
- Hotfix to make sure Z-Wave locks work again. Thanks to @tobiebooth for the quick fix.
Backward-incompatible changes
- Google Voice SMS notification support was removed.
ESP8266 and MicroPython - Part 1
The first release of Micropython for ESP8266 was delivered a couple of weeks ago. The [documentation](http://docs.micropython.org/en/latest/) covers a lot of ground. This post is providing only a little summary which should get you started.
Until a couple of weeks ago, the pre-built MicroPython binary for the ESP8266 was only available to backers of the Kickstarter campaign. This has changed now and it is available to the public for download.
Read on →