Getting started - Local
The simplest and most effective way to use Assist is to leverage the voice providers (for speech-to-text and text-to-speech) included in Home Assistant Cloud
If you are interested in setting up a fully local voice assistant, follow this setup:
Prerequisites
For Assist to be able to talk to your Home Assistant setup your setup needs to be able to listen, understand and then talk back.
In Home Assistant, the Assist pipelines are made up of various components that together form a voice assistant. For each component, you can choose from different options.
- For listening and talking back, it needs your phone with the Home Assistant app, or a voice activated device.
- For understanding, it needs to have a speech-to-text and text-to-speech software integrated.
- For running all together, it needs to have the Home Assistant Operating System running.
Some options for speech-to-text and text-to-speech
There are speech-to-text and text-to-speech options that run entirely local. No data is sent to external servers for processing.
Speech-to-text engines
There are currently two options to run speech-to-text locally: Speech-to-Phrase and Whisper.
Speech-to-Phrase
Speech-to-Phrase
- It transcribes what it knows.
- Extremely fast transcription even on a Home Assistant Green or Raspberry Pi 4 (under one second).
- Only supports a subset of Assist’s voice commands.
- More open-ended items such as shopping lists, naming a timer, and broadcasts are not usable out of the box.
- Speech-to-Phrase supports various languages
. - These qualities make it a great option for Home control!
Whisper
Whisper
- It will try to transcribe everything.
- The cost is slower processing speed:
- On a Raspberry Pi 4, it takes around 8 seconds to process incoming voice commands.
- On an Intel NUC, it is done in under a second.
- Supports various languages
. - Whisper is only a great option in the following case:
- You have powerful hardware at home.
- You plan to extend your voice set-up beyond simple home control. For example, by pairing your assistant with an LLM-based agent.
Text-to-speech engine
For text-to-speech, we have developed Piper
Please be sure to check how either option will work in your language, since quality can change quite a bit.
Installing a local Assist pipeline
For the quickest way to get your local Assist pipeline started, follow these steps:
-
Install the add-ons to convert text into speech and vice versa.
- Install the speech-to-text add-on of your choice, either Speech-to-Phrase or Whisper.
- Install Piper for text-to-speech.
- Start the add-ons.
- Once the add-ons are started, head over to the integrations under Settings > Devices & Services.
- You should now see both services being discovered by the Wyoming integration.
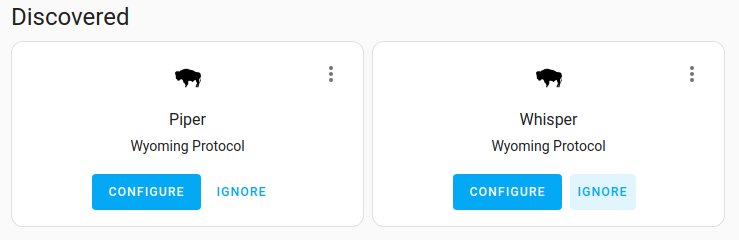
- You should now see both services being discovered by the Wyoming integration.
- For each integration, select Add.
- You now have integrated a local speech-to-text engine of your choice (either Speech-to-Phrase or Whisper) and a text-to-speech engine (Piper).
-
Setup your assistant.
-
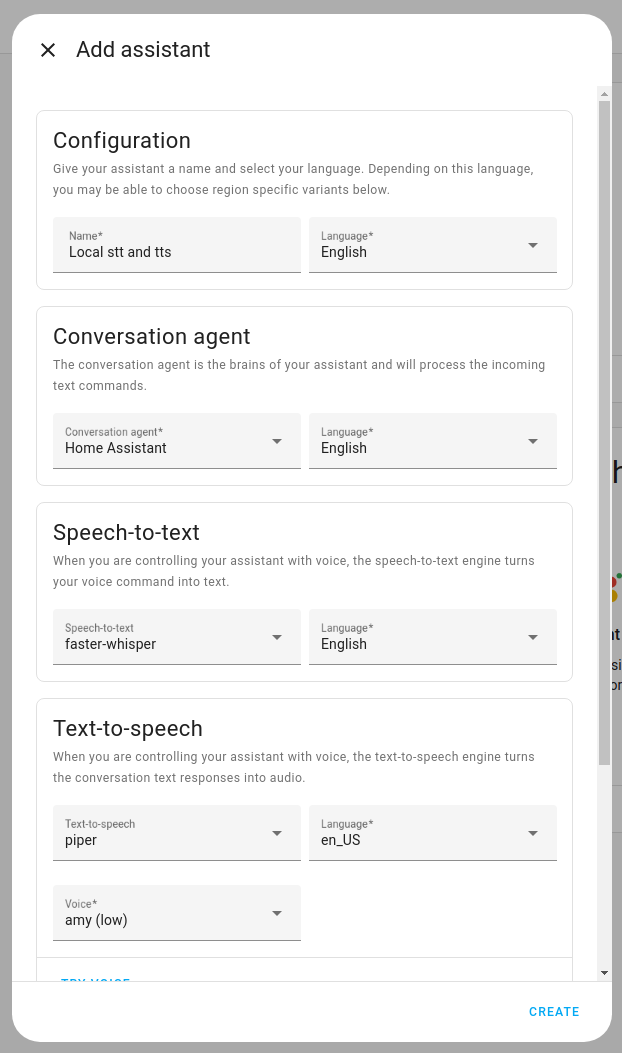
Go to Settings > Voice assistants and select Add assistant.
-
Troubleshooting: If you do not see any assistants here, you are not using the default configuration. In this case, you need to add the following to your configuration.yamlThe configuration.yaml file is the main configuration file for Home Assistant. It lists the integrations to be loaded and their specific configurations. In some cases, the configuration needs to be edited manually directly in the configuration.yaml file. Most integrations can be configured in the UI. [Learn more] file:
# Example configuration.yaml entry
assist_pipeline:
-
-
Enter a name. You can pick any name that is meaningful to you.
-
Select the language that you want to speak.
-
Under Conversation agent, select Home Assistant.
-
Under Speech-to-text, select the speech-to-text engine you choose in the previous step (either Whisper or Speech-to-Phrase). Select the language.
-
Under Text-to-speech, select Piper. Select the language.
- Depending on your language, you may be able to select different language variants.
-
-
That’s it. You ensured your voice commands can be processed locally on your device.
-
If you haven’t done so yet, expose your devices to Assist.
- Otherwise you won’t be able to control them by voice.
Fine-tuning Whisper and Piper for your setup
You would like to tweak the configuration for better performance or accuracy? View some of the options in the video below. Explained by Mike Hansen, creator of Rhasspy, Piper, and Wyoming.
The options are also documented in the add-on itself. Go to the Whisper or the Piper add-on and open the Documentation page.
Also be sure to check the specific tutorial for using Piper in Automations
Learning more about Speech-to-Phrase
You can check out Voice Chapter 9 to learn more about why we introduced Speech-to-Phrase, and why it’s a great option for home control.
Next steps
- To get the best out of the voice interaction, check the best practices.
- Once Assist is configured, you can start using it.
- Talk to Assist via a connected device, such as Android, iOS, or Voice Preview edition
).
- Talk to Assist via a connected device, such as Android, iOS, or Voice Preview edition