Blog
2021.3: My Oh My
Home Assistant Core 2021.3! And my oh My Home Assistant!
I’m super excited for this release! 13 Brand new integrations! Z-Wave JS is moving forward with an almost insane development speed; thank you all for jumping into it as well! 🎉
For me, this release is about two things. My Home Assistant and some super slick new UI features for everything related to service calls. What it is; is explained down below, but both are just a leap forward in: making things easier.
My oh my, enjoy this release!
../Frenck
- My Home Assistant
- New UI for service calls
- Suggested areas
- Fan speeds: 100%
- Z-Wave JS update
- Flexible & variable automation triggers
- Oversettelser i Supervisor panelet
- Other noteworthy changes
- New Integrations
- New Platforms
- Integrations now available to set up from the UI
- Release 2021.3.1 - March 5
- Release 2021.3.2 - March 5
- Release 2021.3.3 - March 8
- Release 2021.3.4 - March 12
- If you need help…
- Backward-incompatible changes
- Farewell to the following
- All changes
My Home Assistant
To be more helpful, we often want to link you to a specific page in your
Home Assistant instance. However, each Home Assistant instance is hosted at a
different URL. Yours might be http://homeassistant.local:8123, or something
completely different.
My Home Assistant allows the documentation, forums, chat, weblogs, or any other website, to link you to specific pages in your Home Assistant instance, without knowing the URL of your instance.
The beauty of this? All the data is stored locally in your browser and My Home Assistant only redirects you to pages that provide you with information about your instance or help you start an action. Following a link from My Home Assistant will never make any changes to your instance.
Long story short! We can do a lot of helpful things with this, for example, the following buttons will bring your places on your instance:
But we can make buttons or links to a lot of screen, and even help you start a configuration for adding an integration, import a Blueprint, link to an add-on page, and a lot more!
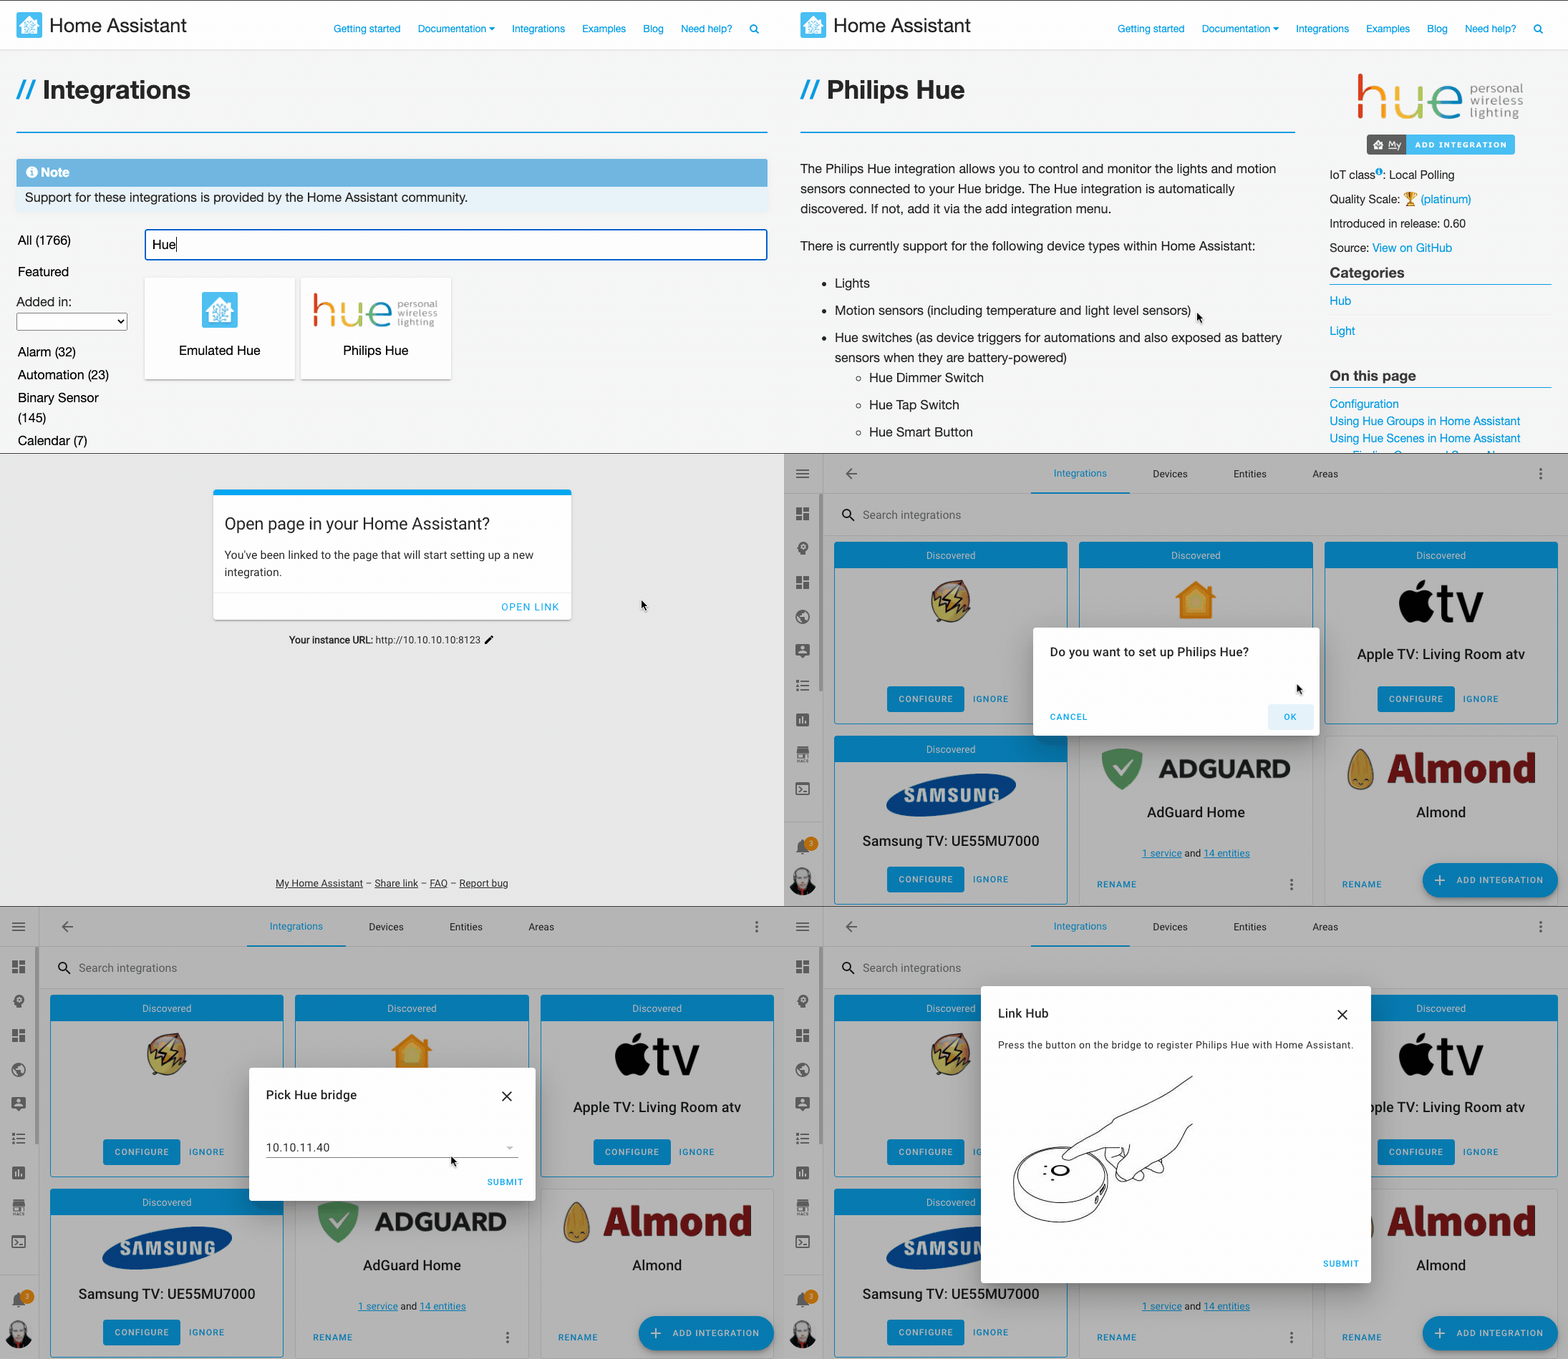 Setting up a new integration on your instance, from the documentation using My Home Assistant.
Additionally, we have added a link/badge generator, so you can create your own links, for e.g., adding to a Blueprint on the Blueprint Exchange.
https://my.home-assistant.io/create-link/
Lastly, support for My Home Assistant with our apps is expected to be available soon! Android should be available via an update today and iOS will land soon.
New UI for service calls
This release adds a new user interface for doing service calls!
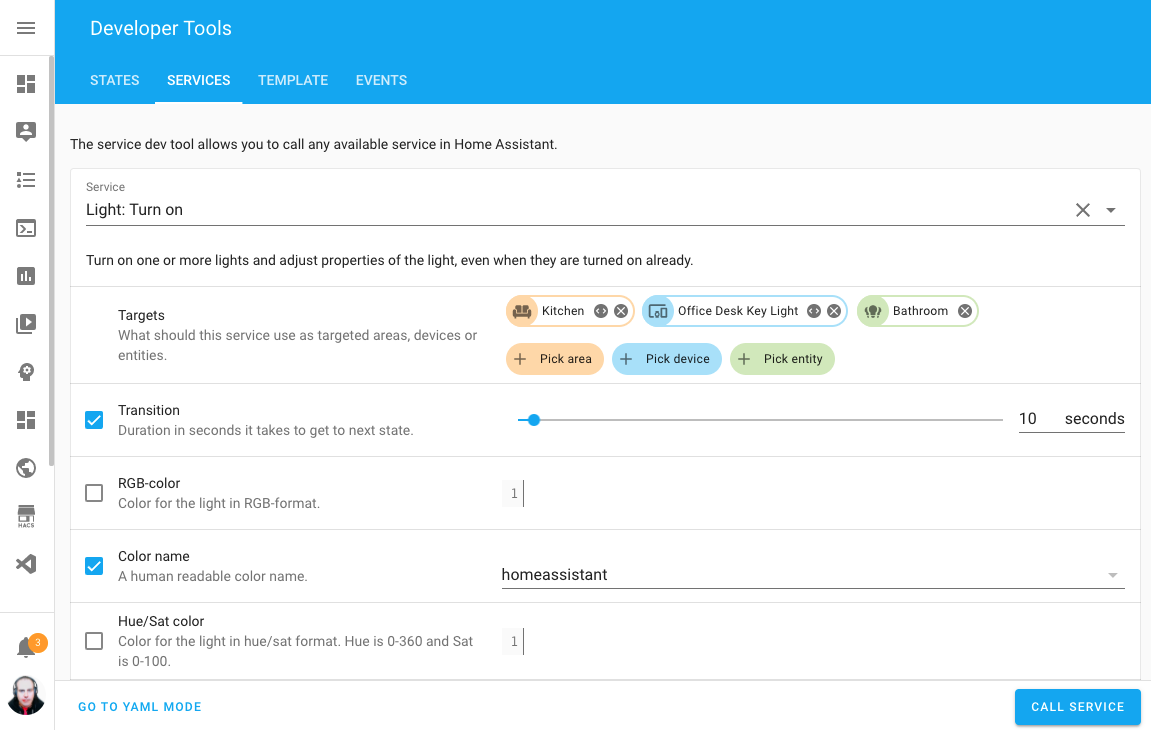 Screenshot of the new UI in the services tab of the Developer Tools.
The UI may look familiar, as it uses the same UI parts as used by the recently introduced Blueprints. This new UI can be found in multiple places, that all have adjusted with a shiny new UI;
- The Actions tab in the Developer Tools.
- Doing service calls in the automation UI editor.
- Doing service calls in the script UI editor.
- In Lovelace cards that support calling actions.
Not all service calls will show this slick new UI yet, as the integrations service descriptions need to be adjusted to with this. But, all common ones have been migrated already. Like doing YAML? Well, the good old YAML mode is available as well!
Suggested areas
Areas are becoming more and more useful in Home Assistant, and this release is helping out with putting them to use a bit!
Recently, it became possible to not only assign devices to areas, but entities as well. And now; Integrations can now suggest areas!
This means, if an integration knows about an area/room/location place it is in, it can suggest an area if the device isn’t in one yet. For example, the Hue integration can now suggest an area based on the Hue group it is in.
The following integration will now already suggest areas as of this release:
- Bond
- Hue
- Hunter Douglas PowerView
- Lutron Caséta
- Netatmo
- Nexia
- NuHeat
- Roku
- Sonos
- Tado
- Universal Devices ISY994
Fan speeds: 100%
Got an overhaul! Fans now work with speed percentages instead of the previous “low”, “mid”, “high”, “off”. This makes Home Assistant more interoperable with more fan brands and third-party assistants, like HomeKit.
Don’t worry, everything has been implemented with backward compatibility.
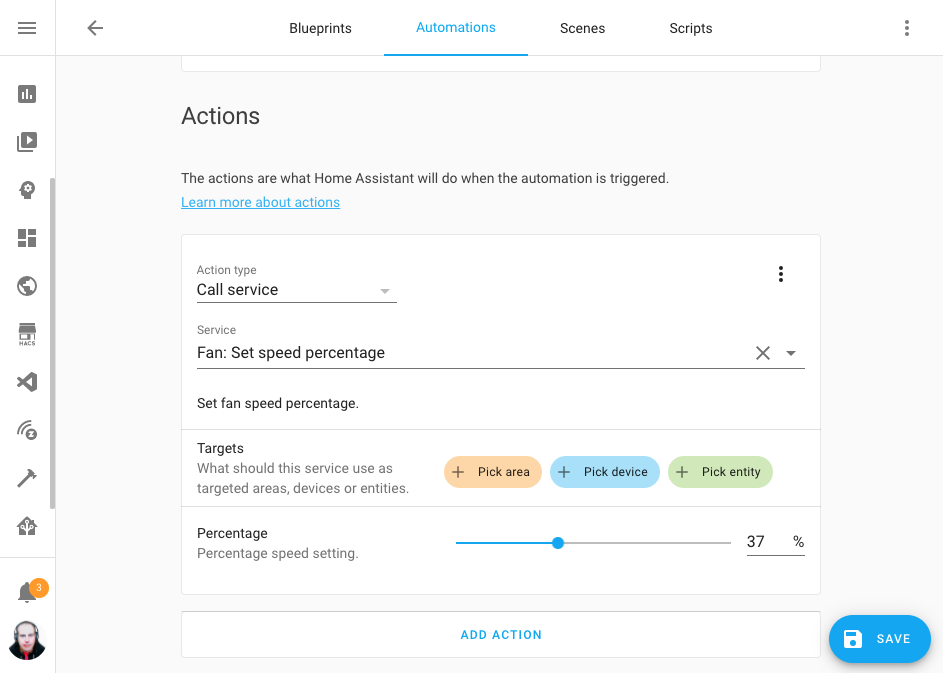 Screenshot of automation editor, showing the % fan speeds!
Did you notice in the above screenshot, the automation editor is now wider? The layout has been adjusted to give you more screen real estate when creating automations.
Z-Wave JS update
Also this release the Z-Wave JS team has been very busy. Several new features have been added and many bugs squashed. Below you can read a summary.
We’ve introduced a protocol schema version in the Z-Wave JS server to allow older clients to connect and talk to a newer server. This prevents compatibility issues for the future!
Home Assistant Core 2021.3.0 will require Z-Wave JS server version 1.1.0. If you’re using the official Home Assistant add-on, the integration will automatically update the add-on if an older add-on and server version is encountered. Magic! If you’re not using the Home Assistant add-on to run the server you will need to update the server before updating Home Assistant Core.
You can now automate and change the configuration settings of your devices with
the zwave_js.set_config_parameter
service and create automations using the new zwave_js.refresh_value
service, to update a device that doesn’t automatically refresh itself.
But there is more!
- Garage doors (barrier) and similar covers can now be controlled.
- Some heating valves and similar devices that can be set to multiple different
values will now show up as
numberentities.
Flexible & variable automation triggers
We now support the use of variables and (limited) templates in automation triggers! This can be really useful, for example, when making Blueprints for MQTT based automations!
automation:
  trigger_variables:
    room: "living_room"
    node: "ac"
    value: "on"
  trigger:
    - platform: mqtt
      topic: "{{ room ~ '/switch/' ~ node}}"
      payload: "{{ 'state:' ~ value }}"
As shortly mentioned, the template syntax for trigger templates and variables are more limited; read more about this in the limited templates documentation.
Oversettelser i Supervisor panelet
Unless you are in the nordics, that title does not mean much, it’s Norwegian and translates to “Translations in the Supervisor panel”. Yes! We have now added translations in the Supervisor panel. 🎉
If you want to help translate that into your native language, join the frontend team on Localize.
But we did not stop there! Now add-ons can provide translation files for configuration options and network descriptions that are shown in the frontend.
Not enough? You want more? Okay then!
- The communication between the frontend and the backend now relies on WebSockets, which allows the Supervisor to notify the frontend about changes.
- For add-on authors, you can now use YAML instead of JSON for your add-ons configuration files.
- New update dialog that will ask you to take a snapshot before you upgrade core/add-ons.
- Better hardware support to cover more devices.
- Passwords and secrets in add-on configurations are checked against known
breaches with https://haveibeenpwned.com/
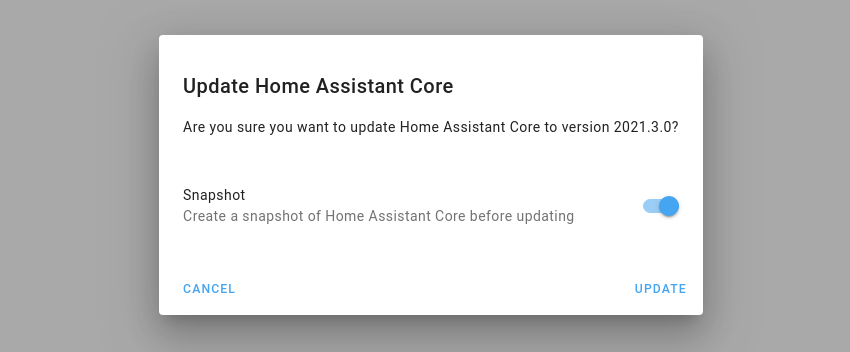 Screenshot of the new update dialog that asks for creating a snapshot.
Other noteworthy changes
There is much more juice in this release; here are some of the other noteworthy changes this release:
- Shelly now supports battery-operated devices, thanks to @thecode
! - You can now use the color
homeassistantas acolor_namein your light service calls, just because we can 😎 -
@emontnemery
, added support for using aliasto virtually any step in scripts/automations. This is really helpful when debugging and documents your sequences as well, as it annotates each step. -
@emontnemery
didn’t stop there, he also added support for enabling/disabling integration configuration entries! So you can, e.g., temporarily disable a whole integration.
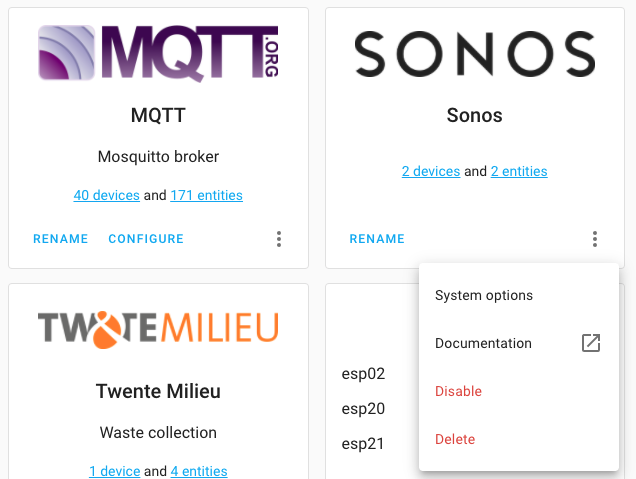 Screenshot of disabling an integration entry.
- Thanks to @Nixon506E
, you can now set a transition time when activate Hue scenes. - In the States tab of the Developer Tools, there is now
a small copy to clipboard button with each entity. Thanks, @KTibow
! -
@postlund
added support for repeat, shuffle and volume stepping to the media player integration of the Apple TV integration. -
@larena1
reduced the amount of rendering history charts cause, so that will speed things up! Thanks! - We now have a select selector! Great for adding dropdown choices
to Blueprints, thanks @EPMatt
! -
@raman325
extended the Universal Media Player with a lot of new capabilities. - When adding a new integration, the UI will now show discovered devices for
that integration as well! Thanks, @bramkragten
! - We updated CodeMirror to the latest version, which provided the YAML code editors in our UI. It should now be better, faster and has improved support for mobile devices.
New Integrations
We welcome the following new integrations this release:
-
AEMET OpenData, added by @Noltari
-
ClimaCell, added by @raman325
-
FAA Delays, added by @ntilley905
-
Honeywell Lyric, added by @timmo001
-
KMTronic, added by @dgomes
-
Litter-Robot, added by @natekspencer
-
Mazda Connected Services, added by @bdr99
-
Mullvad VPN, added by @meichthys
-
My Home Assistant, add by @bramkragten
-
Rituals Perfume Genie, added by @milanmeu
-
SmartTub, added by @mdz
-
Subaru, adde by @G-Two
New Platforms
The following integration got support for a new platform:
-
Aurora has now support for sensors, added by @djtimca
-
KNX added support for fans, added by @crazyfx1
-
Templates can now be used to create weather entities, added by @dgomes
-
VeSync now support their dimmer switches, added by @decompil3d
-
WiLight support covers now, added by @leofig-rj
Integrations now available to set up from the UI
The following integrations are now available via the Home Assistant UI:
-
ASUSWRT, done by @ollo69
-
Keenetic NDMS2 Routers, done by @foxel
-
LiteJet, done by @joncar
-
MySensors, done by @functionpointer
-
Nuki, done by @pree
-
Philips TV, done by @elupus
-
Xiaomi Miio (partially), done by @starkillerOG
Release 2021.3.1 - March 5
- Fix Xiaomi Miio setup of switch entity for lumi.acpartner.v3 (@starkillerOG
- #47345 ) (xiaomi_miio docs) - Make zwave_js add-on manager more flexible (@MartinHjelmare
- #47356 ) (zwave_js docs) - Catch ConditionError in generic_thermostat climate (@amelchio
- #47359 ) (generic_thermostat docs) - Fix zwave_js manual reconfiguration of add-on managed entry (@MartinHjelmare
- #47364 ) (zwave_js docs) - Don’t raise on known non-matching states in numeric state condition (@frenck
- #47378 ) - Fix access of missing zwave_js climate unit value (@MartinHjelmare
- #47380 ) (zwave_js docs) - Update frontend to 20210302.4 (@bramkragten
- #47383 ) (frontend docs) - Revert “Speed-up wemo discovery (#46821)” (@esev
- #47392 ) (wemo docs) - Fix RFLink TCP KeepAlive error log (@cpainchaud
- #47395 ) (rflink docs) - Map silent as a preset mode for fan backcompat (@bdraco
- #47396 ) (fan docs) - Fix measurement unit (Closes: #47390) (@syssi
- #47398 ) (xiaomi_miio docs) - Fix Climacell timezone issue with daily forecasts (@raman325
- #47402 ) (climacell docs) - Fix AirVisual exception when config entry contains old integration type (@bachya
- #47405 ) (airvisual docs) - Don’t convert Climacell forecast temperatures to celsius because platform does it automatically (@raman325
- #47406 ) (climacell docs) - Bump zwave-js-server-python to 0.21.0 (@raman325
- #47408 ) (zwave_js docs) - Fix older Roborock models (@frenck
- #47412 ) (xiaomi_miio docs) - Only create snapshot if add-on update will be done (@MartinHjelmare
- #47424 ) (zwave_js docs)
Release 2021.3.2 - March 5
- Update pyotgw to 1.1b1 (@mvn23
- #47446 ) (opentherm_gw docs) - Fix issue at Netatmo startup (@cgtobi
- #47452 ) (netatmo docs) - Fix Hue scene overriding Hue default transition times (@frenck
- #47454 ) (hue docs) - Bump version with fix for v1 (@elupus
- #47458 ) (philips_js docs) - Update frontend to 20210302.5 (@bramkragten
- #47462 ) (frontend docs) - Use conn_made callback in MySensors (@functionpointer
- #47463 ) (mysensors docs) - Bump zwave-js-server-python to 0.21.1 (@raman325
- #47464 ) (zwave_js docs) - Raise error instead of crashing when template passed to call service target (@balloob
- #47467 ) (websocket_api docs) - Update zwave_js.refresh_value service description (@raman325
- #47469 ) (zwave_js docs) - Bump amcrest package version to 1.7.1 (@pnbruckner
- #47483 ) (amcrest docs)
Release 2021.3.3 - March 8
- Adjust litterrobot tests and code to match guidelines (@natekspencer
- #47060 ) (litterrobot docs) - Bump HAP-python to 3.4.0 (@bdraco
- #47476 ) (homekit docs) - Fix Sonos polling mode (@amelchio
- #47498 ) (sonos docs) - Fix mysensors notify platform (@MartinHjelmare
- #47517 ) (mysensors docs) - Fix AsusWRT wrong api call (@ollo69
- #47522 ) (asuswrt docs) - Bump pymysensors to 0.21.0 (@MartinHjelmare
- #47530 ) (mysensors docs) - Fix mysensors device tracker (@MartinHjelmare
- #47536 ) (mysensors docs) - Fix mysensors unload clean up (@MartinHjelmare
- #47541 ) (mysensors docs) - Correct weather entities forecast time (@dgomes
- #47565 ) - Allow running and restarting with both ozw and zwave active (@ronytomen
- #47566 ) (ozw docs) (zwave docs) - Add fallback zwave_js entity name using node ID (@raman325
- #47582 ) (zwave_js docs) - Ensure bond devices recover when wifi disconnects and reconnects (@bdraco
- #47591 ) (bond docs) - Update frontend to 20210302.6 (@bramkragten
- #47592 ) (frontend docs) - Fix turn on without speed in homekit controller (@bdraco
- #47597 ) (homekit_controller docs) - Ensure template fan value_template always determines on state (@bdraco
- #47598 ) (template docs) - Fix insteon fan speeds (@bdraco
- #47603 ) (insteon docs) - Fix turning off scene in homekit (@bdraco
- #47604 ) (homekit docs) - Fix Shelly logbook exception when missing COAP (@thecode
- #47620 ) (shelly docs) - Update zwave_js supported features list to be static (@raman325
- #47623 ) (zwave_js docs)
Release 2021.3.4 - March 12
- Write SimpliSafe alarm control panel state after arming/disarming (@bachya
- #47649 ) (simplisafe docs) - Cover Tilt Position Bugfix (@mtl010957
- #47682 ) (mqtt docs) - Fix zwave_js target_temp_low (@firstof9
- #47762 ) (zwave_js docs) - Adjust insteon fan speed range to valid upper bound (@bdraco
- #47765 ) (insteon docs) - Bump plexapi to 4.4.1 (@jjlawren
- #47766 ) (plex docs) - Ensure homekit reset accessory service can target any entity (@bdraco
- #47787 ) (homekit docs) - Fix Netatmo event handling (@cgtobi
- #47792 ) (netatmo docs)
If you need help…
…don’t hesitate to use our very active forums or join us for a little chat
Experiencing issues introduced by this release? Please report them in our issue tracker
Community Highlights: 10th edition
Oh yeah! This is already the 10th edition of the Home Assistant Community Highlights! Some interesting things popped up around our community, we thought was worth sharing.
Do you want to share something for the next edition? Information on how to share.
./Klaas
Apexcharts Card
Would you like to map data in graphs? Then you should definitely try the new
ApexCharts card
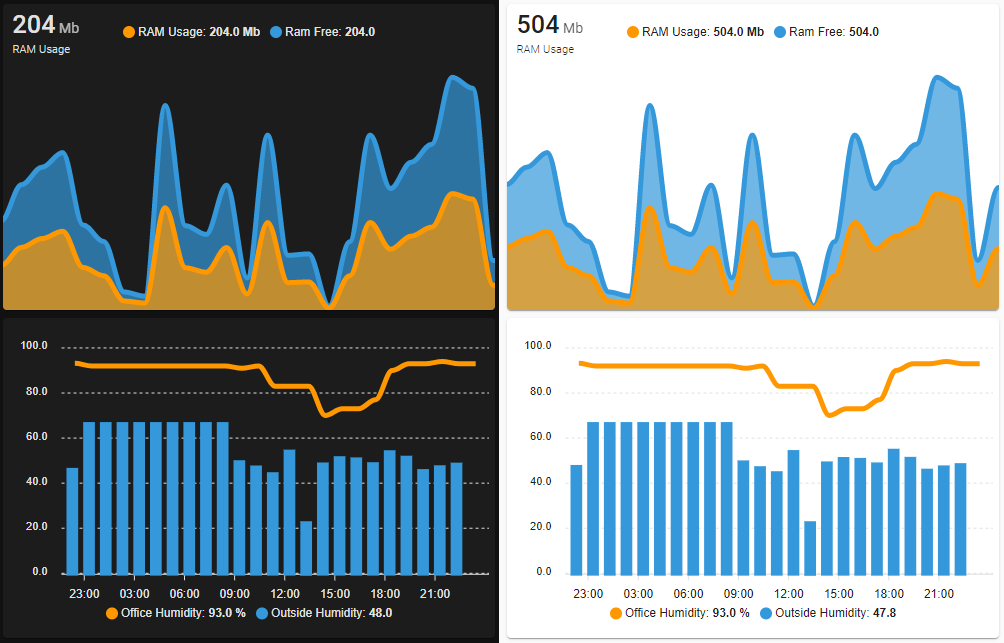
If you would like to stay informed of the developments, you could also follow this topic on our forum.
Home Assistant switch panel
Last week, amauryverschooren
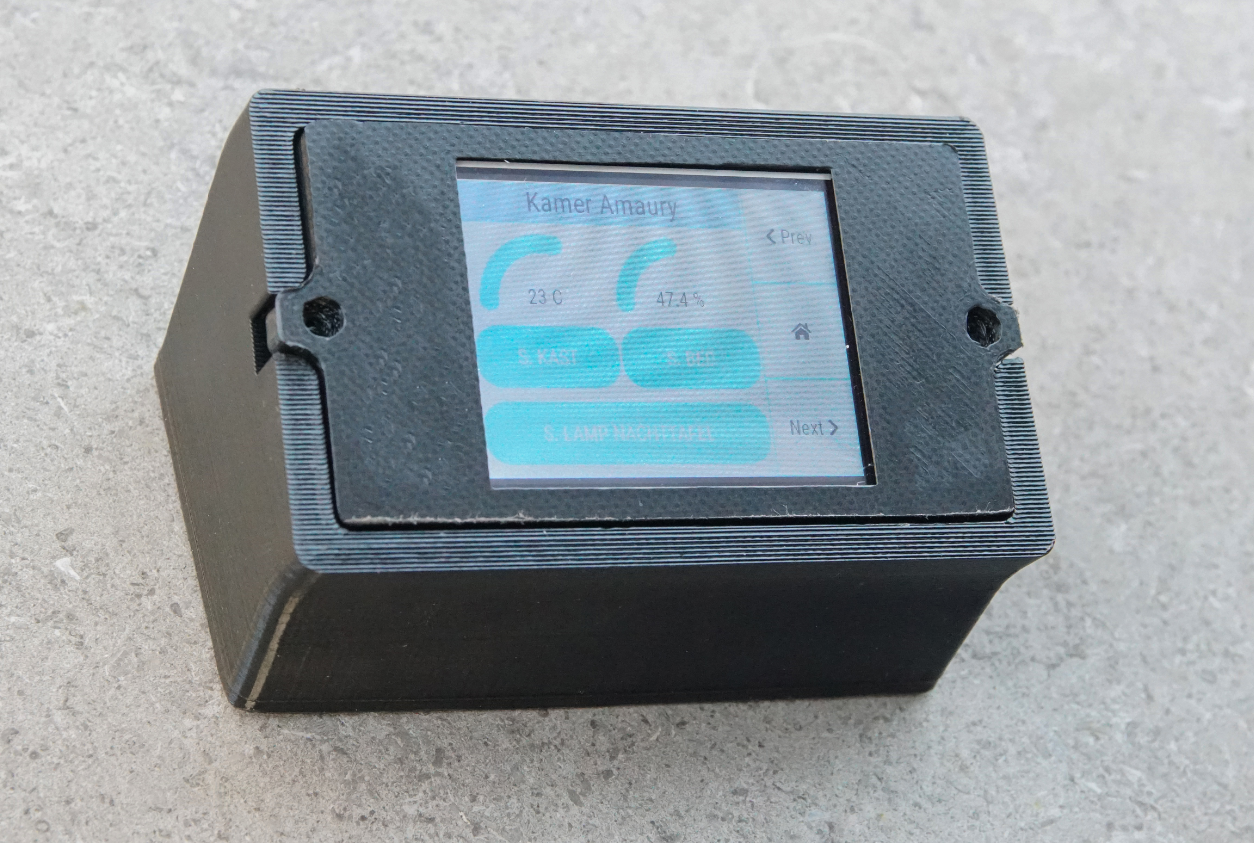
Lovelace dashboard inspiration
Still looking for some new inspiration for your Lovelace dashboards? Last week we
came across some beautiful Lovelace dashboards on our Home Assistant subreddit
You can find here
Home Assistant - Feb 2021
Which card in Lovelace are you most proud of? Share it with us!
Hidden garage
Do you have a vacuum cleaning robot but you don’t know where to place the charging
station? Maybe you can hide these behind a plinth, like what ialex87
My vacuum hidden garage under the kitchenfrom r/homeassistant
Got a tip for the next edition?
Have you seen (or made) something awesome, interesting, unique, amazing, inspirational, unusual or funny, using Home Assistant?
Click here to send us your Community Highlight suggestion.
Also, don’t forget to share your creations with us via Social Media:
- Twitter it! Be sure to mention @home_assistant
- Share it on our Facebook group
- Post it to our subreddit
- Tag @homeassistant
on Instagram - Or via chat, drop us a line in the #lounge at Discord
See you next edition!
Community Highlights: 9th edition
The 9th edition of the Home Assistant Community Highlights! Some interesting things popped up around our community, we thought was worth sharing.
But before we move on to the highlights of this week, let’s start with a little hooray because yesterday both Pascal Vizeli and I had their birthday!
Hip hip hooray! 🎂🥳
./Klaas
O and would you like to keep track of your birthdays in Home Assistant? Then
try this custom integration of Miicroo
Help each other with any question
Last week, we found a burning question on the Home Assistant subreddit
Maybe we can give him some community love and help with his question? 😄
I accidentally got some paint on a curtain in my house, it’s oil paint, how do I get it out without taking my curtain down?from r/homeassistant
DSMR Reader add-on
Good news for those who would like to get started with DSMR Reader!
sanderdw
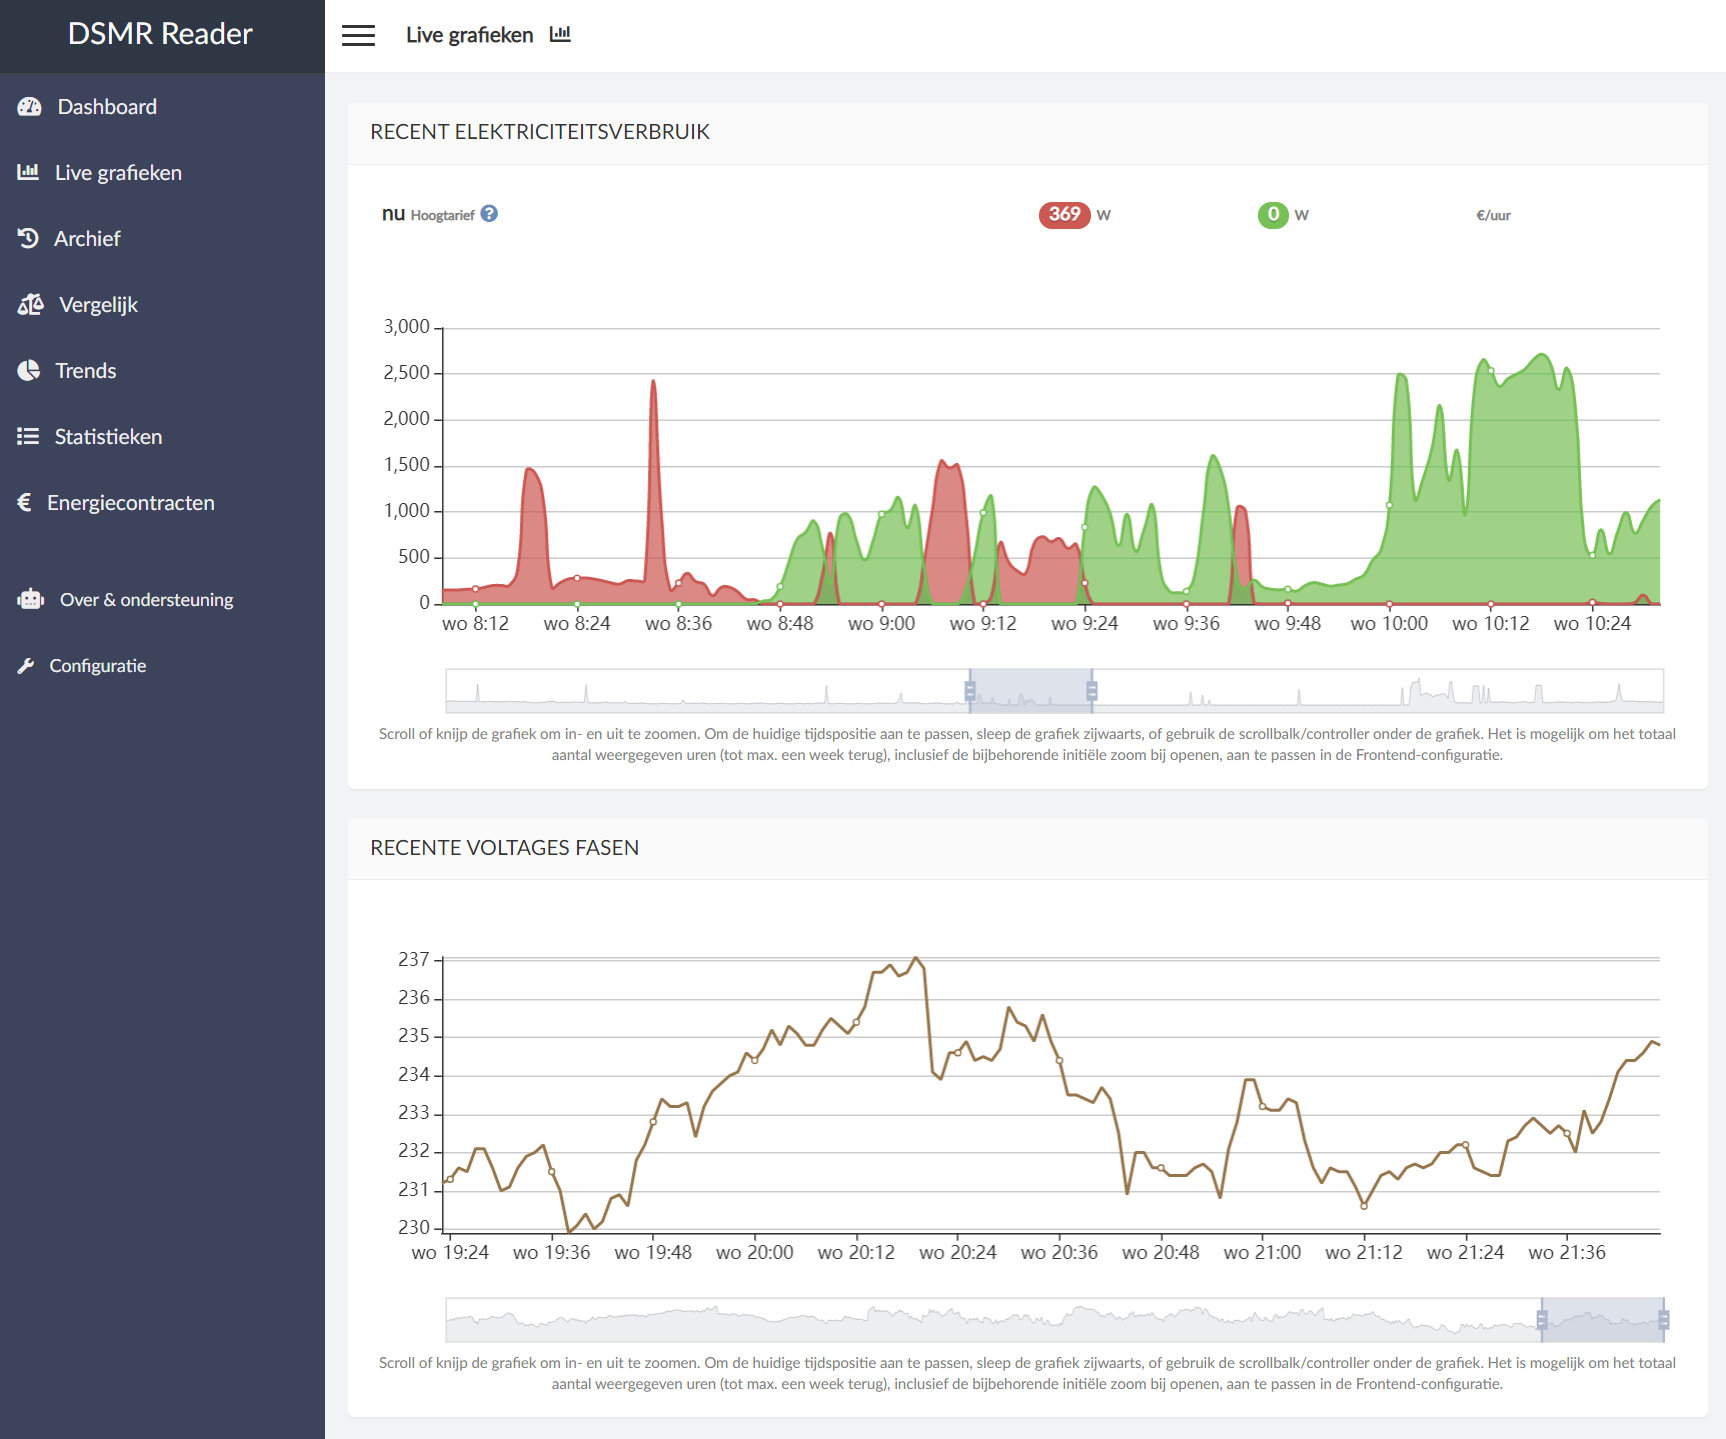
Laundry card
Would you like to display the state of your smart washing machine (such as an LG ThinQ)
in a fun way in Lovelace? Perhaps the example below could inspire you. You can find the
Lovelace YAML code here
Took some trickery but my laundry card is donefrom r/homeassistant
Got a tip for the next edition?
Have you seen (or made) something awesome, interesting, unique, amazing, inspirational, unusual or funny, using Home Assistant?
Click here to send us your Community Highlight suggestion.
Also, don’t forget to share your creations with us via Social Media:
- Twitter it! Be sure to mention @home_assistant
- Share it on our Facebook group
- Post it to our subreddit
- Tag @homeassistant
on Instagram - Or via chat, drop us a line in the #lounge at Discord
See you next edition!
Community Highlights: 8th edition
The 8th edition of the Home Assistant Community Highlights! Some interesting things popped up around our community, we thought was worth sharing. But first of all, I would like to introduce myself and say Hello! Because it’s no longer Frenck who writes the community highlights, but a new person.
My name is Klaas Schoute, 25 years old (almost 26 🥳) and living in the Netherlands. Currently, I’m studying interaction technology at the university of applied sciences in Leiden and from this week until the summer I’m doing an internship at Nabu Casa.
In the coming period, I will be working on energy measurements: what ways there are to measure energy, which insights you can gain from it and how you could optimize consumption.
./Klaas
Control your home from a StreamDeck
Especially the streamers “among us” will really enjoy this! There is now a way to operate your Home Assistant using the buttons on a StreamDeck but also display certain sensor values.
How cool is this!
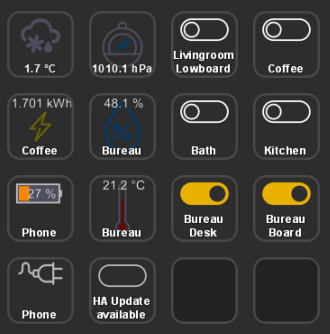
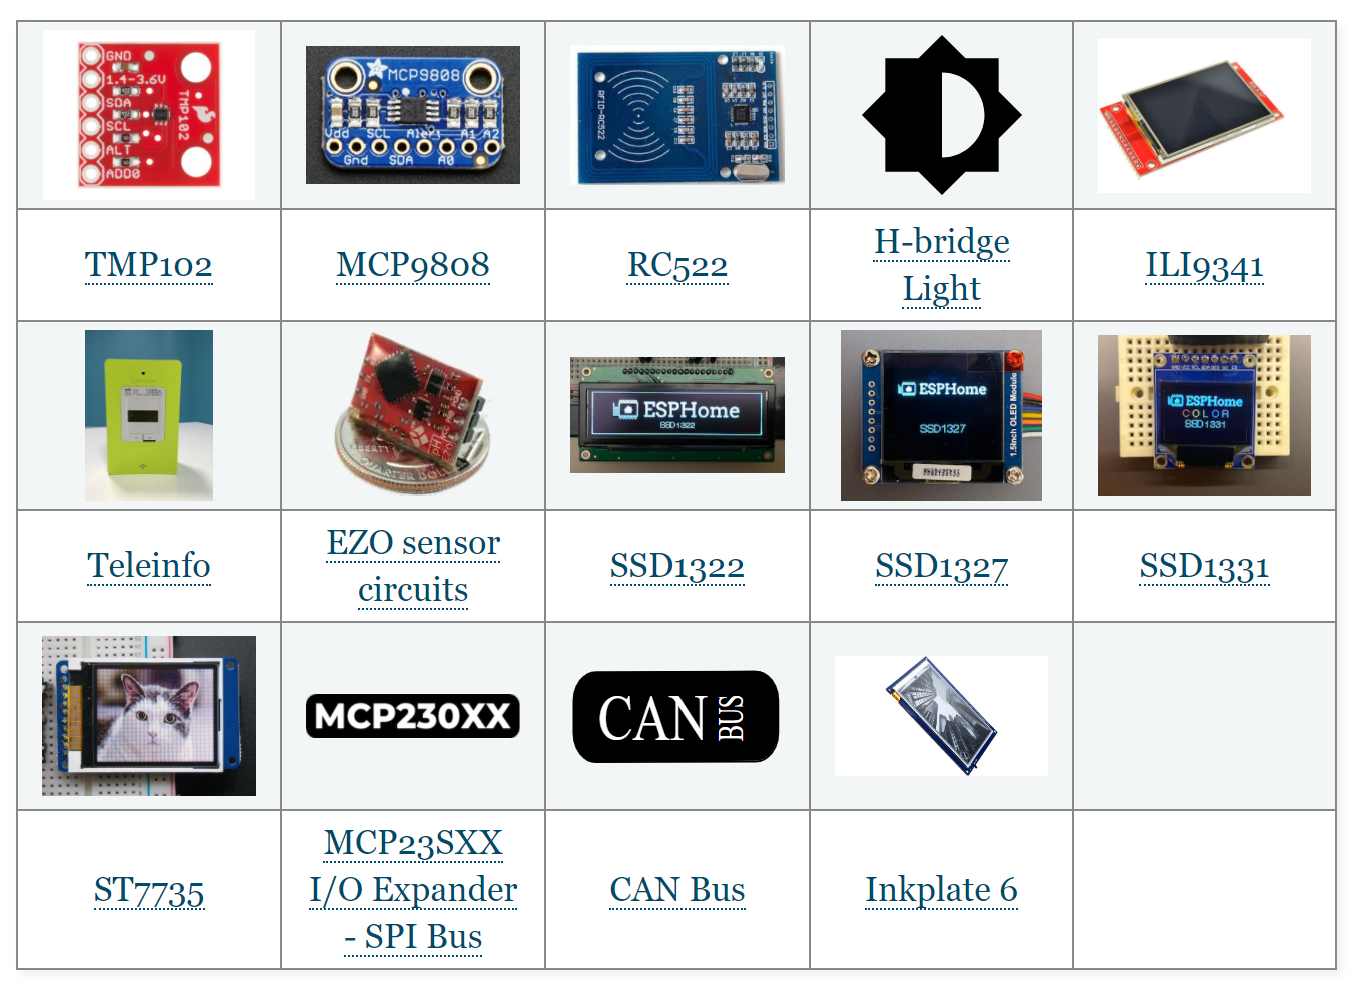
ESPHome update
Quite recently ESPHome has received a new update (1.16.0), with a lot of new hardware support. From now on, you will also be able to expect more frequent updates, as they have adopted a monthly release cycle.
Mechanical sculptures
jessecakeindustries shared a nice vintage project on the Home Assistant subreddit
Who else would want one in the house?
Is there a market for bespoke home automation components? You may recall I built this interface to our home that speaks, rings, and lights regular alerts. It has tasmota at its heart so is hardware based and easily interfaced with Home Assistant. Is there a market for me to make this kind of thing?from r/homeassistant
Got a tip for the next edition?
Have you seen (or made) something awesome, interesting, unique, amazing, inspirational, unusual or funny, using Home Assistant?
Click here to send us your Community Highlight suggestion.
Also, don’t forget to share your creations with us via Social Media:
- Twitter it! Be sure to mention @home_assistant
- Share it on our Facebook group
- Post it to our subreddit
- Tag @homeassistant
on Instagram - Or via chat, drop us a line in the #lounge at Discord
See you next edition!
2021.2: Z-Wave... JS!
Dear reader,
Usually, I try to write a small introduction that recaps the release, while putting a bit of my view in it as well. This release, however, I’m struggling to find the right words…
So there is DHCP discovery added, which is super nice! And some really helpful new Blueprint selectors, tons of UI tweaks! But honestly…
Have you heard about Z-Wave JS?!
Well, out of nowhere, a huge bunch of developers came together this month and spat out a completely new, full-blown, fast, slick, sexy, complete, Z-Wave integration! 🤯
So, thanks guys! An achievement beyond words, really; You all rock ❤️
Enjoy the release!
../Frenck
- Erik Montnemery joins Nabu Casa
- Python 3.7 dropped, Python 3.9 supported
- Z-Wave JS
- No more badges in auto generated dashboards
- DHCP Discovery
- New Blueprint selectors
- Cloud Text to Speech settings
- Other noteworthy changes
- New Integrations
- New Platforms
- Integrations now available to set up from the UI
- Release 2021.2.1 - February 5
- Release 2021.2.2 - February 9
- Release 2021.2.3 - February 11
- If you need help…
- Backward-incompatible changes
- Farewell to the following
- All changes
Erik Montnemery joins Nabu Casa
Today, we are proud to announce that Erik Montnemery has joined Nabu Casa to work full-time on the Home Assistant project.
Some of you might know Erik better by his GitHub handle: @emontnemery
We are excited to have you aboard Erik! Welcome!
Python 3.7 dropped, Python 3.9 supported
Support for Python 3.7 has been removed, raising the minimum Python version you need to run Home Assistant Core to Python 3.8. Python 3.7 was already deprecated since Home Assistant Core 0.116.0.
This is only a concern if you are running Home Assistant Core directly on Python. If you run Home Assistant OS, Supervised or Container, you don’t have to worry about this, as the Home Assistant project takes care of this for you.
However, say hello to: Python 3.9. As of this release, Python 3.9 is fully supported and tested.
Z-Wave JS
This release brings you the Z-Wave JS integration!
A brand new integration for Z-Wave in Home Assistant, full-blown, created in just a month by a bunch of awesome people!
More and more people were concerned about the future of Z-Wave with
Home Assistant; meanwhile the Z-Wave JS
This new integration is based on the same base principles as the OpenZWave integration: It is decoupled from Home Assistant. Instead of MQTT, the Z-Wave JS integration uses a WebSocket connection to a Z-Wave JS server.
This means, in order to use this new integration, you’ll need to run the Z-Wave JS server that sits in between your Z-Wave USB stick and Home Assistant. There are multiple options available for running the Z-Wave JS server, via Docker or manually, and there is also a Home Assistant add-on available.
If you run an installation with a Supervisor, the add-on will even be set up automatically for you.
Current state of Z-Wave JS
The new Z-Wave JS integration is amazingly complete. It supports the following platforms from the start: Binary Sensors, Climate, Covers, Fans, Lights, Locks, Sensors and Switches. Scenes are also supported!
Besides that, it is just blazing fast! ⚡️
While fast-growing, it is a new integration and there is still a lot
in progress. Of course, no doubt, there will be bugs. Bugs that will
be squashed and handled. Please, be sure to
report issues in our issue tracker
What is left? See our Z-Wave JS integration roadmap
Thanks to all
Thanks to all of the following people, the Z-Wave JS integration was able to see the light in just a month!
- @AlCalzone
- @balloob
- @bramkragten
- @cgarwood
- @firstof9
- @itewk
- @jcam
- @kpine
- @marcelveldt
- @MartinHjelmare
- @Michsior14
- @Petro31
- @pvizeli
- @raman325
- @robertsLando
Yes, that is an awful lot of people! Amazing how this all came together and incredible work!
What about the old Z-Wave integration?
The old zwave integration has been based on
OpenZWave 1.4, which is really old and does not get any upstream updates
anymore. This also means that it is hard for us to keep it in a working state
for the upcoming future.
Therefore, as of today, the old Z-Wave is marked as being deprecated.
If one is starting with Home Assistant and Z-Wave, the zwave integration is
no longer recommended. For existing users, we recommend migrating to the
Z-Wave JS integration. However, don’t panic,
zwave is deprecated but not removed yet. We currently have no plans for
removing it, unless it can no longer be made to be build for the
latest Python
What about the OpenZWave beta integration?
Over a year ago, Home Assistant started working on the OpenZWave integration. Based on OpenZWave 1.6 and the OZW daemon, using MQTT as a transport. This project was promising and something we put a lot of time and effort in.
Unfortunately, the OpenZWave project itself became a bit stale as most of the upstream development is done by a single person: Justin Hammond (Fishwaldo).
Quite a few people were worried about the lesser activity on OpenZWave. Justin has responded on our forum on what is happening in his life and it is sad to read how many people have personally impacted him negatively.
Is OZW Dead - No. I’ll tinker with it, I’ll make changes as time allows, but it will be at my own pace, to scratch my own itches now.
Let us be straight here: OpenZWave is an 11 year-old project, which is used by an incredible amount of systems (besides Home Assistant) in this world, with an even greater track record. So:
Thank you Justin for all you have done in all those years!
The team that was working on the OZW integration have shifted their focus to the new Z-Wave JS integration. We don’t think the OpenZWave integration will make it out of beta. We recommend Home Assistant users migrate to the Z-Wave JS integration.
No more badges in auto generated dashboards
If you are using an auto generated Lovelace dashboard, you probably always had a ton of badges on the top of your dashboard. If there are just a few it works, but as more start to appear, it soon becomes cluttered.
 Screenshot of the old badges clutter that is now gone!
We decided to no longer use badges in the auto generated Lovelace dashboards. Instead, every entity is neatly grouped by area or domain in an entities card.
If you liked the badges, you can always take control of your dashboard and add them.
DHCP Discovery
Home Assistant now listens on your network for devices that request a IP address. Based on those intercepted messages, Home Assistant can now discover integrations for you to use with the discovered devices.
This really powerful addition has been made by @bdraco
So as of this release, your Home Assistant might actually find some new
devices it can use! Thanks @bdraco
New Blueprint selectors
For our Blueprint fanatics, some new goodies to the Blueprint has been added
this release. Thanks to @thomasloven
 Screenshot of the text selectors.
- An object selector: Shows an YAML editor in the UI.
- An text selector: Show a single line text input or text area for longer messages in the UI.
- Blueprint descriptions now support Markdown.
 Screenshot of the object selector, giving a YAML input field.
Cloud text-to-speech settings
Nabu Casa has been offering an amazing text-to-speech service for a while now, yet it was hard to find, and even harder to setup and use.
To fix this, a new settings UI has been added where you can select the default language and gender to use for the text-to-speech service, so you no longer have to attach that to every service call. You can find it in the Home Assistant Cloud panel.
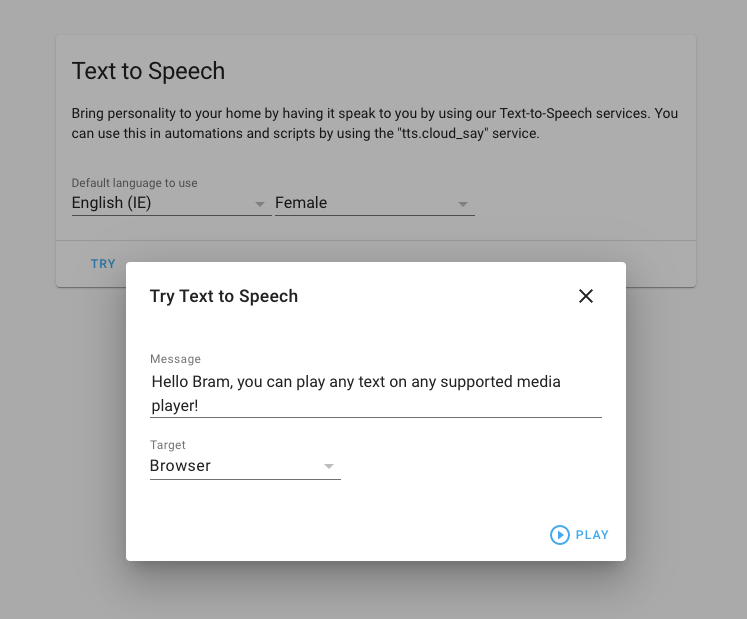 Screenshot of Cloud TTS options.
We also added the ability to try the chosen settings right in your browser. Click the try button, enter some text and click play to hear the text being spoken.
Other noteworthy changes
This release has no big new features, but we do have quite a bit of tweaks that are definitely noteworthy to mention.
- We now give you a clearer reason why your Lovelace card configuration is not
supported in the UI editor thanks to @spacegaier
. - Shelly RGB devices are now fully supported!! Nice @chemelli74
! -
@dmulcahey
Added filtering and zoom to node to the ZHA network visualization. Very useful to find you Zigbee network issues. - The deCONZ integration added support for logging basic event in the logbook.
Nicely done @Kane610
. - The Tasmota integration is out of beta! Awesome @emontnemery
! -
@spacegaier
Added support for themes on the media card. - The items in the shopping list card can be ordered using drag & drop!
Thanks @ShaneQi
! - Newly ignored discovered integrations now show a name of the item ignored. This makes it easier to undo that later.
-
@balloob
made a new framework that can detect significant changes in entities, allowing to reduce the amount of update we need to send to both Google Assistant and Alexa! - Setting up Lutron Caseta was quite a pain, but not anymore! @bdraco
added one-touch pairing to the integration set up! - If you use light profiles,
@Adminiuga
is your man. All parameters of a light profile can now be optional and default profiles are always applied. - Dropdown helpers (
input_select) got some new service capabilities added by @l-mb. They can now cycle through the options, and service calls to jump to the first or last item have been added as well. - If you have a Foscam camera, @joe248
added a service to move to PTZ presets.
New Integrations
We welcome the following new integrations this release:
-
AirNow, added by @asymworks
-
DHCP Discovery, added by @bdraco
-
Huisbaasje, added by @denniss17
-
Ondilo ICO, added by @JeromeHXP
-
Z-Wave JS, added by @cgarwood
, @MartinHjelmare , @marcelveldt , @raman325 , @firstof9 , @balloob
New Platforms
The following integration got support for a new platform:
-
Logitech Harmony Hub now adds switches for activities,
added by @mkeesey
-
WiLight now supports fans, added by @leofig-rj
-
Hyperion now has all kinds of advanced control switches,
added by @dermotduffy
Integrations now available to set up from the UI
The following integrations are now available via the Home Assistant UI:
-
Somfy MyLink, done by @bdraco
-
Foscam, done by @skgsergio
Release 2021.2.1 - February 5
- Convert ozw climate values to correct units (@Chrisgozd
- #45369 ) (ozw docs) - Add support for iCloud 2FA (@nzapponi
- #45818 ) (icloud docs) - Don’t log missing mpd artwork inappropriately (@mweinelt
- #45908 ) (mpd docs) - Fix entities device_info property in Harmony integration (@bieniu
- #45964 ) (harmony docs) - Fix Local Media in Media Browser (@DeadEnded
- #45987 ) (media_source docs) - Bump zwave-js-server-python to 0.17.1 (@MartinHjelmare
- #45988 ) (zwave_js docs) - Bump awesomeversion from 21.2.0 to 21.2.2 (@ludeeus
- #45993 ) - Do not listen for dhcp packets if the filter cannot be setup (@bdraco
- #46006 ) (dhcp docs) - Bump zwave-js-server-python to 0.17.2 (@MartinHjelmare
- #46010 ) (zwave_js docs) - dhcp does not need promisc mode. Disable it in scapy (@bdraco
- #46018 ) (dhcp docs) - Revert aioshelly (@balloob
- #46038 ) (shelly docs) - Prevent fritzbox callmonitor phonebook_id 0 from being ignored (@obelix05
- #45990 ) (fritzbox_callmonitor docs) - Upgrade holidays to 0.10.5.2 (@fabaff
- #46013 ) (workday docs)
Release 2021.2.2 - February 9
- Fix zwave_js cover control for Up/Down and Open/Close (@natekspencer
- #45965 ) (zwave_js docs) - Fix foscam to work again with non-admin accounts and make RTSP port configurable again (@skgsergio
- #45975 ) (foscam docs) - Fix downloader path validation on subdir (@gadgetchnnel
- #46061 ) (downloader docs) - Fix deprecated method isAlive() (@cdce8p
- #46062 ) (zwave docs) - Improve deCONZ logbook to be more robust in different situations (@Kane610
- #46063 ) (deconz docs) - Fix zwave_js Notification CC sensors and binary sensors (@raman325
- #46072 ) (zwave_js docs) - Fix incorrect current temperature for homekit water heaters (@bdraco
- #46076 ) (homekit docs) - Use async_update_entry rather than updating config_entry.data directly in Axis (@Kane610
- #46078 ) (axis docs) - Handle missing value in all platforms of zwave_js (@marcelveldt
- #46081 ) (zwave_js docs) - update discovery scheme for zwave_js light platform (@marcelveldt
- #46082 ) (zwave_js docs) - Update zwave_js discovery scheme for boolean sensors in the Alarm CC (@marcelveldt
- #46085 ) (zwave_js docs) - Fix Google translate TTS by bumping gTTS from 2.2.1 to 2.2.2 (@hmmbob
- #46110 ) (google_translate docs) - Revert “Convert ozw climate values to correct units (#45369)” (@dshokouhi
- #46163 ) (ozw docs) - Enable KNX auto_reconnect for auto-discovered connections (@farmio
- #46178 ) (knx docs) - Ensure creating an index that already exists is forgiving for postgresql (@bdraco
- #46185 ) (recorder docs) - Fix Tado Power and Link binary sensors (@Noltari
- #46235 ) (tado docs) - Handle empty mylink response at startup (@bdraco
- #46241 ) (somfy_mylink docs)
Release 2021.2.3 - February 11
- Fix SNMP engine memory leak in Brother integration (@bieniu
- #46272 ) (brother docs) - Use oauthv3 for Tesla (@alandtse
- #45766 ) (tesla docs) (breaking-change) - Bump pymyq to 3.0.1 (@ehendrix23
- #46079 ) (myq docs) - Revert transmission to check torrent lists by name rather than object (@JPHutchins
- #46190 ) (transmission docs) - Update powerwall for new authentication requirements (@bdraco
- #46254 ) (powerwall docs) - Fix Lutron Integration Protocol reconnect logic (@bdraco
- #46264 ) (lutron_caseta docs) - Bump roonapi to 0.0.32 (@pavoni
- #46286 ) (roon docs) - Add guards for missing value in binary_sensor platform of zwave_js integration (@marcelveldt
- #46293 ) (zwave_js docs) - Add reauth support for tesla (@bdraco
- #46307 ) (tesla docs) - Add
already_in_progressstring to roku config flow (@bramkragten- #46333 ) (roku docs) - Restore Google/Alexa extra significant change checks (@balloob
- #46335 ) (alexa docs) (google_assistant docs) - Fix Shelly relay device set to light appliance type (@thecode
- #46181 ) (shelly docs)
If you need help…
…don’t hesitate to use our very active forums or join us for a little chat
Experiencing issues introduced by this release? Please report them in our issue tracker
Security Disclosure 2: vulnerabilities in custom integrations HACS, Font Awesome and others

This blog looks pretty much the same as the security disclosure of yesterday. However, it is a new disclosure, affecting a similar issue. We want to make sure the information is complete.
This is a disclosure about security vulnerabilities found in 3rd party custom integrations. Custom integrations are not created and/or maintained by Home Assistant. Users install them at their own risk. We want to inform you about these because the found vulnerabilities impact the security of your Home Assistant instance.
If you do not use custom integrations, your Home Assistant is not vulnerable. If you do use custom integrations, your instance might be vulnerable if you use one of the impacted integrations.
TL;DR:
- Multiple custom integrations were found that allowed an attacker to steal any file without logging in. Previously implemented fixes were not sufficient.
- Upgrade Home Assistant as soon as possible. Home Assistant Core 2021.1.5 added mitigation to prevent the issue from happening.
- Upgrade the custom integrations to a fixed version or remove them from your installation.
- If you have used any of the custom integrations with a known vulnerability, we recommend that you update your credentials.
On the morning of Saturday, January 23 2021, the Home Assistant project was informed by security researcher Nathan Brady about a security vulnerability. It provided more insight on the implementation of the fixes done for the previous security vulnerability. We learned that not all custom integrations that implement security patches are sufficient to deflect the problem.
We verified all fixes made to custom integrations that were found to be vulnerable in the previous security disclosure. The conclusion is that some custom integrations are still vulnerable to a directory traversal attack while not being authenticated with Home Assistant. It allows an attacker to access any file without having to log in. This access includes any credentials that you might have stored to allow Home Assistant to access other services.
We have responsibly disclosed these issues to the authors of those custom integrations and worked with them on fixing their integrations.
The following have been found:
-
Home Assistant Community Store
(HACS) – fixed in 1.10.1 -
Font Awesome
– fixed in 1.3.1 -
BWAlarm (ak74 edition)
– fixed in 1.12.9 -
Simple Icons
– fixed in 1.11.0
Please make sure to also read the previous security disclosure. While this specific security vulnerability might not impact them, you might be impacted by the previously found vulnerability.
Besides working with the custom integration authors, the following actions have been taken to help protect users:
- Home Assistant released Home Assistant Core 2021.1.5 with extra protection to stop directory traversal attacks before reaching the vulnerable code. This prevents the abuse of all found vulnerabilities.
- This security disclosure is shared widely and linked from banners on the Home Assistant website and forums.
- The Home Assistant Supervisor will notify the user when a possible insecure installation is found that uses custom integrations.
- The Android & iOS Apps are updated to notify the user if their Home Assistant instance is potentially insecure.
- Nabu Casa updated their feature to limit remote access via Home Assistant Cloud and block instances that run an insecure Home Assistant Core version.
- An alert has been placed at alerts.home-assistant.io.
Alright, so here we are, a day after our first major security disclosure, disclosing a second one. Surely it is not fun, but we are thankful it got reported responsibly to us. This time we were able to move quickly and got everything updated pretty fast. Therefore, we decided to disclose all information immediately.
I want to emphasize that it’s not allowed to personally harass/attack/insult the developers of these custom integrations. That would be a violation of our Code of Conduct and we will enforce this.
Paulus
FAQ
Has this vulnerability been abused?
We don’t know.
Disclosure: security vulnerabilities in custom integrations HACS, Dwains Dashboard, Font Awesome and others

This is a disclosure about security vulnerabilities found in 3rd party custom integrations. Custom integrations are not created and/or maintained by Home Assistant. Users install them at their own risk. We want to inform you about these because the found vulnerabilities impact the security of your Home Assistant instance.
If you do not use custom integrations, your Home Assistant is not vulnerable. If you do use custom integrations, your instance might be vulnerable if you use one of the impacted integrations.
TL;DR:
- Multiple custom integrations were found that allowed an attacker to steal any file without logging in.
- Upgrade Home Assistant as soon as possible. Home Assistant Core 2021.1.3 added extra protections that stops attackers from reaching the vulnerable code in custom integrations.
- Upgrade the custom integrations to a fixed version or remove them from your installation.
- If you have used any of the custom integrations with a known vulnerability, we recommend that you update your credentials.
On the morning of Thursday, January 14 2021, the custom integration Home Assistant Community Store (HACS) project was informed by security researcher Oriel Goel
We started to research what other custom integrations could be impacted and found several more. We have responsibly disclosed these issues to the authors of those custom integrations and worked with them on fixing their integrations.
The following have been found:
-
Home Assistant Community Store
(HACS) – fixed in 1.10.0 -
Dwains Lovelace Dashboard
– fixed in 2.0.1 -
Font Awesome
– fixed in 1.3.0 -
BWAlarm (ak74 edition)
– fixed in 1.12.8 -
Simple Icons
– fixed in 1.10.0 -
Custom Updater
(deprecated) – fixed in latest commit
We haven’t been able to get in touch with the authors of the following integration. You should remove this custom integration as soon as possible:
-
Custom icons
– not fixed
The following integration was discovered to be vulnerable to a variant of the above security vulnerability. It allows for a directory traversal attack but requires the attacker to be authenticated. We have been unable to reach the author:
-
Hass-album
– not fixed
If you have used any of these custom integrations, we recommend that you update your credentials.
Besides working with the custom integration authors, the following actions have been taken to help protect users:
- Home Assistant released Home Assistant Core 2021.1.3 with extra protection to stop directory traversal attacks before reaching the vulnerable code. This prevents the abuse of all found vulnerabilities.
- Home Assistant published a security bulletin strongly urging people to upgrade their Home Assistant instance. This bulletin has been shared widely and linked from banners on the Home Assistant website and forums.
- The Home Assistant Supervisor will notify the user when a possible insecure installation is found that uses custom integrations.
- The Home Assistant Companion apps for Android and iOS have been updated to notify the user if their Home Assistant instance is potentially insecure.
- Nabu Casa emailed the security bulletin to all Home Assistant Cloud subscribers and users on trial.
- Nabu Casa activated their feature to limit remote access
via Home Assistant Cloud and block instances that run an insecure version of Home Assistant.
Look. It sucks that this happened. The custom integrations we have listed are all open source, maintained by volunteers in their spare time. They often work alone on this and that’s why it’s more likely for a bug to go undetected. But more eyes doesn’t guarantee bug-free software either. From time to time, such things will happen to every piece of software.
I want to emphasize that it’s not allowed to personally harass/attack/insult the developers of these custom integrations. That would be a violation of our Code of Conduct and we will enforce this.
As Home Assistant, we could have done more to prepare for this scenario. We are currently exploring adding new opt-in features for users to be notified and allow Home Assistant to take action preemptively to patch vulnerabilities.
Paulus
Edit: 23 January 2021: Additional security vulnerabilities disclosed in this second disclosure post.
FAQ
Why didn’t you release the names of the custom integrations in the first security bulletin?
When we discovered the issues, we disclosed them to the authors of the affected custom integrations and gave them time to fix the problem and release a new version. This is a good and common practice when disclosing security vulnerabilities.
Since some of these custom integrations are quite popular, we also decided to publish a security bulletin to urge Home Assistant users to upgrade their instances. We made sure to include enough information for users to resolve the vulnerability.
Has this vulnerability been abused?
We don’t know.
Security Bulletin

It has come to our attention that certain custom integrations have security issues and could potentially leak sensitive information. Home Assistant is not responsible for custom integrations and you use custom integrations at your own risk.
The latest version of Home Assistant Core has extra protection to help secure your instance.
Update your Home Assistant instance as soon as possible.
To update Home Assistant, click on the Supervisor menu item to see if an update to 2021.1.3 (or newer) is available. If you don’t have the Supervisor menu item, follow the update instructions. Home Assistant 2021.1.3 is still compatible with Python 3.7 and an upgrade is possible.
If you cannot update Home Assistant at this time, we strongly advise you to disable all custom integrations. You can disable your custom integrations by renaming the custom_components folder inside your Home Assistant configuration folder to something else. Please be sure to restart Home Assistant after you’ve renamed it.
If you need additional help with upgrading, we are happy to help you out on our Discord chat server.
We will provide more details about impacted custom integrations in the future.
Paulus
Edit: 15 January 2021: Blog post updated to state 2021.1.3, which added some additional checks.
Edit: 16 January 2021: Blog post updated to remove supervisor reload instructions, as latest version is now generally available. Added note that Python 3.7 is still supported.
Edit: 22 January 2021: More details are now available in the disclosure post.
Edit: 23 January 2021: Additional security vulnerabilities disclosed in this second disclosure post.
2021.1: Happy New Year!

We said goodbye to 2020, which was a weird and wild year. 2020 will be remembered because of the awful pandemic, that hopefully will get under control in 2021.
We wish you, your family, friends and everyone around you, safety, health, happiness and countless blessings for 2021!
Happy New Year!
Kicking off the year with Home Assistant Core 2021.1!
Now don’t get too excited. The 2020.12 release was jam-packed, and most of us enjoyed the holidays with our loved ones. Furthermore, we didn’t have a full release cycle, this one was shorter than usual. This is due to the delaying of the previous release cycle (for the conference) and the introduction of the new release cycle (monthly now).
As a result of that, this release starts 2021 slowly, with a light release. No big new features, no new integrations. Just fixes, tweaking and tuning.
Besides, I’m curious, what is your smart home new years resolution? Let me know in the comments!
Enjoy the release!
../Frenck
- In memoriam of Villhellm
- Home Assistant Conference Videos
- Other noteworthy changes
- New Integrations
- New Platforms
- Integrations now available to set up from the UI
- Release 2021.1.1 - January 9
- Release 2021.1.2 - January 14
- Release 2021.1.3 - January 15
- Release 2021.1.4 - January 16
- Release 2021.1.5 - January 23
- If you need help…
- Backward-incompatible changes
- Farewell to the following
- All changes
In memoriam of Villhellm
It is with sadness that we announce that one of the Jedis in our Discord Server,
@Villhellm
He had been an active member in forums, and other discord servers related to Home Automation (Dr. Zzs, DigiblurDIY, and many more.)
We want to take a moment to recognize his efforts and the support he had provided to the HA community, and may he rest in peace.
Some of his friends have set up a GoFundMe
We thank you for your support!
Home Assistant Conference Videos
A couple of weeks ago, the Home Assistant Conference of 2020 took place. We had quite a few messages and requests for making all talks held at the conference available for viewing.
We have started the process of making those available on our
YouTube Channel
All videos of the conference will be added to the
Home Assistant Conference 2020 playlist
Other noteworthy changes
This release has no big new features, but we do have quite a bit of tweaks that are definitely noteworthy to mention.
-
@spacegaier
removed the “No Area” from the device tables, reducing the clutter in those lists. - Since 2020.12, entities can be assigned to areas. Thanks to @elupus
, these areas are now sent to Google Assistant as room hints. -
Rachio now has pause and resume services, thanks to @brg468
. - A bunch of new sensors are added to Météo-France.
Additional weather conditions, UV, and wind gust, done by @mbo18
! -
@alengwenus
has been refactoring the LCN integration. While it does not bring new things to the surface, it does improve in quality and prepares for future improvements. Keep up the good work! -
Homeatic IP Cloud now supports HmIP-HDM1 and
HmIPW-DRD3, thanks to contributions by @SukramJ
. -
Accuweather now has Wind information, thanks @abmantis
! -
ReCollect Waste now has integration options,
starting by giving the option to display pickup types by their human-friendly
names. Thanks, @bachya
! -
@postlund
rewrote the Apple TV integration for 2020.12, but he is not stopping! Besides some fixes, he extended the device information and added some attributes. - The SQL Sensor now supports MSSQL, thanks to @dgomes
! - Support for climate devices with a temperature range, has been added to the
HomeKit controller integration.
Thanks, @thevoltagesource
! - The MQTT integration discovery feature, now has support for
device trackers, which has been added by @PeteBa
. - Sending animations using the Telegram Bot is now
possible with the new animation service added by @tofuSCHNITZEL
. - If you have a Xiaomi Miio vacuum cleaner with a mop function, this release
added status for the water box and the mop itself. Thanks, @JJdeVries
! -
WeMo now supports the outdoor plug, thanks @mattbilodeau
! - The Music Player Daemon integration now shows album art in the
media player. Looks good @mweinelt
! -
Amazon Polly has a new voice: Olivia. A female,
Australian and neural voice. Thanks @aque0us
! -
Google Cloud TTS now has support for SSML
(Speech Synthesis Markup Language). Thanks, @lufton
!
New Integrations
This release has not introduced new integrations.
New Platforms
The following integration got support for a new platform:
-
Somfy added climate controls and battery sensors,
added by @tetienne
-
Home Connect added support for functional and ambient
lights, added by @Sjack-Sch
-
Gree added support for device light panels, added by @cmroche
Integrations now available to set up from the UI
The following integrations are now available via the Home Assistant UI:
-
BMW Connected Drive, done by @rikroe
Release 2021.1.1 - January 9
- Fix KNX cover state return open when unknown (@farmio
- #44926 ) (knx docs) - Fix wait_template incorrectly matching falsey values (@bdraco
- #44938 ) - Disambiguate Supervisor HTTPUnauthorized on user/password validation (@zeehio
- #44940 ) (hassio docs) - Fix parameters when toggling light (@emontnemery
- #44950 ) (light docs) - Bump pymyq to 2.0.13 (@ehendrix23
- #44961 ) (myq docs)
Release 2021.1.2 - January 14
- Update the Utility Meter sensor status on HA start (@dgomes
- #44765 ) (utility_meter docs) - Bump bimmer_connected to 0.7.14 (@rikroe
- #45086 ) (bmw_connected_drive docs) - Fix neato battery sensor not ready (@Santobert
- #44946 ) (neato docs) - Fallback to tag for any AfterShip tracking that have no checkpoints (@ludeeus
- #45053 ) (aftership docs) - Bump MyQ to 2.0.14 (@ehendrix23
- #45067 ) (myq docs) - Fix OpenWeatherMap forecast timestamp (@spacegaier
- #45124 ) (openweathermap docs) - Add filtering (@frenck
- commit )
Release 2021.1.3 - January 15
- Extend filter and filter tests (@frenck
- #45179 ) (http docs) - Bump aioHTTP 3.7.3 - YARL 1.6.3 (@pvizeli
- #45180 )
Release 2021.1.4 - January 16
- Fix Home Connect ambient color (@Sjack-Sch
- #45038 ) (home_connect docs) - Fix HomeKit climate integration for devices with a single set point in Heat_Cool mode. (@thevoltagesource
- #45065 ) (homekit_controller docs) - Fix all forecast datetime values in OpenWeatherMap (@spacegaier
- #45202 ) (openweathermap docs) - Bump up ZHA dependency (@Adminiuga
- #45230 ) (zha docs)
Release 2021.1.5 - January 23
- Update python-mpd2 to 3.0.3 (@mweinelt
- #45141 ) (mpd docs) - Bump pybotvac to 0.0.20 (@Santobert
- #45367 ) (neato docs) - Bump pyatmo to v4.2.2 (@cgtobi
- #45386 ) (netatmo docs) - Avoid misuse sanitize_path, clarify docs (@balloob
- #45469 )
If you need help…
…don’t hesitate to use our very active forums or join us for a little chat
Experiencing issues introduced by this release? Please report them in our issue tracker
2020.12: Automate with Blueprints!
Welcome to Home Assistant Core 2020.12!
You are looking at our new versioning schema. From now on, the Home Assistant Core will be using calendar versioning, consisting of the year, month and a patch number to indicate a bug-fix release. This also means our release schedule is changing. Home Assistant Core will now be released every first Wednesday of the month!
As most things are announced at the Home Assistant Conference; more things will be added/tweaked in these release notes the next couple of days.
For me, this has been an exciting year! And thanks everybody for contributing to this amazing project, no matter what and how you contributed. You are all amazing! ❤️
With the Holiday season coming, it is time to slow down a bit, enjoy time with our family. And in a couple of weeks, a new year will start; Let’s make it a good one!
Happy holidays, stay safe and for the last time this year: Enjoy the release!
../Frenck
- Blueprints
- New neural voices for Nabu Casa Cloud TTS
- Assign areas to entities and readable area IDs
- Temporarily disable devices
- Other noteworthy changes
- New Integrations
- New Platforms
- Integrations now available to set up from the UI
- Release 2020.12.1 - December 16
- Release 2020.12.2 - December 30
- If you need help…
- Backward-incompatible changes
- Farewell to the following
- All changes
Blueprints
Say hello; to the major new feature of Home Assistant 2020.12: Blueprints!
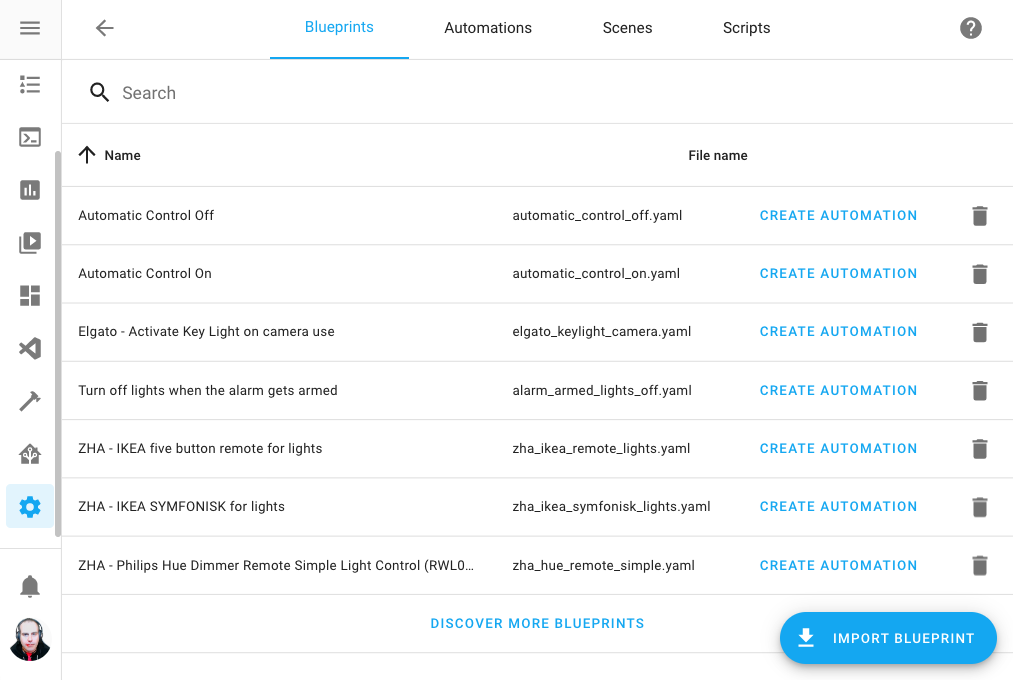 Screenshot of the blueprints configuration panel.
An automation blueprint is a pre-created automation with user-settable options. This allows for a separation of the logic and inputs of an automation. It sounds a bit complicated, but as a matter of fact, it will make things re-usable and easier.
Imagine a blueprint that controls a light based on motion, that allows you to configure the motion sensor to trigger on, and the light to control.
It is now possible to create two automations that each have their own configuration for this blueprint and act completely independently, yet are based on the same automation configuration.
Sharing blueprints
Blueprints are great for sharing your automations and ideas with the community.
We created a Blueprint Exchange forum category where you can post your created blueprints. For others to use!
We believe that the power of blueprint relies in sharing. You can now share complex automations that others can use, even if they are using the UI editors.
For example, a blueprint can be shared for a specific Zigbee remote control that maps all buttons to a light. A blueprint that sends a notification when it found empty batteries. A blueprint for muting music when you pick up your Android phone.
The sky is the limit in the ideas and automations blueprints we can share!
Using blueprints
Let’s cut a long story short, it sounds exciting, but what does it mean?
You can import blueprints by copying the URL of the forum topic or from GitHub into the UI. Then you can create automations from these blueprints by filling out the required inputs.
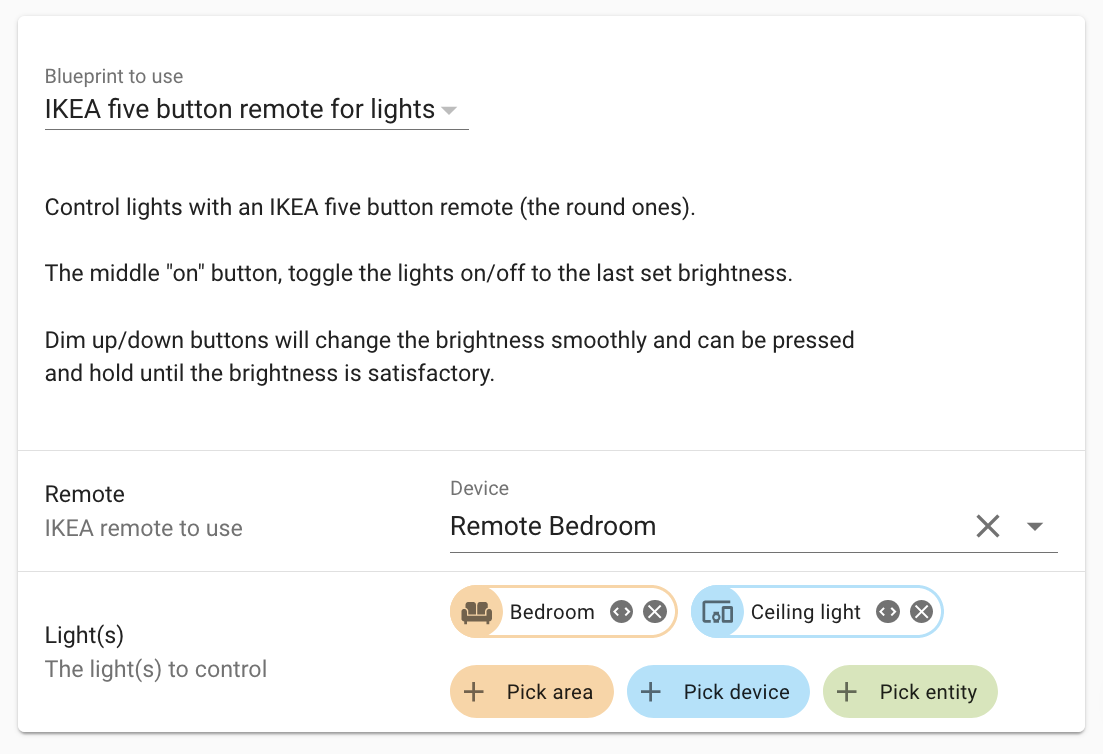 Screenshot of a blueprint.
It is really easy to deploy a blueprint, even multiple times! Blueprints are fully functional in both the UI and for YAML.
Creating blueprints
We created a really nice tutorial on how to make blueprints.
Essentially, a blueprint is just like an automation, with some added blueprint metadata. You can convert any existing automation into a blueprint!
As the last step, be sure to share your freshly created blueprint on the community on the Blueprint Exchange, helping and and inspiring others.
New neural voices for Nabu Casa Cloud TTS
If you have a Nabu Casa Home Assistant Cloud
This is a great alternative to, for example, the Google TTS integration. The resulting audio is absolutely stunning and the neural voices sound supernatural.
This service is automatically enabled when you are signed in to your
Nabu Casa cloud account and can be called using the tts.cloud_say
For example:
action:
  service: tts.cloud_say
  target:
    entity_id: media_player.family_room_speaker
  data:
    message: These new voices sound absolutely stunning!
    options:
      gender: female
    language: en-US
Assign areas to entities and readable area IDs
Areas have been around for a bit already. But, not everything supports areas yet. And using it in for example YAML-based automations, is not really an easy task to do.
Today that changes, as this release works towards making areas more useful by making them more accessible and more universal.
The first change: individual entities can now be assigned to areas.
Previously this was limited to devices only. This also works for entities without a device (for example, entities provided by Helpers). Devices provide entities, and thus it is now possible to override the area with a single entity for a device as well. For example, your in-wall mounted switch controls a light in another room.
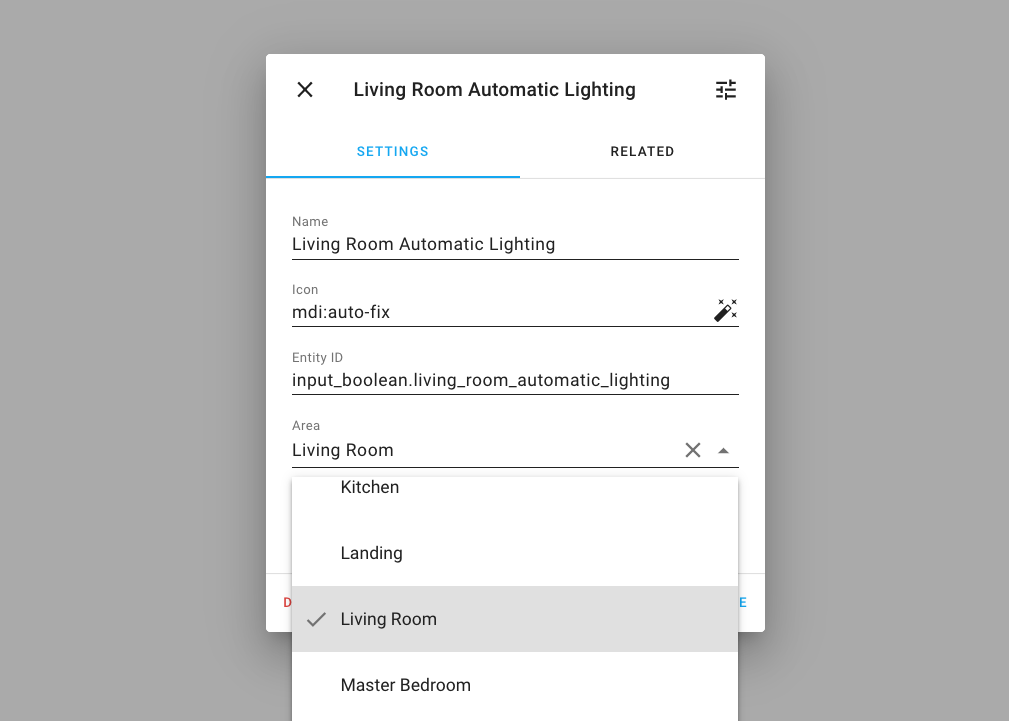 Screenshot of assigning a entity to an area.
Second improvement: The ID of a newly created area will now be based on the name of the area instead of a random string.
This makes it easier to use areas in service calls, as you can now use area identifiers that actually make sense for a human! In a YAML automation or script it will look like this:
action:
  - service: light.turn_on
    target:
      area_id: living_room
To find the area ID for the area you want to target, go to the Configuration Panel, and edit the area you want to target. In area edit dialog, the ID is shown.
Temporarily disable devices
Do you have your Christmas tree set up in Home Assistant? After the Holidays are over, you store all those decorations for the next season. But what about those devices in Home Assistant?
Thanks to @emontnemery
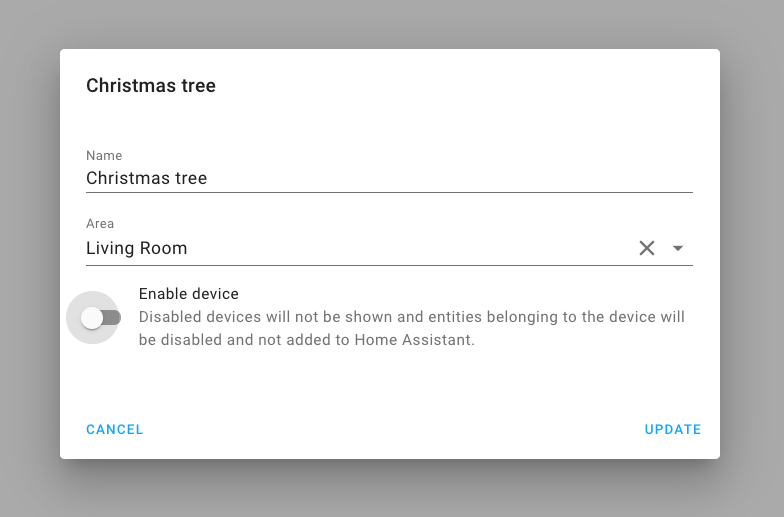 Screenshot of disabling a device.
Of course, besides seasonal things, it can also be helpful if you have a broken device or temporarily taking down any other device.
Other noteworthy changes
- The Apple TV integration now supports tvOS version 13 and
above and can be setup from the UI, thanks @postlund
! -
@thecode
has been busy with the Shelly integration and added support for inputs, so you can now use the Shelly i3 and Shelly’s in detached state. - Thanks to @adrum
, the HomeKit controller integration now has support for (de)humidifiers. -
deCONZ now supports tilt on covers, and preset and fan
for climate devices, thanks @Kane610
! -
@frenck
added support for setting the repeat mode to the Spotify integration. - The Nest integration now supports camera and doorbell events,
thanks @allenporter
! - Changes made to your KNX integration’s YAML configuration,
can now be reloaded without restarting Home Assistant. Thanks @spacegaier
! - The number formatting in the frontend is more consistent, thanks to @joshmcrty
! -
@dmulcahey
has been improving the user experience of ZHA. The feedback when pairing a new Zigbee device in the frontend is improved, discovered devices are shown earlier with their progress, and the ZHA configuration panel now has a Zigbee network visualization tab! This allows you to see your network and find connection issues. - The rest integration can now handle request parameters, nicely
done @boxcee
! - Learn new RF commands using a Broadlink remote! Thanks, @felipediel
! -
@mLupine
extended templated binary sensors and these now support templating the delay_onanddelay_off!
New Integrations
We welcome the following new integrations this release:
-
FireServiceRota, added by @cyberjunky
-
Kuler Sky, added by @emlove
-
Motion Blinds, added by @starkillerOG
-
SRP Energy, added by @briglx
-
Twinkly, added by @dr1rrb
New Platforms
The following integration got support for a new platform:
-
HomeKit Controller now has initial support for
cameras, added by @Jc2k
-
@emontnemery
has added support for fans and covers to the Tasmota integration - [MQTT][MQTT docs] added support for scenes, added by @kiall
Integrations now available to set up from the UI
The following integrations are now available via the Home Assistant UI:
-
Aurora, done by @djtimca
-
Recollect Waste, done by @bachya
Release 2020.12.1 - December 16
- Bump envoy_reader version to 0.17.3 (@gtdiehl
- #44205 ) (enphase_envoy docs) - Bump dsmr-parser to 0.25 (@RobBie1221
- #44223 ) (dsmr docs) - Fix unhandled KeyError in Recollect Waste (@bachya
- #44224 ) (recollect_waste docs) - Bump hatasmota to 0.1.6 (@emontnemery
- #44226 ) (tasmota docs) - Remove Home Assistant Cast user when removing entry (@emontnemery
- #44228 ) (cast docs) - Default smartenergy multiplier and divisor (@dmulcahey
- #44257 ) (zha docs) - Fix setting timestamp on input_datetime (@balloob
- #44274 ) (input_datetime docs) - Fix Shelly devices missing properties field (@thecode
- #44279 ) (shelly docs)
Release 2020.12.2 - December 30
- Bump HAP-python to 3.1.0 (@bdraco
- #44176 ) (homekit docs) - Update denonavr to 0.9.8 (@scarface-4711
- #44194 ) (denonavr docs) - Bump pyroon to 0.0.28 (@pavoni
- #44302 ) (roon docs) - Fix velux homekit covers not enumerated correctly (@Jc2k
- #44318 ) (homekit_controller docs) - Bump pyMyQ to version 2.0.12 (@ehendrix23
- #44328 ) (myq docs) - Update pytradfri to 7.0.5 (@rubenbe
- #44347 ) - Bump pyiqvia to 0.3.1 (@bachya
- #44358 ) (iqvia docs) - Fix bug in unloading RainMachine options listener (@bachya
- #44359 ) (rainmachine docs) - Fix Volumio pause with missing track type (@OnFreund
- #44447 ) (volumio docs) - Fix falsey comparisons in NWS weather (@MatthewFlamm
- #44486 ) (nws docs) - Bump pydeconz to version 77 (@Kane610
- #44514 ) (deconz docs) - Fix Tasmota device triggers (@emontnemery
- #44574 ) (tasmota docs) - Fix template triggers from time events (@bdraco
- #44603 ) (template docs) - Bump env_canada to 0.2.5 (@michaeldavie
- #44631 ) (environment_canada docs) - Bump pycarwings2 to 2.10 (@filcole
- #44634 ) (nissan_leaf docs)
If you need help…
…don’t hesitate to use our very active forums or join us for a little chat
Experiencing issues introduced by this release? Please report them in our issue tracker


