Opower
The Opower integrationIntegrations connect and integrate Home Assistant with your devices, services, and more. [Learn more] allows you to get energy information from utilities that use Opower.
More than 175 utilities use Opower. Currently only the following utilities are supported by this integration:
- American Electric Power (AEP) subsidiaries
- AEP Ohio
- AEP Texas
- Appalachian Power
- Indiana Michigan Power
- Kentucky Power
- Public Service Company of Oklahoma (PSO)
- Southwestern Electric Power Company (SWEPCO)
- Burbank Water and Power (BWP)
- City of Austin Utilities
- Consolidated Edison (ConEd) and subsidiaries
- Orange & Rockland Utilities (ORU)
- Duquesne Light Company (DQE)
- Evergy
- Eversource
- Exelon subsidiaries
- Atlantic City Electric
- Baltimore Gas and Electric (BGE)
- Commonwealth Edison (ComEd)
- Delmarva Power
- PECO Energy Company (PECO)
- Potomac Electric Power Company (Pepco)
- Glendale Water and Power (GWP)
- National Grid US subsidiaries
- National Grid Massachusetts
- National Grid NY Long Island
- National Grid NY Metro
- National Grid NY Upstate
- Northern Indiana Public Service Company (NIPSCO)
- Pacific Gas & Electric (PG&E)
- Portland General Electric (PGE)
- Puget Sound Energy (PSE)
- Sacramento Municipal Utility District (SMUD)
- Seattle City Light (SCL)
- Southern Maryland Electric Cooperative (SMECO)
- Southwest Gas
When you add the Opower integration to Home Assistant, you will need to provide your utility account’s authentication details to enable retrieving your energy data. This is typically the same information needed to access your utility’s website.
Utility Authentication Requirements
For many utilities, only a username and password are required to access your accounts. Some utilities require additional authentication information. It might be necessary to configure your utility account with an authentication method that is compatible with the Opower integration. Utility-specific authentication requirements are listed below:
Burbank Water and Power (BWP)
You need to first create an account at https://bwp.opower.com/ and use those credentials when you set up the integration.
Consolidated Edison (ConEd)
Your ConEd account must be set up to use two-factor authentication using time-based one time passwords (TOTP). Other authentication methods, such as secret questions, are not supported.
When adding the Opower ConEd integration you will need to provide the TOTP secret that is used to synchronize your authenticator app, such as Google Authenticator, to your ConEd account.
NOTE: The TOTP secret is not one of the 6 digit time-based numeric codes. It is a string of around 16 characters containing the shared secret that enables your authenticator app to generate the correct time-based code at the appropriate time. The QR codes used for setting up TOTP accounts contain the secret. Using the TOTP secret, the Opower integration will be able to generate the correct time-based code when it needs to authenticate to the ConEd website.
If you have an existing TOTP set up, there are methods for exporting the account from your authenticator app and then using a tool to obtain the TOTP secret from the encoded string.
Alternatively, you can create a new TOTP secret for your account and use the “no camera to scan” option to capture the TOTP secret. You may also want to capture the QR code by taking a picture, or using a QR code scanner. There are tools available that can decode the TOTP data from a QR code.
NOTE: At this time, ConEd only has a single TOTP set up per account. Therefore, it is important that you configure the same TOTP secret for ConEd access in both Opower and your authenticator app.
Troubleshooting: “2FA code was invalid” error
If authentication fails despite correct credentials and TOTP secret, this might be due to your Home Assistant server’s clock and the ConEd server’s clock being out of sync. TOTP codes are only valid within 30-second windows. Try updating and restarting Home Assistant Core, which may resolve the issue. Some users have reported needing to restart multiple times before the issue gets resolved.
Exelon subsidiaries (ACE, BGE, ComEd, Delmarva, PECO, Pepco)
The integration properly supports Multi-Factor Authentication (MFA) for Exelon subsidiaries via code sent to either email or phone SMS. These subsidiaries turned on MFA automatically for customers, however you may not have added a phone number. This integration supports this use case, but beware that once you add a phone you most likely cannot remove it entirely. You will be asked to re-authenticate via MFA periodically.
Pacific Gas & Electric (PG&E)
The integration properly supports Multi-Factor Authentication (MFA) for PG&E via either email or phone. You will be asked to re-authenticate via MFA every 180 days.
Configuration
To add the Opower service to your Home Assistant instance, use this My button:

If the above My button doesn’t work, you can also perform the following steps manually:
-
Browse to your Home Assistant instance.
-
In the bottom right corner, select the
Add Integration button. -
From the list, select Opower.
-
Follow the instructions on screen to complete the setup.
Sensors
Depending on your utility, some or all of the usage and cost sensors may not be provided, or they may permanently show a value of 0. This can be normal for some utilities. If your utility should provide these sensors, refer to the troubleshooting steps.
The primary way this integration provides historical energy data to Home Assistant is through statistics. These statistics are not exposed as standard sensor entities.
Use these statistics when configuring the Energy dashboard by selecting a statistic. You can also view the available statistics in Developer tools > Statistics.
The integration adds the following diagnostic sensors for each account:
- Last changed
- Last updated
The integration adds the following sensors only if your utility provides forecasted usage/cost:
For electricity:
- Current bill electric usage to date
- Current bill electric cost to date
- Current bill electric forecasted usage (for the first few days of the bill this is 0)
- Current bill electric forecasted cost (for the first few days of the bill this is 0)
- Typical monthly electric usage (based on the same month for previous years, not populated for accounts younger than a year)
- Typical monthly electric cost (based on the same month for previous years, not populated for accounts younger than a year)
For gas:
- Current bill gas usage to date
- Current bill gas cost to date
- Current bill gas forecasted usage (for the first few days of the bill this is 0)
- Current bill gas forecasted cost (for the first few days of the bill this is 0)
- Typical monthly gas usage (based on the same month for previous years, not populated for accounts younger than a year)
- Typical monthly gas cost (based on the same month for previous years, not populated for accounts younger than a year)
Note the unit for gas is CCF (centum cubic feet). 1 CCF is one hundred cubic feet which is equivalent to 1 therm.
Energy
Because utilities only release usage/cost data with a 48-hour delay, the integration inserts data into statistic objects. You can find the statistics in Settings > Developer tools > Statistics and search for “opower”. This delay means that there will be no data in the energy dashboard for today and likely yesterday (depending on time of day you are checking).
At the initial setup, the integration pulls historical monthly usage/cost since the account activation. If the utility provides more granular data, it pulls daily usage/cost for the past 3 years and hourly usage/cost for the past 2 months (note: typically, utilities provide only monthly or daily data for gas). After the initial setup, the integration keeps pulling data (twice per day) for the past 30 days to allow for any corrections in the data from the utilities.
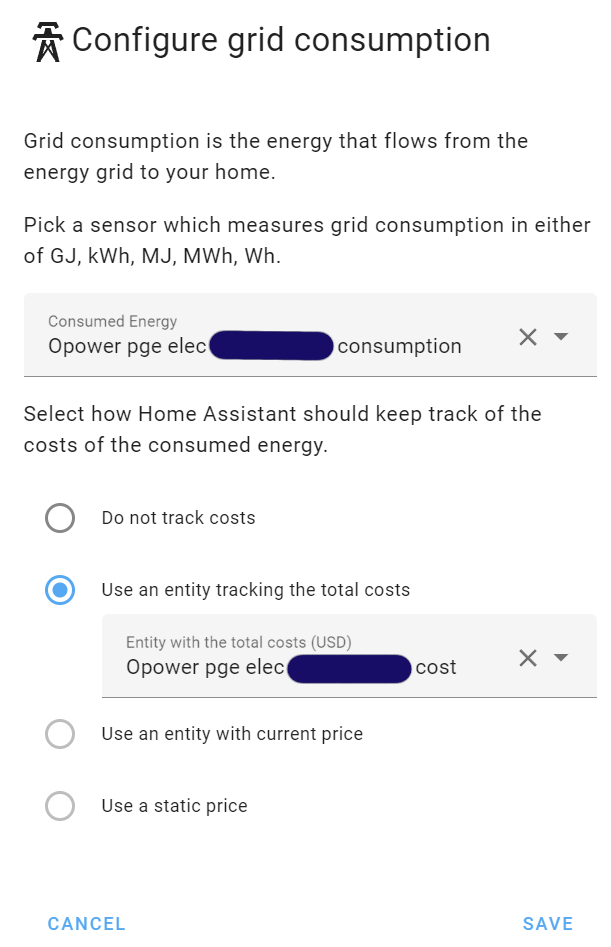
In the configuration of the energy dashboard (Settings > Dashboards > Energy):
For electricity:
- Select Add consumption under Electricity grid.
- Select Opower {utility name} elec {account number} consumption for consumed energy.
- Select the radio button to Use an entity tracking the total costs.
- Select Opower {utility name} elec {account number} cost for entity with the total costs.
Track return to grid energy and compensation
- Select Add return under Electricity grid.
- Select Opower {utility name} elec {account number} return for energy returned to the grid.
- Select the radio button to Use an entity tracking the total received money.
- Select Opower {utility name} elec {account number} compensation for entity with the total compensation.
Your Configure grid consumption should now look like this:
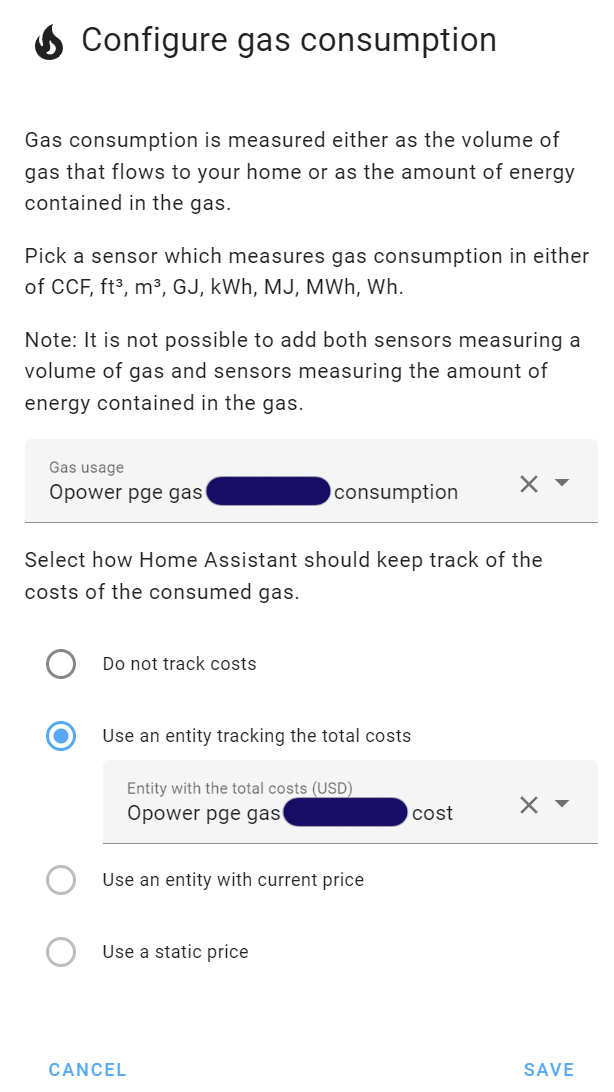
For gas:
- Select Add gas source for the Gas consumption.
- Select Opower {utility name} gas {account number} consumption for the gas usage.
- Select the radio button to Use an entity tracking the total costs.
- Select Opower {utility name} gas {account number} cost for the entity with the total costs.
Your Configure gas consumption should now look like this:
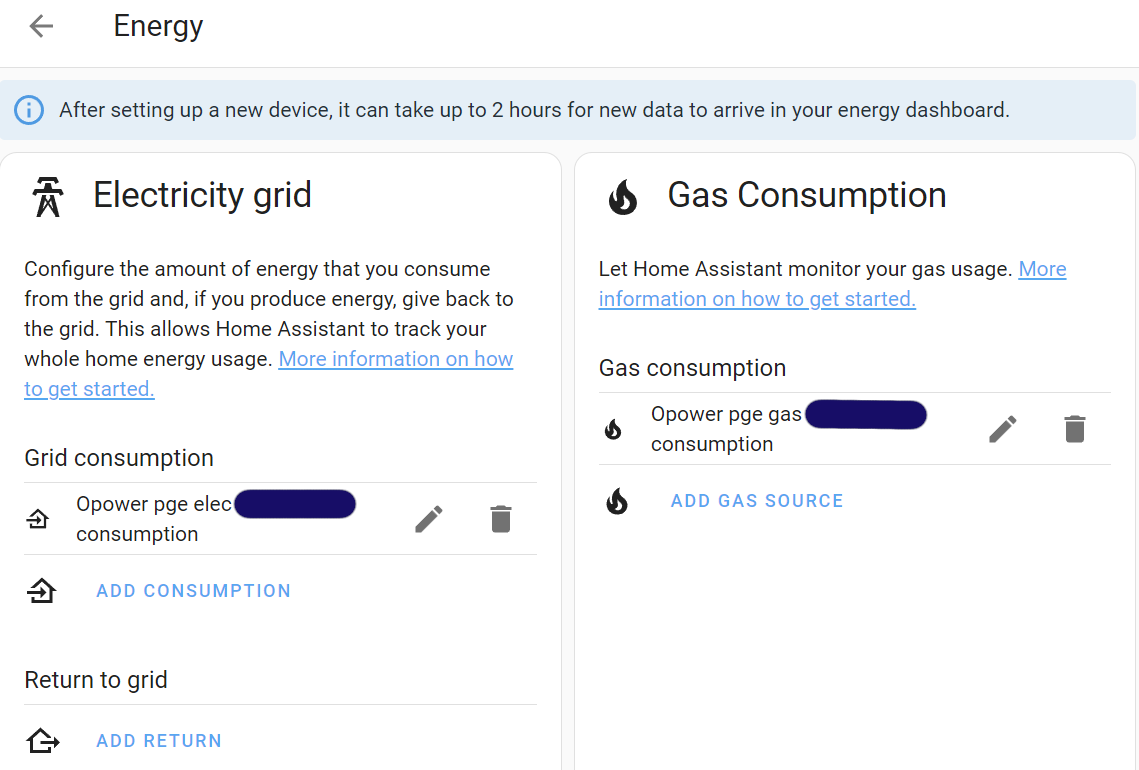
With the above changes your (Settings > Dashboards > Energy) page should now look like this:
Known limitations
- There is a delay, often for up to a few days, for sensors and statistics to have up-to-date data.
- For some utilities, there are no usage/cost sensors added by this integration, or they may constantly show a value of
0. This is expected and fine; you should use the statistics instead. - For some utilities, the usage/cost sensors might disappear or become unavailable at the beginning of your bill period.
- Sensors for typical monthly usage and cost are not populated for accounts younger than a year.
- Many utilities provide granular usage (for example, daily or hourly) but not cost. They only provide cost for billing periods (for example, month). This results in showing 0 for cost.
- For some utilities, the account number displayed in Home Assistant might not match the account number on your utility bill or web portal. This is expected behavior. The integration uses an internal identifier from the Opower system (
preferredUtilityAccountId), which can differ from your public billing account number (accountName). It does not mean you are connected to anyone else’s account or that you are seeing someone else’s statistics.
Troubleshooting
- If your usage or cost sensors are completely missing or showing
0, this may be expected behavior; see Known limitations above. - If the account number shown in Home Assistant doesn’t match the one on your bill, this is normal and does not mean you are connected to someone else’s account; see Known limitations above.
- Before opening an issue, ensure you can access the energy usage section/dashboard on your utility website and verify that the data is up-to-date there.
- When configuring the Energy dashboard in Home Assistant, use the statistics as described in Known limitations above.
Removing the integration
To remove an integration instance from Home Assistant
- Go to Settings > Devices & services and select the integration card.
- From the list of devices, select the integration instance you want to remove.
- Next to the entry, select the three dots
menu. Then, select Delete.
If you remove the integration, the statistics are not automatically deleted. You can find and delete the statistics in Settings > Developer tools > Statistics and search for “opower”.