Z-Wave
The Z-Wave integration allows you to control a Z-Wave network via the Z-Wave JS driver.
Getting started
To run a Z-Wave network, you need the following elements:
- A supported Z-Wave controller. First-time user? For recommendations on what to buy, go here.
- A running Z-Wave JS server.
- An installed Z-Wave integration in Home Assistant.
Setting up a Z-Wave JS server
If you are running Home Assistant Operating SystemHome Assistant OS, the Home Assistant Operating System, is an embedded, minimalistic, operating system designed to run the Home Assistant ecosystem. It is the recommended installation method for most users. [Learn more] or Home Assistant SupervisedHome Assistant Supervised is the full Home Assistant ecosystem, without the Home Assistant Operating System. [Learn more], the easiest way to get started is by using the built-in Z-Wave JS add-on in Home Assistant.
For other ways to setup a Z-Wave server, refer to the advanced installation instructions.
Follow these steps:
- Open the Home Assistant user interface.
- Plug the Z-Wave dongle into the device running Home Assistant.
- Most likely, your dongle will be recognized automatically. On the user interface, you will be asked if you want to set up this device with the Z-Wave JS add-on. Select Submit.
- If your dongle is not recognized, follow these steps:
 , or follow these steps:
- Browse to your Home Assistant instance.
- Go to Settings > Devices & Services.
- In the bottom right, select the Add Integration button.
- From the list, select Z-Wave.
- Follow the instructions on screen to complete the setup.
- Wait for the installation to complete.
- You are prompted for network security keys.
- If you are using Z-Wave for the first time, leave all the fields empty and select Submit. The system will generate network security keys for you.
- If this Z-Wave dongle has already been paired with secure devices, you need to enter the previously used network key as the S0 network key. S2 security keys will be automatically generated for you.
- Make sure that you keep a backup of these keys in a safe place in case you need to move your Z-Wave dongle to another device. Copy and paste them somewhere safe.
- Wait for the Z-Wave JS add-on to start up.
- Once the installation is complete, the Device info of the Z-Wave controller is shown.
- You successfully installed the Z-Wave integration and the Z-Wave JS add-on.
- You can now add devices to the Z-Wave network.
While your Z-Wave mesh is permanently stored on your dongle, the additional metadata is not. When the Z-Wave integration starts up the first time, it will interview your entire Z-Wave network. Depending on the number of devices paired with the Z-Wave dongle, this can take a while. You can speed up this process by manually waking up your battery-powered devices. Most of the time, this is a button press on those devices (see their manual). It is not necessary to exclude and re-include devices from the mesh.
Adding a new device to the Z-Wave network
- In Home Assistant, go to Settings > Devices & Services.
- Select the Z-Wave integration. Then select Configure.
- Select Add device.
- The Z-Wave controller is now in inclusion mode.
- If your device supports SmartStart (700 series controller), select Scan QR code and scan the QR code on your device.
- If your device does not support SmartStart, set the device in inclusion mode. Refer to the device manual to see how this is done.
- If your device is included using S2 security, you may be prompted to enter a PIN number provided with your device. Often, this PIN is provided with the documentation and is also printed on the device itself. For more information on secure inclusion, refer to this section.
- The UI should confirm that the device was added. After a short while (seconds to minutes), the entities should also be created.
- If the controller fails to add/find your device, cancel the inclusion process.
- In some cases, it might help to first remove a device (exclusion) before you add it, even when the device has not been added to this Z-Wave network yet.
- Another approach would be to factory reset the device. Refer to the device manual to see how this is done.
Important:
- Do not move your Z-Wave stick to include devices. This is no longer necessary and leads to broken routes.
- Do not initiate device inclusion from the Z-Wave stick itself. This is no longer supported.
Removing a device from the Z-Wave network
- In Home Assistant, go to Settings > Devices & Services.
- Select the Z-Wave integration. Then, select Configure.
- Select Remove device, then Start exclusion.
- The Z-Wave controller is now in exclusion mode.
- Put the device you want to remove in exclusion mode. Refer to its manual how this is done.
- The UI should confirm that the device was removed and the device and entities will be removed from Home Assistant.
Special Z-Wave entities
The Z-Wave integration provides several special entities, some of which are available for every Z-Wave device, and some of which are conditional based on the device.
Entities available for every Z-Wave device
- Node status sensor: This sensor shows the node status for a given Z-Wave device. The sensor is disabled by default. The available node statuses are explained in the Z-Wave JS documentation. They can be used in state change automations. For example to ping a device when it is dead, or refresh values when it wakes up.
-
Ping button: This button can be pressed to ping a device. It is an alternative to the
zwave_js.pingservice. - Controller/node statistics sensors: Z-Wave JS collects statistics about communications between nodes and the controller. The statistics can be used to troubleshoot RF issues in your environment. These statistics are available in the network configuration and device info panels. But they are also available as sensors which are disabled by default.
Conditional entities
- Button to manually idle notifications: Any Notification Command Class (CC) values on a device that have an idle state will get a corresponding button entity. This button entity can be used to manually idle a notification when it doesn’t automatically clear on its own. A device can have multiple Notification CC values. For example one for detecting smoke and one for detecting carbon monoxide.
Using advanced features (UI only)
While the integration aims to provide as much functionality as possible through existing Home Assistant constructs (entities, states, automations, services, etc.), there are some features that are only available through the UI.
All of these features can be accessed either in the Z-Wave integration configuration panel or in a Z-Wave device’s device panel.
Integration configuration panel
The following features can be accessed from the integration configuration panel:

- Add device: Allows you to pre-provision a SmartStart device or start the inclusion process for adding a new device to your network.
- Remove device: Starts the exclusion process for removing a device from your network.
- Rebuild network routes: Forces your network to rediscover routes to the controller from each device. This is useful when devices or the controller have moved to a new location, or if you are having significant problems with your network, but it also generates a lot of network traffic and should be used sparingly.
- Controller statistics: Provides statistics about communication between the controller and other devices, allowing you to troubleshoot your network’s RF quality.
- Third-party data opt-in/out: Allows you to opt-in or out of telemetry that the Z-Wave JS project collects to help inform development decisions, influence manufacturers, etc. This telemetry is disabled by default and has to be opted in to be activated.
Integration menu
Some features can be accessed from the menu of integration itself. As they are not specific to Z-Wave, they are not described here in detail.
- Download diagnostics: Exports a JSON file describing the entities of all devices registered with this integration.
Device panel
Controller
The following features can be accessed from the device panel of a Z-Wave controller:
- Factory reset: Exercise extreme caution when using this action! Once initiated, your controller will be reset to factory settings, it will forget all devices it is paired with, it will establish a new network ID that will prevent any recovery of your old network, and all Z-Wave devices for this network will be removed from Home Assistant. If there are any devices still paired with the controller when it is reset, they will have to go through the exclusion process before they can be re-paired.
Network devices
The following features can be accessed from the device panel of any Z-Wave device on your network aside from the controller:
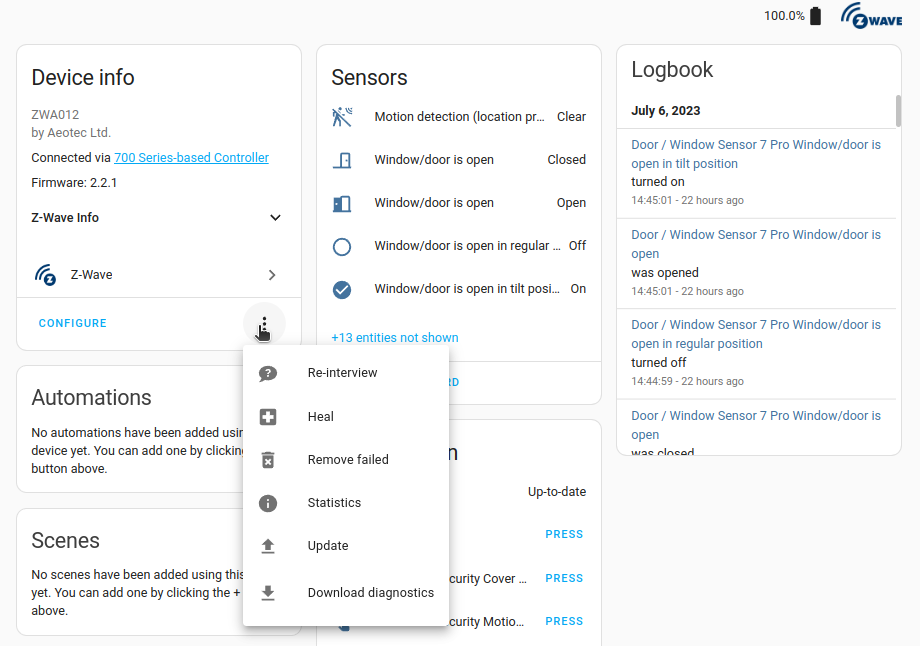
- Configure: Provides an easy way to look up and update configuration parameters for the device. While there is an existing service for setting configuration parameter values, this UI may sometimes be quicker to use for one-off changes.
- Re-interview: Forces the device to go through the interview process again so that Z-Wave-JS can discover all of its capabilities. Can be helpful if you don’t see all the expected entities for your device.
- Rebuild routes: Forces the device to rediscover its optimal route back to the controller. Use this if you think you are experiencing unexpected delays or RF issues with your device. Your device may be less responsive during this process.
- Remove failed: Forces the controller to remove the device from the controller. Can be used when a device has failed and it can’t go through the normal exclusion process.
- Statistics: Provides statistics about communication between this device and the controller, allowing you to troubleshoot RF issues with the device.
- Update: Updates a device’s firmware using a manually uploaded firmware file. Only some devices support this feature (controllers and devices with the Firmware Update Metadata Command Class).
- Download diagnostics: Exports a JSON file describing the entities of this specific device.
Services
Service zwave_js.set_config_parameter
This service will update a configuration parameter. To update multiple partial parameters in a single call, use the zwave_js.bulk_set_partial_config_parameters service.
| Service Data Attribute | Required | Description |
|---|---|---|
entity_id |
no | Entity (or list of entities) to set the configuration parameter on. At least one entity_id, device_id, or area_id must be provided. |
device_id |
no | Device ID (or list of device IDs) to set the configuration parameter on. At least one entity_id, device_id, or area_id must be provided. |
area_id |
no | Area ID (or list of area IDs) for devices/entities to set the configuration parameter on. At least one entity_id, device_id, or area_id must be provided. |
parameter |
yes | The parameter number or the name of the property. The name of the property is case sensitive. |
bitmask |
no | The bitmask for a partial parameter in hex (0xff) or decimal (255) format. If the name of the parameter is provided, this is not needed. Cannot be combined with value_size or value_format. |
value |
yes | The target value for the parameter as the integer value or the state label. The state label is case sensitive. |
value_size |
no | The size of the target parameter value, either 1, 2, or 4. Used in combination with value_format when a config parameter is not defined in your device’s configuration file. Cannot be combined with bitmask. |
value_format |
no | The format of the target parameter value, 0 for signed integer, 1 for unsigned integer, 2 for enumerated, 3 for bitfield. Used in combination with value_size when a config parameter is not defined in your device’s configuration file. Cannot be combined with bitmask. |
Examples of setting a single parameter value
Let’s use parameter 31 for this device as an example to show examples of different ways that the LED 1 Blink Status (bottom) partial parameter can be set. Note that in places where we are using different values for the same key, the different values are interchangeable across the examples. We can, for instance, use 1 or Blink interchangeably for the value in all of the examples.
Example 1:
service: zwave_js.set_config_parameter
target:
  entity_id: switch.fan
data:
  parameter: 31
  bitmask: 0x01
  value: 1
Example 2:
service: zwave_js.set_config_parameter
target:
  entity_id: switch.fan
data:
  parameter: 31
  bitmask: 1
  value: "Blink"
Example 3:
service: zwave_js.set_config_parameter
target:
  entity_id: switch.fan
data:
  entity_id: switch.fan
  parameter: "LED 1 Blink Status (bottom)"
  value: "Blink"
Service zwave_js.bulk_set_partial_config_parameters
This service will bulk set multiple partial configuration parameters. Be warned that correctly using this service requires advanced knowledge of Z-Wave.
| Service Data Attribute | Required | Description |
|---|---|---|
entity_id |
no | Entity (or list of entities) to bulk set partial configuration parameters on. At least one entity_id, device_id, or area_id must be provided. |
device_id |
no | Device ID (or list of device IDs) to bulk set partial configuration parameters on. At least one entity_id, device_id, or area_id must be provided. |
area_id |
no | Area ID (or list of area IDs) for devices/entities to bulk set partial configuration parameters on. At least one entity_id, device_id, or area_id must be provided. |
parameter |
yes | The parameter number of the property. The name of the property is case sensitive. |
value |
yes | Either the raw integer value that you want to set for the entire parameter, or a dictionary where the keys are either the bitmasks (in integer or hex form) or the partial parameter name and the values are the value you want to set on each partial (either the integer value or a named state when applicable). Note that when using a dictionary, and bitmasks that are not provided will be set to their currently cached values. |
Examples of bulk setting partial parameter values
Let’s use parameter 21 for this device as an example to show how partial parameters can be bulk set. In this case, we want to set 0xff to 127, 0x7f00 to 10, and 0x8000 to 1 (or the raw value of 4735).
When using the dictionary format to map the partial parameter to values, the cached values for the missing partial parameters will be used. So in examples 2, 3, 4, and 5, the service would use the cached value for partial parameters 0xff0000, 0x3f000000, and 0x40000000 because new values haven’t been specified. If you send the raw integer value, it is assumed that you have calculated the full value, so in example 1, partial parameters 0xff0000, 0x3f000000, and 0x40000000 would all be set to 0.
Example 1:
service: zwave_js.bulk_set_partial_config_parameters
target:
  entity_id: switch.fan
data:
  parameter: 21
  value: 4735
Example 2:
service: zwave_js.bulk_set_partial_config_parameters
target:
  entity_id: switch.fan
data:
  parameter: 21
  value:
    0xff: 127
    0x7f00: 10
    0x8000: 1
Example 3:
service: zwave_js.bulk_set_partial_config_parameters
target:
  entity_id: switch.fan
data:
  parameter: 21
  value:
    255: 127
    32512: 10
    32768: 1
Example 4:
service: zwave_js.bulk_set_partial_config_parameters
target:
  entity_id: switch.fan
data:
  parameter: 21
  value:
    255: 127
    32512: 10
    32768: "Fine"
Example 5:
service: zwave_js.bulk_set_partial_config_parameters
target:
  entity_id: switch.fan
data:
  parameter: 21
  value:
    "Quick Strip Effect: Hue Color Wheel / Color Temp": 127
    "Quick Strip Effect Intensity": 10
    "Quick Strip Effect Intensity Scale": "Fine"
Service zwave_js.refresh_value
This service will refresh the value(s) for an entity. This service will generate extra traffic on your Z-Wave network and should be used sparingly. Updates from devices on battery may take some time to be received.
| Service Data Attribute | Required | Description |
|---|---|---|
entity_id |
yes | Entity or list of entities to refresh values for. |
refresh_all_values |
no | Whether all values should be refreshed. If false, only the primary value will be refreshed. If true, all watched values will be refreshed. |
Service zwave_js.set_value
This service will set a value on a Z-Wave device. It is for advanced use cases where you need to modify the state of a node and can’t do it using native Home Assistant entity functionality. Be warned that correctly using this service requires advanced knowledge of Z-Wave. The service provides minimal validation and blindly calls the Z-Wave JS API, so if you are having trouble using it, it is likely because you are providing an incorrect value somewhere. To set a config parameter, you should use the zwave_js.set_config_parameter or zwave_js.bulk_set_partial_config_parameters services instead of this one.
| Service Data Attribute | Required | Description |
|---|---|---|
entity_id |
no | Entity (or list of entities) to set the value on. At least one entity_id, device_id, or area_id must be provided. |
device_id |
no | Device ID (or list of device IDs) to set the value on. At least one entity_id, device_id, or area_id must be provided. |
area_id |
no | Area ID (or list of area IDs) for devices/entities to set the value on. At least one entity_id, device_id, or area_id must be provided. |
command_class |
yes | ID of Command Class that you want to set the value for. |
property |
yes | ID of Property that you want to set the value for. |
property_key |
no | ID of Property Key that you want to set the value for. |
endpoint |
no | ID of Endpoint that you want to set the value for. |
value |
yes | The new value that you want to set. |
options |
no | Set value options map. Refer to the Z-Wave JS documentation for more information on what options can be set. |
wait_for_result |
no | Boolean that indicates whether or not to wait for a response from the node. If not included in the payload, the integration will decide whether to wait or not. If set to true, note that the service call can take a while if setting a value on an asleep battery device. |
Service zwave_js.multicast_set_value
This service will set a value on multiple Z-Wave devices using multicast. It is for advanced use cases where you need to set the same value on multiple nodes simultaneously. Be warned that correctly using this service requires advanced knowledge of Z-Wave. The service provides minimal validation beyond what is necessary to properly call the Z-Wave JS API, so if you are having trouble using it, it is likely because you are providing an incorrect value somewhere.
| Service Data Attribute | Required | Description |
|---|---|---|
entity_id |
no | Entity (or list of entities) to set the value on via multicast. At least two entity_id or device_id must be resolved if not broadcasting the command. |
device_id |
no | Device ID (or list of device IDs) to set the value on via multicast. At least two entity_id or device_id must be resolved if not broadcasting the command. |
area_id |
no | Area ID (or list of area IDs) for devices/entities to set the value on via multicast. At least two entity_id or device_id must be resolved if not broadcasting the command. |
broadcast |
no | Boolean that indicates whether you want the message to be broadcast to all nodes on the network. If you have only one Z-Wave network configured, you do not need to provide a device_id or entity_id when this is set to true. When you have multiple Z-Wave networks configured, you MUST provide at least one device_id or entity_id so the service knows which network to target. |
command_class |
yes | ID of Command Class that you want to set the value for. |
property |
yes | ID of Property that you want to set the value for. |
property_key |
no | ID of Property Key that you want to set the value for. |
endpoint |
no | ID of Endpoint that you want to set the value for. |
value |
yes | The new value that you want to set. |
options |
no | Set value options map. Refer to the Z-Wave JS documentation for more information on what options can be set. |
Service zwave_js.invoke_cc_api
Call this service to use the Command Class API directly. In most cases, the zwave_js.set_value service will accomplish what you need to, but some Command Classes have API commands that can’t be accessed via that service. Refer to the Z-Wave JS Command Class documentation for the available APIs and arguments. Be sure to know what you are doing when calling this service.
| Service Data Attribute | Required | Description |
|---|---|---|
entity_id |
no | Entity (or list of entities) to ping. At least one entity_id, device_id, or area_id must be provided. If endpoint is specified, that endpoint will be used to make the CC API call for all devices, otherwise the primary value endpoint will be used for each entity. |
device_id |
no | Device ID (or list of device IDs) to ping. At least one entity_id, device_id, or area_id must be provided. If endpoint is specified, that endpoint will be used to make the CC API call for all devices, otherwise the root endpoint (0) will be used for each device. |
area_id |
no | Area ID (or list of area IDs) for devices/entities to ping. At least one entity_id, device_id, or area_id must be provided. If endpoint is specified, that endpoint will be used to make the CC API call for all devices, otherwise the root endpoint (0) will be used for each zwave_js device in the area. |
command_class |
yes | ID of Command Class that you want to set the value for. |
endpoint |
no | The endpoint to call the CC API against. |
method_name |
yes | The name of the method that is being called from the CC API. |
parameters |
yes | A list of parameters to pass to the CC API method. |
Service zwave_js.refresh_notifications
This service will refresh the notifications of a given type on a device that supports the Notification Command Class.
| Service Data Attribute | Required | Description |
|---|---|---|
entity_id |
no | Entity (or list of entities) to refresh notifications for. At least one entity_id, device_id, or area_id must be provided. |
device_id |
no | Device ID (or list of device IDs) to refresh notifications for. At least one entity_id, device_id, or area_id must be provided. |
area_id |
no | Area ID (or list of area IDs) for devices/entities to refresh notifications for. At least one entity_id, device_id, or area_id must be provided. |
notification_type |
yes | The type of notification to refresh. |
notification_event |
no | The notification event to refresh. |
Service zwave_js.reset_meter
This service will reset the meters on a device that supports the Meter Command Class.
| Service Data Attribute | Required | Description |
|---|---|---|
entity_id |
yes | Entity (or list of entities) for the meters you want to reset. |
meter_type |
no | If supported by the device, indicates the type of meter to reset. Not all devices support this option. |
value |
no | If supported by the device, indicates the value to reset the meter to. Not all devices support this option. |
Service zwave_js.set_lock_configuration
This service will set the configuration of a lock.
| Service Data Attribute | Required | Description |
|---|---|---|
entity_id |
no | Lock entity or list of entities to set the usercode. |
operation_type |
yes | Lock operation type, one of timed or constant. |
lock_timeout |
no | Seconds until lock mode times out. Should only be used if operation type is timed. |
auto_relock_time |
no | Duration in seconds until lock returns to secure state. Only enforced when operation type is constant. |
hold_and_release_time |
no | Duration in seconds the latch stays retracted. |
twist_assist |
no | Enable Twist Assist. |
block_to_block |
no | Enable block-to-block functionality. |
Service zwave_js.set_lock_usercode
This service will set the usercode of a lock to X at code slot Y. Valid usercodes are at least 4 digits.
| Service Data Attribute | Required | Description |
|---|---|---|
entity_id |
no | Lock entity or list of entities to set the usercode. |
code_slot |
yes | The code slot to set the usercode into. |
usercode |
yes | The code to set in the slot. |
Service zwave_js.clear_lock_usercode
This service will clear the usercode of a lock in code slot X. Valid code slots are between 1-254.
| Service Data Attribute | Required | Description |
|---|---|---|
entity_id |
no | Lock entity or list of entities to clear the usercode. |
code_slot |
yes | The code slot to clear the usercode from. |
Events
There are two types of events that are fired, notification events and value notification events. You can test what events come in using the event developer tools in Home Assistant and subscribing to the zwave_js_notification or zwave_js_value_notification events respectively. Once you know what the event data looks like, you can use this to create automations.
Node events (Notification)
Check the Z-Wave JS notification event documentation for an explanation of the notification event data. These events fire with the zwave_js_notification event type.
Notification event data can be used to trigger automations, both in the automation UI and in YAML, using the event platform. Check the details of an event by subscribing to the zwave_js_notification event in the Developers Tools.
# Fires whenever the lock is unlocked by the keypad.
trigger:
  - platform: event
    event_type: zwave_js_notification
    event_data:
      node_id: 14
      event_label: "Keypad unlock operation"
Notification Command Class
These are notification events fired by devices using the Notification Command Class. The parameters attribute in the example below is optional, and when it is included, the keys in the attribute will vary depending on the event.
{
    "domain": "zwave_js",
    "node_id": 1,
    "endpoint": 0,
    "home_id": "974823419",
    "device_id": "ad8098fe80980974",
    "command_class": 113,
    "command_class_name": "Notification",
    "type": 6,
    "event": 5,
    "label": "Access Control",
    "event_label": "Keypad lock operation",
    "parameters": {"userId": 1}
}
Multilevel Switch Command Class
These are notification events fired by devices using the Multilevel Switch Command Class. There are events for start level change and stop level change. These would typically be used in a device like the Aeotec Nano Dimmer with an external switch to respond to long button presses.
Start level change
{
    "domain": "zwave_js",
    "node_id": 1,
    "endpoint": 0,
    "home_id": 974823419,
    "device_id": "2f44f0d4152be3123f7ad40cf3abd095",
    "command_class": 38,
    "command_class_name": "Multilevel Switch",
    "event_type": 4,
    "event_type_label": "label 1",
    "direction": "up"
},
Stop level change
{
    "domain": "zwave_js",
    "node_id": 8,
    "endpoint": 0,
    "home_id": 3803689189,
    "device_id": "2f44f0d4152be3123f7ad40cf3abd095",
    "command_class": 38,
    "command_class_name": "Multilevel Switch",
    "event_type": 5,
    "event_type_label": "label 2",
    "direction": null
},
Entry Control Command Class
These are notification events fired by devices using the Entry Control Command Class.
{
    "domain": "zwave_js",
    "node_id": 1,
    "endpoint": 0,
    "home_id": "974823419",
    "device_id": "ad8098fe80980974",
    "command_class": 111,
    "command_class_name": "Entry Control",
    "event_type": 6,
    "event_type_label": "label 1",
    "data_type": 5,
    "data_type_label": "label 2",
    "event_data": "555"
}
Scene events (Value Notification)
Value Notifications are used for stateless values, like Central Scenes and Scene Activation. These events fire with the zwave_js_value_notification event type.
Value Notification example:
{
    "domain": "zwave_js",
    "node_id": 1,
    "home_id": "974823419",
    "endpoint": 0,
    "device_id": "ad8098fe80980974",
    "command_class": 91,
    "command_class_name": "Central Scene",
    "label": "Event value",
    "property": "scene",
    "property_name": "scene",
    "property_key": "001",
    "property_key_name": "001",
    "value": "KeyPressed",
    "value_raw": 0
}
Value updated events
Due to some devices not following the Z-Wave Specification, there are scenarios where a device will send a value update but a state change won’t be detected in Home Assistant. To address the gap, the zwave_js_value_updated event can be listened to to capture any value updates that are received by an affected entity. This event is enabled on a per device and per entity domain basis, and the entities will have assumed_state set to true. This change will affect how the UI for these entities look; if you’d like the UI to match other entities of the same type where assumed_state is not set to true, you can override the setting via entity customization.
The following devices currently support this event:
| Make | Model | Entity Domain |
|---|---|---|
| Vision Security | ZL7432 In Wall Dual Relay Switch | switch |
Value Updated example:
{
    "node_id": 4,
    "home_id": "974823419",
    "device_id": "ad8098fe80980974",
    "entity_id": "switch.in_wall_dual_relay_switch",
    "command_class": 37,
    "command_class_name": "Switch Binary",
    "endpoint": 0,
    "property": "currentValue",
    "property_name": "currentValue",
    "property_key": null,
    "property_key_name": null,
    "value": 0,
    "value_raw": 0
}
This event can be used to trigger a refresh of values when the new state needs to be retrieved. Here’s an example automation:
trigger:
  - platform: event
    event_type: zwave_js_value_updated
    event_data:
      entity_id: switch.in_wall_dual_relay_switch
action:
  - service: zwave_js.refresh_value
    data:
      entity_id:
        - switch.in_wall_dual_relay_switch_2
        - switch.in_wall_dual_relay_switch_3
Automations
The Z-Wave integration provides its own trigger platforms which can be used in automations.
zwave_js.value_updated
This trigger platform can be used to trigger automations on any Z-Wave JS value update, including Z-Wave JS values that aren’t supported in Home Assistant via entities. While they can’t be authored from the automation UI, they can be authored in YAML directly in your configuration.yaml.
Example automation trigger configuration
# Fires whenever the `latchStatus` value changes from `closed` to `opened` on the three devices (devices will be derived from an entity ID).
trigger:
  platform: zwave_js.value_updated
  # At least one `device_id` or `entity_id` must be provided
  device_id: 45d7d3230dbb7441473ec883dab294d4  # Garage Door Lock device ID
  entity_id:
    - lock.front_lock
    - lock.back_door
  # `property` and `command_class` are required
  command_class: 98 # Door Lock CC
  property: "latchStatus"
  # `property_key` and `endpoint` are optional
  property_key: null
  endpoint: 0
  # `from` and `to` will both accept lists of values and the trigger will fire if the value update matches any of the listed values
  from:
    - "closed"
    - "jammed"
  to: "opened"
Available trigger data
In addition to the standard automation trigger data, the zwave_js.value_updated trigger platform has additional trigger data available for use.
| Template variable | Data |
|---|---|
trigger.device_id |
Device ID for the device in the device registry. |
trigger.node_id |
Z-Wave node ID. |
trigger.command_class |
Command Class ID. |
trigger.command_class_name |
Command Class name. |
trigger.property |
Z-Wave Value’s property. |
trigger.property_name |
Z-Wave Value’s property name. |
trigger.property_key |
Z-Wave Value’s property key. |
trigger.property_key_name |
Z-Wave Value’s property key name. |
trigger.endpoint |
Z-Wave Value’s endpoint. |
trigger.previous_value |
The previous value for this Z-Wave value (translated to a state name when possible). |
trigger.previous_value_raw |
The raw previous value for this Z-Wave value (the key of the state when a state is named). |
trigger.current_value |
The current value for this Z-Wave value (translated to a state name when possible). |
trigger.current_value_raw |
The raw current value for this Z-Wave value (the key of the state when a state is named). |
zwave_js.event
This trigger platform can be used to trigger automations on any Z-Wave JS controller, driver, or node event, including events that may not be handled by Home Assistant automatically. Refer to the linked Z-Wave JS documentation to learn more about the available events and the data that is sent along with it.
There is strict validation in place based on all known event types, so if you come across an event type that isn’t supported, please open a GitHub issue in the home-assistant/core repository.
Example automation trigger configuration
# Fires whenever the `interview failed` event is fired on the three devices (devices will be derived from device and entity IDs).
trigger:
  platform: zwave_js.event
  # At least one `device_id` or `entity_id` must be provided for `node` events. For any other events, a `config_entry_id` needs to be provided.
  device_id: 45d7d3230dbb7441473ec883dab294d4  # Garage Door Lock device ID
  entity_id:
    - lock.front_lock
    - lock.back_door
  config_entry_id:
  # `event_source` and `event` are required
  event_source: node   # options are node, controller, and driver
  event: "interview failed"  # event names can be retrieved from the Z-Wave JS docs (see links above)
  # `event_data` and `partial_dict_match` are optional. If `event_data` isn't included, all events of a given type for the given context will trigger the automation. When the `interview failed` event is fired, all argument live in a dictionary within the `event_data` dictionary under the `args` key. The default behavior is to require a full match of the event_data dictionary below and the dictionary that is passed to the event. By setting `partial_dict_match` to true, Home Assistant will check if the isFinal argument is true and ignore any other values in the dictionary. If this setting was false, this trigger would never fire because the dictionary always contains more keys than `isFinal` so the comparison check would never evaluate to true.
  event_data:
    args:
      isFinal: true
  partial_dict_match: true  # defaults to false
Available trigger data
In addition to the standard automation trigger data, the zwave_js.event trigger platform has additional trigger data available for use.
| Template variable | Data |
|---|---|
trigger.device_id |
Device ID for the device in the device registry (only included for node events). |
trigger.node_id |
Z-Wave node ID (only included for node events). |
trigger.event_source |
Source of event (node, controller, or driver). |
trigger.event |
Name of event. |
trigger.event_data |
Any data included in the event. |
Advanced installation instructions
If you are using Home Assistant Container, Home Assistant Core, or you don’t want to use the built-in Z-Wave JS Server add-on, you will need to run the Z-Wave JS server yourself, to which the Z-Wave integration will connect.
Running Z-Wave JS Server
This application provides the connection between your Z-Wave USB stick and Home Assistant. The Home Assistant Z-Wave integration connects to this server via a WebSocket connection. You need to run this Z-Wave JS server before you can use the integration.
There are multiple ways to run this server: The chart below illustrates Options 1 and 2, which are available for Home Assistant OS only.
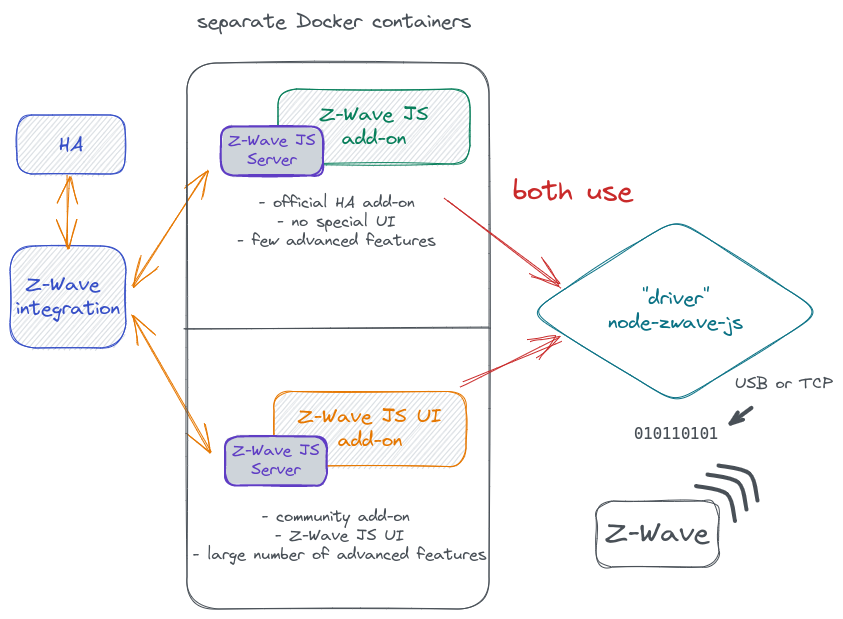
Option 1: The official Z-Wave JS add-on, as described above
This option is only available for Home Assistant Operating SystemHome Assistant OS, the Home Assistant Operating System, is an embedded, minimalistic, operating system designed to run the Home Assistant ecosystem. It is the recommended installation method for most users. [Learn more] (the recommended installation type) and Home Assistant SupervisedHome Assistant Supervised is the full Home Assistant ecosystem, without the Home Assistant Operating System. [Learn more] installations.
This add-on can only be configured via the built-in Z-Wave control panel in Home Assistant. If you followed the standard installation procedure, this is how you are running the Z-Wave JS server.
Option 2: The Z-Wave JS UI add-on installed from the community add-on store
This option is only available for Home Assistant Operating SystemHome Assistant OS, the Home Assistant Operating System, is an embedded, minimalistic, operating system designed to run the Home Assistant ecosystem. It is the recommended installation method for most users. [Learn more] (the recommended installation type) and Home Assistant SupervisedHome Assistant Supervised is the full Home Assistant ecosystem, without the Home Assistant Operating System. [Learn more] installations.
This add-on includes the Z-Wave JS Server as part of the Z-Wave JS UI application. The Z-Wave network can be configured via the built-in Z-Wave control panel in Home Assistant and alternatively via the Z-Wave control panel built into Z-Wave JS UI. It provides you with a full-fledged, attractive, and feature-complete UI to manage your Z-Wave nodes and settings, which may support more advanced use cases as development continues on the Z-Wave control panel.
Option 3: The Z-Wave JS UI Docker container
This is the recommended approach if you’re running Home Assistant Container. See the Z-Wave JS UI documentation for instructions.
This method provides the same server application and UI as the Z-Wave JS UI add-on. After installing the Docker image, make sure you enable the WS Server in the Home Assistant section of Settings page.
Option 4: Run the Z-Wave JS server yourself
This is considered a very advanced use case. In this case you run the Z-Wave JS Server or Z-Wave JS UI NodeJS application directly. Installation and maintaining this is out of scope for this document. See the Z-Wave JS server or Z-Wave JS UI GitHub repository for information.
Supported Z-Wave dongle. The Z-Wave controller dongle should be connected to the same host as where the Z-Wave JS server is running. In the configuration for the Z-Wave JS server, you need to provide the path to this stick. It’s recommended to use the /dev/serial-by-id/yourdevice version of the path to your stick, to make sure the path doesn’t change over reboots. The most common known path is /dev/serial/by-id/usb-0658_0200-if00.
Network keys are used to connect securely to compatible devices. The network keys consist of 32 hexadecimal characters, for example, 2232666D100F795E5BB17F0A1BB7A146 (do not use this one, pick a random one). Without network keys security enabled devices cannot be added securely and will not function correctly. You must provide these network keys in the configuration part of the Z-Wave JS Server.
For new installations, unique default keys will be auto-generated for you by the Z-Wave JS add-on. You can also generate those network keys in the Settings section of Z-Wave JS UI.
Make sure that you keep a backup of these keys in a safe place. You will need to enter the same keys to be able to access securely paired devices.
Installing and configuring the Z-Wave integration in Home Assistant
Once you have the Z-Wave JS server up and running, you need to install and configure the integration in Home Assistant (as described above).
If you’re running full Home Assistant with supervisor, you will be presented with a dialog that asks if you want to use the Z-Wave JS Supervisor add-on. You must uncheck this box if you are running the Z-Wave JS server in any manner other than the official Z-Wave JS add-on, including using Z-Wave JS UI add-on.
If you’re not running the supervisor or you’ve unchecked the above-mentioned box, you will be asked to enter a WebSocket URL (defaults to ws://localhost:3000). It is very important that you fill in the correct (Docker) IP/hostname here. For example for the Z-Wave JS UI add-on this is ws://a0d7b954-zwavejs2mqtt:3000.
FAQ: Supported devices and Command Classes
See the Z-Wave JS device database.
While there is support for the most common devices, some Command Classes are not yet (fully) implemented in Z-Wave JS. You can track the status here.
You can also keep track of the road map for the Z-Wave integration here.
FAQ: Installation and configuration
Which Z-Wave controller should I buy?
Z-Wave supports all known 500 and 700 series Z-Wave controllers. If you are just starting out, we recommend that you purchase a 700 series controller (with firmware updated to >=7.17.2).
For more information, see Supported Z-Wave dongles
Why was I (not) automatically prompted to install Z-Wave?
Some Z-Wave USB sticks can be auto-discovered, which can simplify the Z-Wave setup process. The following devices have been tested with discovery, and offer a quick setup experience; however, these are not all of the devices supported by Z-Wave:
| Device | Identifier | Vendor |
|---|---|---|
| Aeotec Z-Stick Gen5+ | 0658:0200 | https://aeotec.com/products/aeotec-z-stick-gen5/ |
| Nortek HUSBZB-1 | 10C4:8A2A | https://www.nortekcontrol.com/products/2gig/husbzb-1-gocontrol-quickstick-combo/ |
| Zooz ZST10 | 10C4:EA60 | https://www.getzooz.com/zooz-zst10-s2-stick/ |
| Z-WaveMe UZB | 0658:0200 | https://z-wave.me/products/uzb/ |
Additional devices may be discoverable, however only devices that have been confirmed discoverable are listed above.
What happened to Zwavejs2Mqtt or the Z-Wave JS to MQTT add-on?
Zwavejs2Mqtt was renamed Z-Wave JS UI in September 2022. They are synonymous with no difference between their capabilities.
Can I switch between the official Z-Wave JS add-on and the Z-Wave JS UI add-on?
You can, but you cannot run them both at the same time. Only one of them can be active at the same time.
How do I switch between the official Z-Wave JS add-on and the Z-Wave JS UI add-on?
Switching does not require renaming your devices.
-
Disable the Z-Wave integration. Do not remove the Z-Wave integration or you will lose all device and entity naming. This will automatically stop the official Z-Wave JS add-on.
-
Note your network security keys from the official add-on.
-
Install and configure the Z-Wave JS UI add-on, including setting the location of your Z-Wave device and the network security keys.
-
Add the Z-Wave integration again (even though it is still installed), and uncheck the “Use the Z-Wave JS Supervisor add-on”. Enter the correct address for the community add-on in the URL field in the next step.
-
Uninstall the official Z-Wave JS add-on.
-
Enable the Z-Wave integration.
What’s the benefit of using Z-Wave JS UI add-on over the official add-on?
The official add-on provides the Z-Wave Server in its bare minimum variant, just enough to serve the Home Assistant integration.
The Z-Wave JS UI project includes the Z-Wave JS Server for convenience but also provides a Z-Wave control panel and the ability to serve your Z-Wave network to MQTT. This allows you to use the control panel, and if you so choose, to also use MQTT at the same time. For example, some users may use MQTT to interact with Z-Wave from other devices, while the Home Assistant integration still works (as long as you keep the WS Server enabled in Z-Wave JS UI).
Z-Wave JS UI seems to provide discovery of Home Assistant devices on its own too, now I’m confused
Correct, the Z-Wave JS UI project existed before Home Assistant had plans to move to the Z-Wave JS Driver. You should use the integration for device discovery and not the MQTT discovery provided by Z-Wave JS UI.
Can I run Z-Wave JS UI only for the control panel and nothing else?
Sure, in the settings of Z-Wave JS UI, make sure to enable “WS Server” and disable “Gateway”.
Should I name my devices in Home Assistant, or in Z-Wave JS UI?
Ultimately, this is a personal decision. If you provide a name or location for a device in the Z-Wave JS UI, that name will be imported into Home Assistant when the integration is reloaded or Home Assistant is restarted. Any entity names, however, will not change if the device has already been set up by Home Assistant. Names set in Z-Wave JS UI will not overwrite changes that have already been made in Home Assistant.
Names set in Home Assistant will not import into Z-Wave JS UI.
Should I use Secure Inclusion?
That depends. There are two generations of Z-Wave encryption, Security S0, and Security S2. Both provide encryption and allow detecting packet corruption.
Security S0 imposes significant additional traffic on your mesh and is recommended only for older devices that do not support Security S2 but require encryption to work, such as door locks.
Security S2 does not impose additional network traffic and provides additional benefits. For example, end devices using S2 require the hub to report whether it has received and understood their reports.
By default, Z-Wave prefers Security S2, if supported. Security S0 is used only when absolutely necessary.
Where can I see the security keys in the Z-Wave JS add-on?
After the initial setup of the Z-Wave controller, you can view the security keys in the Z-Wave JS add-on. Go to Settings > Add-ons > Z-Wave JS and open the Configuration tab. You can now see the three S2 keys and the S0 key. The network security key is a legacy configuration setting, identical to the S0 key.
FAQ: Troubleshooting topics
I’m having a problem, what to do first?
Many reported issues result from RF interference caused by the system’s USB ports. This can manifest in many ways, including devices that won’t include at all, devices that won’t include securely, sensors with erroneous values (packets corrupted), delayed control of devices, or no ability to control devices.
All users are encouraged to use a USB extension cable to prevent such interference. Please try such a cable before opening an issue or requesting support on Discord. It will nearly always be the first troubleshooting step that we ask you to take anyway.
After ensuring you are using an extension cable, rebuild network routes.
The combination of these two steps corrects a large number of reported difficulties.
I have an Aeotec Gen5 controller, and it isn’t detected on my Raspberry Pi 4?
The first-generation Gen5 controller has a known bug when plugged into a Pi 4 and possibly other systems. Aeotec released the Gen5+ stick to correct this bug. Gen5 users can plug their sticks into a USB 2.0 hub in order to overcome the issue.
I do not see any entities created for my device in Home Assistant
Entities will be created only after the node is ready (the interview is completed). Also, note that some devices (like button remotes) do not create any entities but will only provide events when a button is pressed. See the events section on how to handle those events in your automations.
If you are certain that your device should have entities and you do not see them (even after a restart of Home Assistant Core), create an issue about your problem on the GitHub issue tracker.
My device does not automatically update its status in HA if I control it manually
Your device might not send automatic status updates to the controller. While the best advice would be to update to recent Z-Wave Plus devices, there is a workaround with active polling (request the status).
Z-Wave does not automatically poll devices on a regular basis. Polling can quickly lead to network congestion and should be used very sparingly and only where necessary.
-
We provide a
zwave_js.refresh_valueservice to allow you to manually poll a value, for example from an automation that only polls a device when there is motion in that same room. If you really need polling, you can enable this in Z-Wave JS UI but not in the official add-on. -
Z-Wave JS UI allows you to configure scheduled polling on a per-value basis, which you can use to keep certain values updated. It also allows you to poll individual values on-demand from your automations, which should be preferred over blindly polling all the time if possible.
My device is recognized as Unknown Manufacturer and/or some functions don’t work with the Z-Wave integration
When your device is not yet fully interviewed, this info will not yet be present. So make sure your device is interviewed at least once.
If the interview is complete, then the device does not yet have a device file for Z-Wave JS. Unlike other Z-Wave drivers, your device may very well work as intended even without such a file. If your device not fully supported, consider contributing the device configuration file.
How do I get a dump of the current network state?
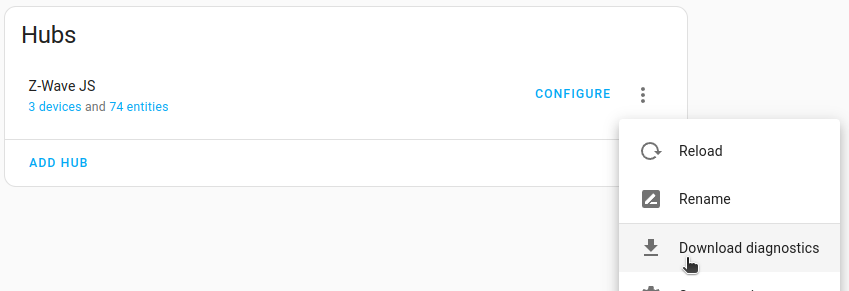
When trying to determine why something isn’t working as you expect, or when reporting an issue with the integration, it is helpful to know what Z-Wave JS sees as the current state of your Z-Wave network. To get a dump of your current network state, follow these steps:
- Go to Settings > Devices & Services.
- Select the Z-Wave integration. Then, select the three dots.
- From the dropdown menu, select Download diagnostics.
How do I address interference issues?
Many users have reported issues with interference when the USB stick was directly connected to the machine (proximity). If you are having issues, try to use a short USB 2.0 A (male to female) extension cord.
How do I access the Z-Wave logs?
The easy way
Enable Z-Wave JS logging
- Go to the Z-Wave integration panel:

- Select
Enable debug loggingon the left-hand side of the screen.
The log level will be set to debug for the integration, library, and optionally the driver (if the driver log level is not already set to verbose, debug, or silly), and all Z-Wave JS logs will be added to the Home Assistant logs.
Disable Z-Wave JS logging
- Go to the Z-Wave integration panel:
- Select
Disable debug loggingon the left-hand side of the screen.
The log level will be reset to its previous value for the integration, library, and driver, and the Home Assistant frontend will automatically send you the Z-Wave logs generated during that time period for download.
The advanced way
Enable Z-Wave JS logging manually, or via an automation
Set the log level for zwave_js_server to debug. This can either be done in your configuration.yaml in the logger section, or using the logger.set_level service. When the integration detects that the log level has been set to debug, it will also set the Z-Wave JS logs to debug if the level isn’t already verbose, debug, or silly and will include those logs in the Home Assistant logs. The Z-Wave JS logs can be found under the logger name zwave_js_server.server.
Disable Z-Wave JS logging manually, or via an automation
Set the log level for zwave_js_server to a level higher than debug. This can either be done in your configuration.yaml in the logger section, or using the logger.set_level service. The Z-Wave JS logs will no longer be included in the Home Assistant logs, and if the log level of Z-Wave JS was changed by the integration, it will automatically change back to its original level.
Z-Wave terminology
For some of the concepts, you may come across different terminology in Z-Wave than in Home Assistant. The table below provides equivalents for some of those terms.
| Z-Wave functionality | Home Assistant |
|---|---|
| inclusion | add |
| exclusion | remove |
| barrier operator | cover |
| window covering | cover |
| multilevel switch | represented by different entity types: cover, fan, dimmer, etc. |