Zigbee Home Automation
The Zigbee Home Automation (ZHA) integrationIntegrations connect and integrate Home Assistant with your devices, services, and more. [Learn more] allows you to wirelessly connect many off-the-shelf Zigbee-based devices directly to Home Assistant, using one of many compatible hardware adapters called Zigbee coordinators.
This integrationIntegrations connect and integrate Home Assistant with your devices, services, and more. [Learn more] currently supports the following device types within Home Assistant:
- Alarm control panel
- Binary sensor
- Button
- Climate (beta)
- Cover
- Device tracker
- Fan
- Light
- Lock
- Number (analog input/output)
- Select
- Sensor
- Siren
- Switch
- Update
Introduction
The ZHA integration is a hardware-independent Zigbee gateway implementation that can replace most proprietary Zigbee gateways (or bridges, hubs, or controllers). ZHA creates a single Zigbee network to which you can add most Zigbee-based devices.
ZHA uses an open-source Python library called zigpy, so any coordinator that is compatible with zigpy can be used with ZHA. Review compatible hardware recommendations before purchasing Zigbee devices.
Zigbee terminology
- Zigbee network: A mesh-network of devices with low-power digital radios using a low-bandwidth communication protocol.
- Zigbee coordinator: A hardware radio adapter (typically a USB dongle) that plugs directly into the same computer running your Home Assistant installation.
- Zigbee router device: A hardware device that is always mains-powered (AC) such as outlets or fans.
- Zigbee end device: A hardware device that is typically battery-powered (DC) such as remotes or motion sensors.
- Zigbee group: A collection of two or more Zigbee devices of the same type, different from Home Assistant’s Groups.
Zigbee concepts
- A Zigbee network can have only one Zigbee coordinator.
- The Zigbee coordinator can have multiple Zigbee router devices or Zigbee end devices connected.
- Each Zigbee router device can have multiple Zigbee end devices connected to it.
- A Zigbee device can only be connected to a single Zigbee network.
- Zigbee networks depend heavily on having multiple Zigbee Router devices to expand coverage and increase device capacity.
- Router devices help pass messages to other nearby devices in the Zigbee network and therefore can improve range and increase the number of devices you can add.
Compatible hardware
The hardware-independent design of this integration provides support for many Zigbee coordinators available from different manufacturers, as long as the coordinator is compatible with the zigpy library.
Recommended Zigbee radio adapters and modules
- Silicon Labs EmberZNet based radios using the EZSP protocol (via the bellows library for zigpy)
- Home Assistant Connect ZBT-2 (EFR32MG24-based USB adapter)
- Home Assistant Connect ZBT-1 (EFR32MG21-based USB dongle)
- Home Assistant Yellow with integrated MGM210P radio, which is based on the EFR32MG21
- ITead SONOFF Zigbee 3.0 USB Dongle Plus Model “ZBDongle-E” (EFR32MG21 variant)
- SMLIGHT SLZB-07 (EFR32MG21-based USB dongle)
- Texas Instruments based radios (via the zigpy-znp library for zigpy)
- dresden elektronik deCONZ based Zigbee radios (via the zigpy-deconz library for zigpy)
Other supported but not recommended Zigbee radio adapters or modules
The following hardware is supported, but not recommended. Specific models and details are noted where available in each section.
List of hardware that is not recommended
-
It is not recommended to run a coordinator via Serial-Proxy-Server (also called Serial-to-IP bridge or Ser2Net remote adapter) over:
- Wi-Fi,
- WAN, or
- VPN
-
The coordinator requires a stable, local connection to its serial port interface without drops in communication with the Zigbee gateway application running on the host computer.
-
Serial protocols used by the coordinator do not have enough robustness, resilience, or fault tolerance to handle packet loss and latency delays that can occur over unstable connections.
Silicon Labs EmberZNet based radios using legacy hardware using the EZSP protocol (via the bellows library for zigpy)
-
Elelabs Zigbee USB Adapter/POPP ZB-Stick
- It is suggested to upgrade the EmberZNet NCP application firmware
-
Elelabs Zigbee Raspberry Pi Shield
- It is suggested to upgrade the EmberZNet NCP application firmware
-
ITead Sonoff ZBBridge
- Note: Wi-Fi-based bridges are not recommended for ZHA with EZSP radios.
- These first need to be flashed with Tasmota firmware and Silabs EmberZNet NCP EZSP UART Host firmware to use as Serial-to-IP adapter
-
Nortek GoControl QuickStick Combo Model HUSBZB-1 (Z-Wave & Zigbee Ember 3581 USB Adapter)
- It is suggested to upgrade the EmberZNet NCP application firmware
- Bitron Video/Smabit BV AV2010/10 USB-Stick with Silicon Labs Ember 3587
- Telegesis ETRX357USB/ETRX357USB-LR/ETRX357USB-LRS+8M
- These first need to be flashed with other EmberZNet firmware
Texas Instruments based radios using legacy hardware (via the zigpy-znp library for zigpy)
-
CC2538 USB stick, module, or dev board hardware flashed with Z-Stack coordinator firmware
- This is no longer recommended as it can only run deprecated (old/end-of-life) firmware.
-
CC2530/CC2531 USB stick, module, or dev board hardware flashed with Z-Stack coordinator firmware
- This is no longer recommended as it uses deprecated hardware and very old, end-of-life firmware.
- This will not work properly if the Zigbee network has more than 15-20 devices.
dresden elektronik deCONZ based Zigbee radios using legacy hardware (via the zigpy-deconz library for zigpy)
- ConBee II (a.k.a. ConBee 2) USB adapter from dresden elektronik
- RaspBee II (a.k.a. RaspBee 2) Raspberry Pi Shield from dresden elektronik
- ConBee USB adapter from dresden elektronik
- RaspBee Raspberry Pi Shield from dresden elektronik
Digi XBee Zigbee based radios (via the zigpy-xbee library for zigpy)
-
Digi XBee Series 3 (xbee3-24) and Digi XBee Series S2C modules
- It is suggested to upgrade XBee Series 3 and S2C to newest firmware using XCTU
-
Digi XBee Series 2 (S2) modules
- These first need to be flashed with Zigbee Coordinator API firmware
ZiGate based radios (via the zigpy-zigate library for zigpy and require firmware 3.1d or later)
If you find an opportunity to improve this information, refer to the section on how to add support for new and unsupported devices.
Configuration requirements
Be sure to connect a compatible radio module and restart Home Assistant before proceeding with configuration.
ZHA will automatically create a Zigbee network once configured with a Zigbee coordinator; you can then add compatible devices.
It is strongly encouraged to review the guidance for Zigbee interference avoidance and network range/coverage optimization.
Configuration
To add the Zigbee Home Automation hub to your Home Assistant instance, use this My button:

Zigbee Home Automation can be auto-discovered by Home Assistant. If an instance was found, it will be shown as Discovered. You can then set it up right away.
If it wasn’t discovered automatically, don’t worry! You can set up a manual integration entry:
-
Browse to your Home Assistant instance.
-
In the bottom right corner, select the
Add Integration button. -
From the list, select Zigbee Home Automation.
-
Follow the instructions on screen to complete the setup.
- In the popup dialog, select the Serial Device Path from the detected options on your system.
- Choose the one to which your radio is connected.
- Select Submit.
- After submitting, the integrationIntegrations connect and integrate Home Assistant with your devices, services, and more. [Learn more] will try to detect the radio type automatically.
- If unsuccessful, you will need to manually set your radio type:
- Choose your Radio Type:
- ezsp: Silicon Labs EmberZNet protocol (for example, Home Assistant ZBT-1 or ZBT-2, Elelabs, HUSBZB-1, Telegesis)
- deCONZ: dresden elektronik deCONZ protocol (for example, ConBee I/II, RaspBee I/II)
- znp: Texas Instruments (for example, CC253x, CC26x2, CC13x2)
- zigate: ZiGate Serial protocol (for example, ZiGate USB-TTL, PiZiGate, ZiGate WiFi)
- xbee: Digi XBee ZB Coordinator Firmware protocol (for example, Digi XBee Series 2, 2C, 3)
- Select Submit to proceed to the next step.
- Choose your Radio Type:
- Enter the Serial device path:
- Most devices need at the very least the serial device path, such as
/dev/ttyUSB0, but it is recommended to use the device path from the/dev/serial/by-idfolder (for example,/dev/serial/by-id/usb-Silicon_Labs_HubZ_Smart_Home_Controller_C0F003D3-if01-port0). - A list of available device paths can be found in Settings > System > Hardware > dot menu > All Hardware.
- Most devices need at the very least the serial device path, such as
- Set the Port speed (not applicable for all radios).
- Set the Data flow control (not applicable for all radios).
- Press Submit.
- If unsuccessful, an error will be displayed in the popup.
- An error is likely if Home Assistant can’t access the USB device or your device is not up to date.
- Refer to Troubleshooting below for more information.
ZiGate or Sonoff ZBBridge devices
If you use a ZiGate or Sonoff ZBBridge device, you need additional configuration for usb_path.
Additional ZBBridge config
- ZiGate USB TTL or DIN:
/dev/ttyUSB0orautoto auto discover the zigate - PiZigate:
pizigate:/dev/ttyS0 - Wi-Fi ZiGate:
socket://[IP]:[PORT](for example,socket://192.168.1.10:9999) - Sonoff ZBBridge:
socket://[IP]:[PORT](for example,socket://192.168.1.11:8888)
Global options
There are a few global options available once ZHA has been configured. To access these settings, go to Settings > Zigbee and select Options.
The options are as follows:
When a new device joins the network, it performs an identify procedure (such as blinking) so you can locate it. Turn this off if you are adding many devices in bulk and don’t need the visual feedback, or if a particular device’s identify behavior is disruptive (for example, a siren that beeps). Default: on.
The default transition time (in seconds) used when changing light state. Set to 0 to disable transitions. Increase this (for example, to 1 or 2) if you want all lights to fade in and out by default, without having to set a transition on every automation. Default: 0.
For older non-Zigbee 3.0 lights, this allows a smooth transition from an off-state to a new color or brightness level, without first showing the old color. Enable this if you have older bulbs (such as older IKEA or Philips bulbs) that briefly flash their previous color when turning on with a transition. Only enable this option if absolutely necessary. If multiple lights are turned on at the same time, this can lead to temporary network congestion. Default: off.
Prevents the brightness slider from jumping to an intermediate value while a light is transitioning. This avoids a confusing visual flicker in the UI when turning lights on with a transition effect. Disable this if you are debugging light behavior and want to see the actual intermediate brightness values during a transition. Default: on.
When you turn on a ZHA group light, all group members optimistically update to the on state, instead of waiting to be polled. Disable this if you have unreliable bulbs in a group that sometimes don’t respond, so the UI reflects the actual state rather than an assumed state. Default: on.
The time (in seconds) after which a mains-powered device with no activity is considered unavailable. Set to 0 to disable. Lower this value (for example, to 3600 (1 hour)) if you want faster detection when a plug or bulb loses power. Default: 7200 (2 hours).
The time (in seconds) after which a battery-powered device with no activity is considered unavailable. Set to 0 to disable. Raise this for sleepy sensors (such as door or temperature sensors) that only report when triggered, to prevent them from repeatedly going unavailable. Lower it if you want quicker notification when a battery runs out. Default: 21600 (6 hours).
About network information
The network information page provides details about your Zigbee network and coordinator. To open it, go to Settings > Zigbee and select Network information.
The following information is shown:
-
Channel: The Zigbee channel currently in use by the network. Valid channels are 11 to 26 (all in the 2.4 GHz band). This is the only field you can change. To edit it, select the pencil
icon. - PAN ID: The 16-bit Personal Area Network identifier of your Zigbee network. This value uniquely identifies the network among nearby Zigbee networks.
- Extended PAN ID: The 64-bit extended version of the PAN ID. This value is used to uniquely identify the network across longer distances and more devices.
- Coordinator IEEE: The IEEE 802.15.4 hardware address (MAC address) of the Zigbee coordinator. This address is fixed and unique to the coordinator hardware.
-
Radio type: The Zigbee radio stack used by the coordinator. Common values are
ezsp(Silicon Labs),znp(Texas Instruments),deconz(ConBee/RaspBee),zigate, andxbee. -
Serial port: The path to the serial device the coordinator is connected to, for example,
/dev/ttyUSB0or asocket://URL for network-connected adapters. -
Baudrate: The communication speed of the serial connection in bits per second (for example,
115200). This field is only shown for direct serial connections and is hidden for network/socket-based (Ethernet) adapters.
Defining the Zigbee channel to use
The best practice is to not change the Zigbee channel from the ZHA default.
Before changing the Zigbee channel on an existing network, review the following sections on this page:
- Best practices to avoid pairing/connection difficulties
- Zigbee interference avoidance and network range/coverage optimization
These sections both provide helpful advice on improving your Zigbee network performance.
To change the Zigbee channel
-
Go to Settings > Zigbee.
-
Select Network information.
-
To edit the Zigbee channel, select the pencil
. -
Select the desired Zigbee channel from the dropdown menu.
-
Smart: scans all of the channels and then picks the best one, preferring
15,20,25over all other channels.- This is a one-time operation. It does not continuously monitor the channels and change the channel if interference is detected.
- This is most likely the best option. Only change it if you have a specific reason to do so.
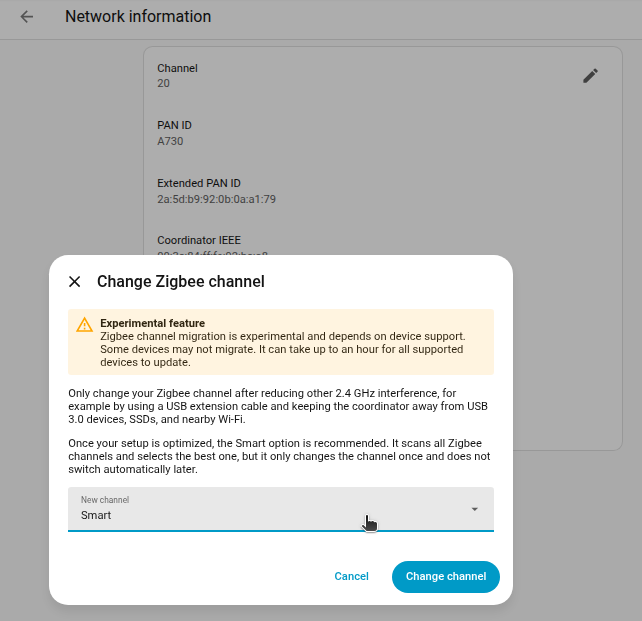
-
Smart: scans all of the channels and then picks the best one, preferring
-
To confirm, select Change channel.
-
It might take up to an hour for all devices to reconnect to the new channel.
- To check the status, take a look at the visualization of the Zigbee network topology.
- To speed up this process, power cycle your Zigbee end devices.
Troubleshooting Zigbee channels
The related troubleshooting segments mentioned above will, among other things, inform that if you have issues with overlapping frequencies between Wi-Fi and Zigbee, then it is usually better to first only try changing and setting a static Wi-Fi channel on your Wi-Fi router or all your Wi-Fi access points (instead of just changing to another Zigbee channel).
MetaGeek Support has a good reference article about channel selection for Zigbee and WiFi coexistence.
About Zigbee channels
The Zigbee specification standards divide the 2.4 GHz ISM radio band into 16 Zigbee channels (that is, distinct radio frequencies for Zigbee). For all Zigbee devices to be able to communicate, they must support the same Zigbee channel (that is, the Zigbee radio frequency) that is set on the Zigbee Coordinator as the channel to use for its Zigbee network. Not all Zigbee devices support all Zigbee channels. Channel support usually depends on the age of the hardware and firmware, as well as on the device’s power ratings.
The general recommendation is to only use channels 15, 20, or 25 to avoid interoperability problems with Zigbee devices. Not only because there is less chance of Wi-Fi networks interfering too much with the Zigbee network on other channels, but also because not all Zigbee devices support all channels.
Modifying the device type
As not all device manufacturers follow the Zigbee standard, at times a device can be incorrectly classified. For example, a switch could be classified as a light.
To correct the device type, also called domain, add the following to your configuration.yamlThe configuration.yaml file is the main configuration file for Home Assistant. It lists the integrations to be loaded and their specific configurations. In some cases, the configuration needs to be edited manually directly in the configuration.yaml file. Most integrations can be configured in the UI. [Learn more] and restart Home Assistant:
zha:
  device_config:
    84:71:27:ff:fe:93:17:24-1:    # format: {ieee}-{endpoint_id}
      type: "switch"              # corrected device type
{ieee} is the lowercase device hardware address which can be read from the Home Assistant UI when looking at Device info. From device info, you can find the {endpoint_id} by viewing the Zigbee device signature.
OTA updates of Zigbee device firmware
The ZHA integration can perform OTA (over-the-air) firmware updates of Zigbee devices. This feature is enabled by default. As it uses standard Update entities in Home Assistant, users will get a UI notification if and when an OTA firmware update is available for a specific device, with an option to initiate the update or ignore that specific update for the device.
To see OTA updates for a device, it must support OTA updates and firmware images for the device must be publicly provided by the manufacturer. ZHA currently only includes OTA providers for a few manufacturers that provide these updates publicly.
Included manufacturers:
- IKEA
- Inovelli
- Ledvance/OSRAM
- Sonoff/iTead
- Third Reality
Before updating a device, you should search for any disadvantages or if you even need to install an available update. Some firmware updates can break features you might use (for example, group binding for IKEA devices). Some updates might also require changes to ZHA. In rare cases, you can even brick devices by installing a firmware update.
Advanced OTA configuration
OTA for a few manufacturers is enabled by default, currently Ledvance, Sonoff, Inovelli, and ThirdReality. Other manufacturers are supported but disabled by default because their updates may change or remove device functionality, may require you to reconfigure devices, or are contributed by the community and may be minimally tested.
Refer to the zigpy documentation for OTA configuration for more information on additional OTA providers.
Adding devices
When adding devices, review the following sections on this page:
- Best practices to avoid pairing/connection difficulties
- Zigbee interference avoidance and network range/coverage optimization
These sections both provide helpful advice on improving your Zigbee network performance.
To add a new Zigbee device:
- Go to Settings > Zigbee.
- To start a scan for new devices, on the bottom right corner of the screen, select Add device.
- Reset your Zigbee devices to factory default settings according to the device instructions provided by the manufacturer (for example, turn lights on and off up to 10 times; switches usually have a reset button or pin). It might take a few seconds for the devices to appear. You can select Show logs for more verbose output.
- Once the device is found, it will appear on that page and will be automatically added to your devices. You can optionally change its name and add it to an area (you can change this later). You can search again to add another device, or you can go back to the list of added devices.
Using router devices to add more devices
Most mains-powered devices, such as many always-powered wall plugs or light bulbs in your Zigbee network, will automatically act as a Zigbee router device (sometimes also referred to as a Zigbee “signal repeater” or “range extender”).
Because Zigbee should use a wireless mesh network to be effective, you will need to add Zigbee router devices to increase the number of Zigbee devices that can be used in your Zigbee network, both in the total number of devices that can be added as well as the total range and coverage of the network. Some Zigbee router devices do a much better job at routing and repeating Zigbee signals and messages than some other devices. You should not have a setup where Zigbee router devices (for example, light bulbs) are often powered off. Zigbee router devices are meant to be always available.
All Zigbee coordinator firmware will only allow you to directly connect a certain number of devices. That limit is set for two reasons; firstly, to not overload the Zigbee coordinator, and secondly, to encourage your Zigbee network to quickly begin to use a “mesh networking” topology instead of only a “star network” topology.
The total number of Zigbee devices that you can have on a Zigbee network depends on a few things. The Zigbee coordinator hardware and its firmware only play a larger role in Zigbee networks with a lot of devices. More important is the number of directly connected devices (“direct children”) versus the number of routers that are connected to your Zigbee coordinator. The Zigpy library, which the ZHA integrationIntegrations connect and integrate Home Assistant with your devices, services, and more. [Learn more] depends on, has an upper limit that is 32 direct children, but you can still have hundreds of Zigbee devices in total connected indirectly through routes via Zigbee router devices.
In this theoretical example, a CC2652-based Zigbee coordinator has three CC2530 Zigbee router devices for a total limit of 77 devices:
- Coordinator: 32 Zigbee End devices - 3 routers = 29
- Router one: + 16 devices
- Router two: + 16 devices
- Router three: + 16 devices
- Total device limit = 77 devices
In practice, you will likely need to add a lot more Zigbee router devices than in this example to extend the coverage of the network to reach that many devices.
Discovery via USB or Zeroconf
Some devices can be auto-discovered, which can simplify the ZHA setup process. The following devices have been tested with discovery and offer a quick setup experience.
USB discovery devices
-
Bitron
-
Bitron Video/SMaBiT BV AV2010/10
- Identifier:
10C4:8B34
- Identifier:
-
Bitron Video/SMaBiT BV AV2010/10
-
ConBee
-
ConBee II
- Identifier:
1CF1:0030
- Identifier:
-
ConBee III
- Identifier:
0403:6015
- Identifier:
-
ConBee II
-
ITead
-
ITead SONOFF Zigbee 3.0 USB Dongle Plus V2 Model “ZBDongle-E” (EFR32MG21 variant)
- Identifier:
1A86:55D4
- Identifier:
-
ITead SONOFF Zigbee 3.0 USB Dongle Plus Model “ZBDongle-P” (CC2652P variant)
- Identifier:
10C4:EA60
- Identifier:
-
ITead SONOFF Zigbee 3.0 USB Dongle Plus V2 Model “ZBDongle-E” (EFR32MG21 variant)
-
Nortek
-
Nortek HUSBZB-1
- Identifier:
10C4:8A2A
- Identifier:
-
Nortek HUSBZB-1
-
slae.sh
-
slae.sh CC2652RB development stick
- Identifier:
10C4:EA60
- Identifier:
-
slae.sh CC2652RB development stick
-
SMLIGHT
-
SMLIGHT SLZB-07
- Identifier:
10C4:EA60
- Identifier:
-
SMLIGHT SLZB-07
-
Tube
-
Tube’s EFR32 Pro Ethernet/Serial Coordinator
- Identifier:
10C4:EA60
- Identifier:
-
Tube’s EFR32 Pro Ethernet/Serial Coordinator
-
ZigStar
-
ZigStar Stick (CC2652 + CH340B variant)
- Identifier:
1A86:7523
- Identifier:
-
ZigStar Coordinators
- Identifier:
1A86:7523
- Identifier:
-
ZigStar Stick (CC2652 + CH340B variant)
Zeroconf discovery devices
-
cod.m
-
cod.m Zigbee Coordinator
- Identifier:
czc._tcp.local.
- Identifier:
-
cod.m Zigbee Coordinator
-
SMLIGHT
-
SMLIGHT SLZB-06 POE Zigbee LAN WiFi USB Adapter
- Identifier:
slzb-06.local.
- Identifier:
-
SMLIGHT SLZB-06 POE Zigbee LAN WiFi USB Adapter
-
Tube
-
Tube’s CC2652P2 USB-powered Zigbee to Ethernet Serial Coordinator
- Identifier:
tube_zb_gw_cc2652p2.local.
- Identifier:
-
Tube’s CC2652P2 PoE-powered Zigbee to Ethernet Serial Coordinator
- Identifier:
tube_zb_gw_cc2652p2_poe.local.
- Identifier:
-
Tube’s EFR32 Based Zigbee to Ethernet Serial Coordinator
- Identifier:
tube_zb_gw_efr32.local.
- Identifier:
-
Tube’s CC2652P2 USB-powered Zigbee to Ethernet Serial Coordinator
-
XZG
-
XZG - Universal Firmware for Zigbee Gateway
- Identifier:
xzg.local.
- Identifier:
-
XZG - Universal Firmware for Zigbee Gateway
-
ZigStar
-
ZigStar UZG Universal Zigbee Gateway (UZG-01)
- Identifier:
uzg-01._tcp.local.
- Identifier:
-
ZigStar LAN/POE Coordinators
- Identifier:
zigstargw.local.
- Identifier:
-
ZigStar UZG Universal Zigbee Gateway (UZG-01)
Additional devices in the Compatible hardware section may be discoverable, however, only devices that have been confirmed discoverable are listed above.
List of actions
The Zigbee Home Automation integrationIntegrations connect and integrate Home Assistant with your devices, services, and more. [Learn more] provides the following actions. Each link below opens a dedicated page with examples, parameters, and a step-by-step UI walkthrough.
-
Clear a lock user code (
zha.clear_lock_user_code) Removes a user code from a slot on a Zigbee lock. -
Disable a lock user code (
zha.disable_lock_user_code) Disables a user code in a slot on a Zigbee lock. -
Enable a lock user code (
zha.enable_lock_user_code) Enables a user code in a slot on a Zigbee lock. -
Issue a Zigbee cluster command (
zha.issue_zigbee_cluster_command) Sends a command to a Zigbee cluster on a device. -
Issue a Zigbee group command (
zha.issue_zigbee_group_command) Sends a command to a Zigbee cluster on a group of devices. -
Permit devices to join the Zigbee network (
zha.permit) Opens the ZHA Zigbee network so new devices can join. -
Remove a device from the Zigbee network (
zha.remove) Removes a node from the ZHA Zigbee network. -
Set a lock user code (
zha.set_lock_user_code) Stores a user code in a slot on a Zigbee lock. -
Set a Zigbee cluster attribute (
zha.set_zigbee_cluster_attribute) Writes a value to a Zigbee cluster attribute on a device. -
Make a warning device squawk (
zha.warning_device_squawk) Emits a short audible and visible pulse on a Zigbee warning device. -
Start an alert on a warning device (
zha.warning_device_warn) Starts a siren and strobe alert on a Zigbee warning device.
For an overview of every action across all integrations, see the actions reference.
Zigbee groups and binding devices
ZHA supports the creation of Zigbee groups (different from Home Assistant’s Group integration), as well as binding devices to each other. Groups and device binding can be set up independently of each other, but they can be also used in combination (such as binding a device to another group of devices).
Groups
A Zigbee group is a collection of two or more Zigbee lights, switches, or fans. A Zigbee group can then be controlled using only one command/entity.
While using a native Zigbee group instead of Home Assistant’s Group integration can improve the visual responsiveness, the broadcast commands issued can flood the Zigbee network if issued repeatedly.
To create a Zigbee group
- Go to Settings > Zigbee.
- Choose Groups and select the Create group button.
- Enter a name for the group.
- Select which devices to include in the group:
- At least two devices must be added to a Zigbee Group before a group entity is created.
- The group should consist of products of the same device type (all lights, all switches, or all fans).
- To confirm, select Create group.
- You can now control all devices in the group with a single command or entity. For example, you can add a toggle to the dashboard to turn on/off all lights in the group.
Binding
Binding a Zigbee device attaches an endpoint from one device to an endpoint of another device (or group).
Commands sent between bound devices bypass ZHA (even when ZHA or Home Assistant are not working) and directly control the targeted device. Binding devices can also allow for faster response times and smoother control.
Before binding devices, note the following:
- ZHA binds remotes to the Zigbee coordinator by default to forward click events to Home Assistant.
- Some remotes can only be bound to a single target; you might need to unbind the remote from the coordinator before binding it to another target.
- All remotes have some upper limit as to the number of devices they can bind.
- Not all devices support binding, some only support binding groups, others only devices; refer to the device manufacturer’s or the community’s documentation to confirm features.
To manage bindings of a Zigbee device
This section only outlines how to manage bindings in general. It will not cover all use cases.
Prerequisites and steps can vary depending on the device type, manufacturer, and your desired end result.
- Go to Settings > Zigbee.
- Select Devices, then select the device you want to manage bindings for.
- In the three dots
menu next to the Reconfigure button, select Manage Zigbee device. - In the pop-up dialog, select the Bindings tab.
- Choose the device from the list of Bindable devices (or Bindable groups).
- If the remote is battery-powered or low-power, wake it by pressing a button immediately before sending a command.
- Confirm the Bind or Unbind action:
- To bind devices, select Bind (or Bind group).
- To unbind devices, select Unbind (or Unbind group).
Backups and migration
The ZHA integrationIntegrations connect and integrate Home Assistant with your devices, services, and more. [Learn more] performs automatic backups of your Zigbee network allowing you to restore/recover the network from a backup or migrate to a different Zigbee Coordinator (radio adapter).
After restoring a Home Assistant backup, you can reconfigure ZHA or migrate to a new Zigbee Coordinator without any loss of your settings or devices that were connected. This can be helpful if your current radio fails or a new radio adapter type/model comes out that you want to migrate to.
Manual backups can also be created from the configuration page under Network Settings.
Migrating to a new Zigbee adapter inside ZHA
ZHA supports migrating the Zigbee network between different Zigbee adapters based on chips from Silicon Labs, Texas Instruments, or ConBee/RaspBee if the backup was made from inside ZHA.
Prerequisites
Confirm you meet the following requirements before migrating:
- The previous adapter is used in the ZHA integrationIntegrations connect and integrate Home Assistant with your devices, services, and more. [Learn more] and not in deCONZ or Zigbee2MQTT.
- The radio type is one of the following:
- ezsp (Silicon Labs EmberZNet)
- znp (Texas Instruments Z-Stack ZNP)
- deCONZ (ConBee/RaspBee from dresden elektronik)
- Be sure it is running firmware 0x26700700 (from 2021-08-18) or later.
To migrate to a new Zigbee adapter inside ZHA:
You will not be able to control your existing Zigbee devices until they join the network after the migration. This can take a few minutes.
If some existing devices do not resume normal functions after some time, try power-cycling them to attempt rejoining to the network.
- Go to Settings > Zigbee.
- Select Migrate.
- Plug in the new Zigbee adapter.
- To minimize interference:
- Use a USB extension cable.
- Use a USB 2.0 port or a powered USB 2.0 hub.
- Keep the Zigbee adapter away from USB 3.0 devices.
- This video shows the effect of interference.
- To minimize interference:
- Reconfiguration of ZHA starts. Select Submit.
- An automatic backup will be performed.
- Under Migrate or change adapter settings, select Migrate to a new adapter.
- Select the new Zigbee adapter from the list of serial ports and select Submit.
- Choose what backup to use for migration:
-
Option 1: To use the backup that was created during this migration, select Migrate automatically (recommended).
- This is the quickest way to complete the migration.
-
Option 2: To restore a specific, older backup, select Advanced migration instead.
- This will let you select a backup of your choice.
-
Option 1: To use the backup that was created during this migration, select Migrate automatically (recommended).
- In the rare event the new radio requires overwriting the IEEE address (the unique MAC address), you will see the prompt for Overwrite Radio IEEE Address.
- Check the Permanently replace the radio IEEE address box and select Submit.
- Selecting this option is required for the migration process to complete successfully.
- Overwriting the IEEE address may take a while.
- Both the old and new Zigbee adapters now have the same Zigbee IEEE address.
- You should not operate the old adapter in the same area unless you change its Zigbee IEEE address.
- If you do not migrate the Zigbee IEEE address from the old Zigbee adapter, you will have to reconnect many of your devices to keep them working.
- The migration process is now complete.
- The old adapter is being reset.
- For combined Z-Wave and Zigbee adapters, like the HUSBZB-1 adapter, only the Zigbee radio portion is reset.
-
Info: You won’t be able to control the devices until they rejoin the network.
- Normally, they rejoin within one hour.
- You may be able to accelerate that process by power-cycling devices.
- You can now remove the old Zigbee adapter.
Troubleshooting
To help resolve any kinks or compatibility problems, report bugs as issues with debug logs.
Limitations
The list of ZHA limitations may not be exhaustive.
List of ZHA limitations:
ZHA only supports connecting a single dedicated Zigbee coordinator with a single Zigbee network:
- The Zigbee Coordinator cannot already be connected or used by any other application.
- Devices currently or previously connected to another Zigbee implementation will need to be reset to their factory default settings before they can be paired/joined to ZHA.
- Refer to each device manufacturer’s documentation for reset steps.
A Zigbee device can only be connected to a single Zigbee Coordinator (only one Zigbee gateway):
- This is a limitation in the Zigbee protocol specifications, governed by the CSA (Connectivity Standards Alliance), applying to all Zigbee implementations and not just the ZHA implementation.
Support for commissioning Zigbee 3.0 devices via “Install Code” or “QR Code” via the zha.permit action:
- Home Assistant’s user interface does not currently support scanning a QR code for Zigbee 3.0 secure provisioning for device pre-commissioning in ZHA’s UI (instead, you currently need to use the
zha.permitaction with the qr_code parameter).
ZHA does not currently support devices that can only use:
- The ZGP (“Zigbee Green Power”) profile:
- This is used in a few batteryless self-powered or energy harvesting devices, (such as Philips Hue Click, Philips Hue Tap, and some “Friends of Hue” partnership switches).
- The ZSE (“Zigbee Smart Energy”) profile:
- This is due to the “Zigbee SE” specification not being part of the standard Zigbee 3.0 specification and thus not implemented in most of the Zigbee protocol stacks that are commonly available Zigbee Coordinator radio adapters and modules.
Knowing which devices are supported
Home Assistant’s ZHA integrationIntegrations connect and integrate Home Assistant with your devices, services, and more. [Learn more] supports all standard Zigbee device types as defined by the CSA (Connectivity Standards Alliance, formerly the Zigbee Alliance).
There is therefore no official compatibility list of devices that will work out-of-the-box with the ZHA integrationIntegrations connect and integrate Home Assistant with your devices, services, and more. [Learn more].
Check out blakadder’s unofficial Zigbee Device Compatibility Repository.
This unofficial list contains independent community members’ reports (or device-specific pairing tips) for several home automation gateway/bridge/hub software (including open-source Zigbee implementations such as ZHA, Zigbee2MQTT, and Tasmota/Zigbee2Tasmota).
Anyone can help maintain the site by submitting device compatibility information to it.
Not all hardware manufacturers fully comply with the standard. This can include:
- Implementing unique (but non-standard) features,
- Not showing all expected entities within the Home Assistant integrationIntegrations connect and integrate Home Assistant with your devices, services, and more. [Learn more] overview.
- Showing no entities within Home Assistant at all.
If you’re comfortable writing Python code, you can work around such interoperability issues by adding conversion/translation code in custom device handlers. For more information, refer to How to add support for new and unsupported devices.
If a device will not join or pair at all, review the following sections on this page:
- Best practices to avoid pairing/connection difficulties
- Zigbee interference avoidance and network range/coverage optimization
These sections both provide helpful advice on improving your Zigbee network performance.
How to add support for new and unsupported devices
If your Zigbee device pairs/joins successfully with the ZHA integrationIntegrations connect and integrate Home Assistant with your devices, services, and more. [Learn more] but does not show all of the expected entities:
- Try to re-pair/re-join the device several times.
- Review the troubleshooting sections.
- Search for similar situations in the Home Assistant community forum or Discord chat server.
- Still not working? You might need a new custom ZHA device handler. This device handler adds exception handling code to ZHA to work around device-specific issues. To submit a device support request for a new custom ZHA device handler, see ZHA device handlers.
ZHA device handlers
For devices that do not follow the standard defined in the CSA’s ZCL (Zigbee Cluster Library), the ZHA integrationIntegrations connect and integrate Home Assistant with your devices, services, and more. [Learn more] relies on a project called “ZHA Device Handlers (also known as “zha-quirk”)”.
The project contains device-specific Python scripts called “quirks” that can resolve compliance and interoperability issues by implementing on-the-fly conversion of custom Zigbee configurations or by implementing manufacturer-specific features for specific devices.
Other Zigbee gateway solutions have similar concepts of using custom handlers/converters for non-standard devices, such as Zigbee2MQTT (and IoBroker) using zigbee-herdsman converters.
If you do not want to create a “quirk” yourself, you can submit a “device support request” as a new issue to the ZHA Device Handlers project repository on GitHub.
To submit a new device support request:
Without device support requests, the community of volunteer developers may not be aware that your specific Zigbee device is not working correctly in ZHA.
The project relies on volunteers; submitting a new device support request does not guarantee that someone will develop a custom quirk for ZHA.
- Sign in to GitHub.com (an account is required)
- Go to the ZHA Device Handlers project issues page
- Select New issue and follow the instructions.
- New device support requests require the device signature + diagnostic information.
- You may also need to actively help in further testing or provide additional information to the volunteering developers.
Best practices to avoid pairing/connection difficulties
If you experience problems pairing a device, verify that you follow best practices to avoid pairing/connection issues:
- Reduce network interference:
- Check that your setup and environment are optimized to avoid interference.
- Interference avoidance is an extremely important topic on its own. Review the tips in the separate section below about Zigbee interference avoidance and network range/coverage optimization.
- Strengthen your network:
- Check that you have enough Zigbee router devices (Zigbee signal repeaters or range extenders).
- If you do not have any, you should add additional mains-powered devices to serve as Zigbee routers.
- Aim to start with mains-powered devices before adding battery-operated devices.
- A “weak” Zigbee network mesh may prevent some devices from being paired (such as a device being too far from a Zigbee router or coordinator).
- Zigbee router devices are also needed to increase the maximum of devices that can be connected to your Zigbee mesh network.
- Some Zigbee devices are not fully compatible with all brands of Zigbee router devices.
- Xiaomi/Aqara devices known not to work with Zigbee router devices from Centralite, General Electrics, Iris, Ledvance/OSRAM, LIGHTIFY/Sylvania, Orvibo, PEQ, Securifi, and SmartThings/Samsung.
- Better results can usually be achieved by using mains-powered devices IKEA and Nue/3A Home or dedicated DIY routing devices based on Texas Instruments CC253x/CC26x2 and XBee Series 2/3 Zigbee radios.
- Plan your pairing:
- Try to pair Zigbee devices where you intend to use them:
- Avoid pairing next to the Zigbee coordinator if you intend to move its location afterward.
- Pairing a device next to the coordinator and moving it later can result in degraded connections.
- If the device you want to add has been previously paired to another network, you will likely need to manually factory-reset the device to add/pair it.
- Some battery-operated Zigbee devices are known to have problems with pairing if they have low battery voltage.
- Some people have reported replacing the battery on their newly received Xiaomi/Aqara devices solved pairing issues.
- Try to pair Zigbee devices where you intend to use them:
- Be patient:
- The pairing of some Zigbee devices may require multiple or repeated attempts.
- Some devices, such as those from Xiaomi/Aqara, may not be fully compliant with Zigbee standards and may therefore require many paring attempts over 10-20 minutes or longer.
Zigbee interference avoidance and network range/coverage optimization
Sources of interference for radios can lead to connection problems, errors in sending and receiving Zigbee messages or signals, and significant degradation in performance. Implementing some good practices can serve as a starting point to achieve better signal quality and reception, improved coverage, and extended range.
It is important to understand the known limitations of low-power/low-bandwidth 2.4 GHz digital radios to avoid issues caused by interference or poor placement of your Zigbee radio adapter or devices.
All electric devices/appliances, especially computers and computer peripherals, generate EMI/EMF/RMI (electromagnetic fields that cause electromagnetic interference). This is often called radio-frequency interference or signal noise, and it can interfere with signal transmissions over 2.4 GHz radios. It can partially degrade or even fully jam wireless communications between your Zigbee adapter and devices.
Examples of real-world interference sources include:
- Signal noise from USB 3.x ports,
- Unshielded USB 3.x devices,
- Non-shielded USB 3.x peripheral cables
- These are widely known to affect 2.4 GHz radio reception for low-power/low-bandwidth devices.
- You should always place your Zigbee adapter as far away as possible from any potential sources of EMI/EMF/RMI, preferably by using an adequately long shielded USB extension cable connected to a USB 2.0 port.
Zigbee relies on a concept of mesh networking with most mains-powered devices being “Zigbee Routers” that act as signal repeaters and range extenders. Collectively, they transmit data over long distances by passing data messages through the Zigbee network mesh of intermediate devices to reach more distant Zigbee devices.
To have a healthy Zigbee network, you need many Zigbee Router devices relatively close to each other to achieve good coverage and range.
Actions to optimize Zigbee Coordinator radio hardware
Common root causes of unreliable performance are often seen with outdated Zigbee Coordinator radio adapter hardware, limited by obsolete chips, bad antenna designs, or old/buggy firmware. You can improve most Zigbee setups by using a good Zigbee Coordinator radio adapter and maintaining it.
-
Buy and use a supported Zigbee Coordinator USB adapter based on newer/modern chip hardware.
- Consider a Zigbee Coordinator USB adapter with an external antenna for more flexibility.
-
Update to a later version of Zigbee Coordinator firmware on the existing radio adapter.
- Most manufacturers usually provide straightforward guides for updating the firmware.
-
Try different physical placement and orientations of the Zigbee Coordinator and its antenna.
- Optimal placement of the Zigbee adapter is close to the middle of the house as possible.
- Try placing Zigbee Coordinator at some distance away from walls, ceilings, and floors.
- Try different orientations of the Zigbee Coordinator adapter or its antenna.
While using an older Zigbee Coordinator radio adapter hardware might work, using obsolete hardware or old firmware can prevent reliable operation. It is also generally a good idea to upgrade Zigbee Coordinator firmware before troubleshooting any further if and when you run into problems with devices.
Actions to avoid or workaround EMI/EMF/RMI interference
Since all Zigbee Coordinator radio adapters are very sensitive/susceptible to all types of EMI/EMF/RMI you should always try to optimize the placement of the Zigbee Coordinator and avoid known sources of interference.
-
Use a long USB extension cable and place Zigbee Coordinator away from interference and obstacles.
- Ensure the USB extension cable is adequately shielded (thicker cables usually have better shielding).
- Place Zigbee Coordinator away from electrical wires/cables, power supplies, and household appliances.
- Extension cables also make it easier to try different orientations of the adapter or antenna.
-
Avoid USB 3.0 ports/computers/peripherals as they are known culprits of RFI/EMI/EMF disruption. (See Ref. 1 and 2).
- Make sure to only connect the Zigbee USB adapter to a USB 2.0 port (and not to a USB 3.x port).
- If a computer only has USB 3.x ports then buy and connect Zigbee Coordinator via a powered USB 2.0 hub.
-
Shield any unshielded computers/peripherals/devices by adding all-metal enclosures/chassis/casings.
- Use shielded USB cables for all external peripherals/devices, especially USB 3.x peripherals.
- Be aware that metal casings can decrease the performance of an internal/built-in Zigbee Coordinator.
-
Avoid Wi-Fi Routers and Wi-Fi Access Points, alternatively change the Wi-Fi channel or Zigbee channel.
- Place your Zigbee Coordinator away from any Wi-Fi access points and all other sources of Wi-Fi.
- Wi-Fi frequency ranges can overlap with Zigbee, see the section above on defining Zigbee channel use.
Problems upgrading Zigbee device firmware via OTA
Before upgrading any OTA firmware, it is recommended to install fresh batteries in the device. OTA firmware updates are power-intensive, and some devices check for a minimum battery level before starting the upgrade. These devices may refuse to initiate the update process if the battery level is too low. However, not all device firmware includes this check.
If Zigbee firmware upgrades do not start on a Zigbee End Device (that is, a battery-powered product), then note that you usually need to “wake up the device” (for example, trigger a state change or press a button if available) so that the device becomes awake and is thus able to receive commands to start the OTA upgrade. The reason for this is that battery-powered products are so-called “sleepy devices,” so they normally are asleep and only receive commands when the state of the device is changed.
If the upgrade still does not start, then try manually restarting the device by disconnecting the power/battery for a few seconds and try again; then again make sure to activate the device by triggering state change or pressing a button on it right before sending the update request. Sometimes, it also helps to try keeping the device awake by repeatedly pushing a button or triggering state change until you see the first “Updating… “ message in the user interface.
Be aware that OTAU (Over-The-Air Upgrade) of Zigbee devices typically takes around 10 minutes per device, if it takes longer then another common reason for Zigbee firmware upgrades not starting, taking a very long time, or even failing, is poor reception or not having a stable Zigbee network mesh. Take action to try to optimize your Zigbee network by avoiding radio frequency interference and adding many Zigbee Router devices (repeaters/extenders) to extend range and coverage. Try to follow all the best practice tips above in the Zigbee interference avoidance and network range/coverage optimization) section under troubleshooting.
Visualization of the Zigbee network topology and device links
To visualize device links in your Zigbee network topology, go to Settings > Zigbee and select Show map.
The network visualization can help to identify devices with poor connection (that is, low values on the link). You will need to look at the ZHA logs to find more detailed information required for troubleshooting.
The visualization shows multi-hop connections between your paired devices and their reported cumulative values of Received Signal Strength Indicator (RSSI) and Link Quality Indication (LQI).
The exact method in which these values are reported depends on the Zigbee network stack used on each device. LQI values can be modified at each step as the message propagates through the mesh networking matrix.
Why some links are missing in Zigbee network topology maps
Missing links between Zigbee end devices (often battery-powered devices) in the Zigbee network visualization map are common. They are generally not a sign of a faulty device if the device is still reporting state changes. This happens with sleepy Zigbee end devices and does not mean that the device is no longer connected.
Some end devices (for example, Xiaomi door sensors) sleep for an extended period, causing the parent Zigbee Router to remove them from its child table via a feature called router child aging. Since using child aging and removing them from the child table is a Zigbee 3.0 feature, this does not always occur because not all Zigbee router devices use child aging.
This is what causes devices to show a missing link. Even though the device is no longer in the child table, the end device can still communicate via the parent Zigbee router.
How to interpret RSSI and LQI values
Interpreting RSSI and LQI values can be complex, as metrics of network health and communication quality are provided by the devices themselves, and each device could get to its results in different ways. Unless you are a Zigbee specialist yourself or are guided by one, please ignore those values. They can be misleading.
It is important to not judge RSSI or LQI values on their own. When troubleshooting Zigbee messages that are being dropped, you must interpret the combination of both RSSI and LQI.
About RSSI (Received Signal Strength Indicator)
RSSI values are negative numbers in -dBm format ranging from 0 to -100 power ratio in decibels of the measured power referenced to one milliwatt. Lower negative values indicate less interference and a good signal.
The value is a measurement between the endpoint device and the first hop from that device. It may not necessarily show signal strength to the Zigbee Coordinator but instead could be showing signal strength to the nearest Zigbee Router device.
Generally:
- Values -60 and above (meaning -50, -40, and so on) indicate a strong signal and very low risk of losing messages.
- Values at -80 and below (meaning -85, -90, and so on) indicate a “noisy” environment and you may risk losing messages.
About LQI (Link Quality Index)
LQI (Link Quality Index) values are shown as positive numbers on a scale but can be very hard to interpret for Zigbee and not as useful as an individual metric for troubleshooting.
This is due to the Zigbee and IEEE 802.15.4 specifications not standardizing how to perform LQI measurements. The LQI value provided by the Zigbee devices is not measured using unified standards from all device manufacturers and Zigbee stacks, and LQI is often only a measure of the last-hop link quality which is not always useful information.
In theory, a positive high LQI value is better, and a lower LQI value is worse. Depending on your devices, that might not always reflect the reality. A good practice is to only include LQI with other types of metrics or data points, not as a standalone indicator.
Vendor-specific examples:
- Zigbee devices based on Silicon Labs EmberZNet stack use positive display numbers for LQI where higher values are better and lower values are worse.
- Texas Instruments Z-Stack computes LQI for each received packet from the raw Received Signal Strength Index (RSSI) by linearly scaling it between the minimum and maximum defined RF power levels for the radio that in effect provides an LQI value that is based on the strength of the received signal.
- This can be misleading in case you have a noisy environment with interference within the same frequency range as the RSSI value may be shown as increased even though the true link quality decreases.
- Other manufacturers and Zigbee stacks measure and calculate LQI values in another way.
Reporting issues
For more details on where and how to report issues, please refer to the Reporting issues page.
When reporting potential bugs related to the ZHA integration on the issues trackers, please always provide the following ZHA/Zigbee-specific information in addition to the information requested by the standard issue template:
- Debug logs for the issue, see debug logging.
- Exact model and firmware of the Zigbee radio (Zigbee Coordinator adapter) being used.
- If the issue is related to a specific Zigbee device, provide both the Zigbee Device Signature and the Diagnostics information.
- Go to Settings > Zigbee.
- Select Devices and from the list, select your device.
- In the three dots
menu next to the Reconfigure button, select Download diagnostics. - In the three dots
menu next to the Reconfigure button, select Manage Zigbee device. - Open the Signature tab and copy the signature.
- Go to Settings > Zigbee.
For troubleshooting, read the following sections on this page. They provide information on improving your Zigbee network performance.
Debug logging
To enable debug logging, follow the steps on Debug logs and diagnostics.
Add Philips Hue bulbs that have previously been added to another bridge
Philips Hue bulbs that have previously been paired to another bridge or gateway will not show up during search in ZHA to add a Zigbee device. Bulbs must be restored to their factory default settings.
You must factory-reset the device.
-
Simply “removing” them from your old bridge/gateway is not sufficient.
-
Be sure there are no other Hue bulbs nearby that have just been powered-on when using this method or you will risk resetting them in this process.
The following reset methods can be used (depending on the bulb version):
-
Zigbee remote:
- Steps are outlined below for either the Philips Hue Dimmer Switch or Lutron Connected Bulb Remote.
- The remote does not have to be paired with your previous bridge.
-
Bluetooth via Android app:
- Newer Philips Hue bulbs can reset via Bluetooth using the official Android app.
- This is an option even if the bulb is already paired to a bridge.
-
Hue Thief command-line tool:
- If you are comfortable using a command-line tool, you can use a third-party tool called Hue Thief.
- This requires an EZSP-based Zigbee USB stick.
Factory-reset using a Zigbee remote
Icons or button names may vary between generations of remotes. The remote used for resetting does not have to be paired with your previous bridge.
To reset using a remote:
- Identify which buttons will be used later to perform the reset (based on the brand of remote):
-
Philips Hue Dimmer Switch:
- Use the (I)/(ON) and (O)/(OFF) buttons.
- Button labels or icons may vary based on the generation of Hue remote.
-
Lutron Connected Bulb Remote:
- Use the 2nd (up arrow) and 4th (light off) buttons.
-
Philips Hue Dimmer Switch:
- Turn on the Hue bulb you want to reset.
- It is important that the bulb has just been powered on.
- Hold the remote near your bulb, closer than 10cm (about 4 inches).
- Press-and-hold both buttons identified in the first step and continue holding them once the bulb begins to blink.
- Expect to hold the buttons for about another 10 seconds while the bulb blinks.
- Lutron Connected Bulb Remote: The green LED on the remote should also begin to blink slowly.
- Release both buttons once the bulb turns off.
- Lutron Connected Bulb Remote: You can release the buttons after the green LED stops flashing on the remote.
- The bulb will turn back on immediately after to indicate the factory-reset is complete.
- The bulb is now ready for pairing to ZHA following normal steps for adding devices.
A green light on the top left of the Philips Hue Dimmer Switch remote indicates that your bulb has been successfully reset to factory default settings.
If you are unable to reset the bulb using a method above, remove it from the Hue Bridge (if it was re-discovered by the Hue Bridge) and try the procedure again.
ZHA Start up issue with Home Assistant or Home Assistant Container
On Linux hosts, ZHA can fail to start during Home Assistant startup or restarts because the Zigbee USB device is being claimed by the host’s modemmanager service. To fix this, disable the modemmanager on the host system.
To remove modemmanager from a Debian/Ubuntu host run this command:
sudo apt-get purge modemmanager
Can’t connect to USB device and using Docker
If you are using Docker and can’t connect, you most likely need to forward your device from the host machine to the Docker instance. This can be achieved by adding the device mapping to the end of the startup string or ideally using Docker compose.
Docker Compose
Install Docker-Compose for your platform (Linux - sudo apt-get install docker-compose).
Create a docker-compose.yml with the following data:
version: '2'
services:
  homeassistant:
    # customizable name
    container_name: home-assistant

    # must be image for your platform, this is the rpi3 variant
    image: homeassistant/raspberrypi3-homeassistant
    volumes:
      - <DIRECTORY HOLDING HOME ASSISTANT CONFIG FILES>:/config
      - /etc/localtime:/etc/localtime:ro
    devices:
      # your usb device forwarding to the docker image
      - /dev/ttyUSB0:/dev/ttyUSB0
    restart: always
    network_mode: host
EZSP error and other log messages
NCP entered failed state
When you see NCP entered failed state. Requesting APP controller restart in logs during normal operation, it indicates a drop in communication between ZHA and the serial interface of the Silabs EmberZNet Zigbee Coordinator.
The EZSP (EmberZNet Serial Protocol) interface used by Silicon Labs EmberZNet Zigbee Coordinator adapters requires a stable connection to the serial port. Therefore, it is not recommended to use a connection over Wi-Fi, WAN, or VPN.
Zigbee 3.0 support
Some coordinators may not support firmware capable of Zigbee 3.0, but they can still be fully functional and feature-complete for your needs.
It is up to hardware manufacturers to make such firmware available to them. If your coordinator was shipped with an older firmware version, you may be able to manually upgrade the firmware.