Kira
The kira integration is the main integration to integrate Keene Electronics IR over IP Kira modules with Home Assistant.
There is currently support for the following device types within Home Assistant:
- Remote (emit an IR code when instructed by Home Assistant)
- Sensor (trigger Home Assistant to do something when a particular IR signal is received)
Some models (original Kira and Kira128) can be configured to act as either a sensor or as a remote. They are also able act as both when set to Standalone mode. The wireless models are hardware specific so the receiver can only be integrated as a sensor and the transmitter can only be integrated as a remote.
If you are using two or more Kira devices for point to point IR transfer across your network they can continue to perform this function whilst also acting as a sensor or remote for Home Assistant.
Configuration
# Example configuration.yaml entry
kira:
Kira modules have no built-in mechanism for auto-discovery, so will need to be configured to send packets to Home Assistant. The process varies according to the module type. The documentation for each can be found on the manufacturer’s website.
Configuration options
# Example configuration.yaml entry
kira:
  sensors:
    - name: kira_sensor
      host: 0.0.0.0
      port: 65432
  remotes:
    - name: kira_remote
      host: 192.168.100.1
      port: 65432
If no sensors or remotes are specified, a sensor with default values will be added.
Entities
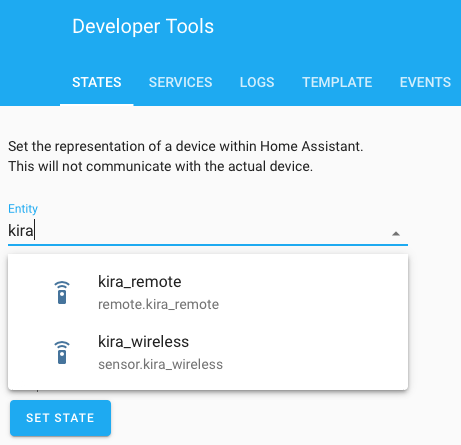
Restart Home Assistant and you should now have an entity called kira_remote (or whatever you called it). To check go to Developer Tools > States and start to type “kira” within the entity list.
IR codes
The first time the Kira integration is loaded, kira_codes.yaml will be created in the Home Assistant configuration directory.
# Example kira_codes.yaml entry
- name: LivingRoomTVOn
  code: "K 2322 228A 1126 023E 0227 023E 0207 023F 0658 025D 0207 023F 0227 0220 0227 023F 0222 023E 0222 0220 067D 023F 0658 0222 0227 025C 0640 023F 0658 025D 0640 023E 0658 025D 0640 023F 0222 025C 0207 0222 0678 023E 0207 023F 0227 023F 0222 025C 063B 025C 0640 023E 0660 023E 0658 025D 0207 0222 0678 023E 0660 0220 0678 023E 0202 025D 0207 023F 2000"
  type: kira
- name: HDMI_1
  code: "0000 006d 0026 0000 0155 00aa 0016 0015 0016 0015 0016 0040 0016 0015 0016 0015 0016 0014 0016 0015 0016 0015 0016 0040 0016 0040 0016 0015 0016 0040 0016 0040 0016 0040 0016 0040 0016 0040 0016 0015 0016 0040 0016 0040 0016 0040 0016 0014 0016 0015 0016 0040 0016 0040 0016 0040 0016 0015 0016 0014 0016 0014 0016 0040 0016 0040 0016 0014 0016 0015 0016 060b 0155 0055 0016 0e58 0155 0055 0016 00aa"
  device: LivingRoomTv
  type: pronto
- name: RGB
  code: "F709 DC24"
  device: LivingRoomTv
  type: nec
Configuration Variables
The type of this code. If this field is omitted, the type will be autodetected if possible.
Some manufacturers (e.g., Samsung) require an IR code to be sent a number of times in a row in rapid succession (usually 3). This doesn’t apply to the vast majority of devices, but it can be helpful if needed.
You now need to edit kira_codes.yaml to make sure it contains the codes you want the Kira to blast out as a remote or respond to as a sensor. Note that each time you edit and save the kira_codes.yaml file you need to restart Home Assistant for the changes to take effect, reloading the automations alone is not sufficient.
Example remote
Using the number 1 button from a Panasonic DVD player:
# Example kira_codes.yaml entry
- name: PanaOne
code: "K 2432 0D31 06EB 0196 01F3 0194 0538 01B4 01D3 01B4 01D1 01B4 01D3 01B4 01D3 01B3 01D3 01B3 01D3 01B4 01D3 01B3 01D3 01B3 01D3 01B4 01D3 01B3 01D3 01B4 0518 01B4 01D3 01B3 01D3 01B4 01D1 01B7 01D1 01B7 01D1 01B4 01D3 01B4 0518 01B4 01D3 01B4 01D1 01B7 0518 01B4 01D3 01B3 01D3 01B4 01D1 01B7 01D1 01B4 01D3 01B4 01D1 01B7 01D1 01B7 01D1 01B4 01D3 01B4 01D1 01B7 01D1 01B4 01D3 01B4 0518 01B4 01D3 01B4 01D1 01B7 01D1 01B7 01D1 01B4 01D3 01B4 01D1 01B7 01D1 01B4 01D3 01B4 01D1 01B7 01D1 01B4 0518 01B7 2000"
device: DVD
type: kira
Go to “Configuration” and select “Scripts” and click to add a new script. This is an example using the Panasonic code above.
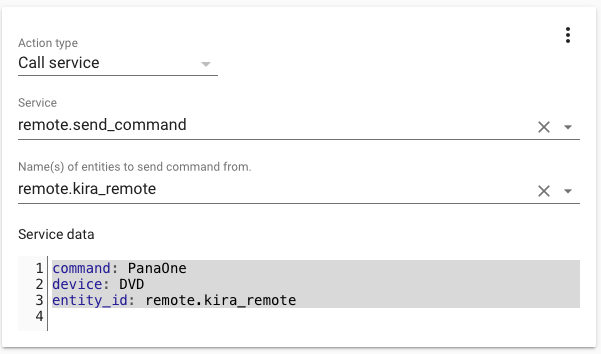
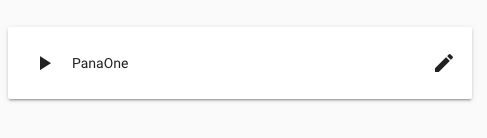
When you have filled in the data to match your YAML entry save the script and test it by clicking the play button next to the name you assigned. If all has gone well your Kira module should now blast this IR code and operate your equipment.
Once you know the code is working and procedure is correct you can use the facility in any number of ways, perhaps triggering the output based on sensor readings or by adding a number of buttons as a virtual remote in the Home Assistant front end.
Example sensor
Using the number 1 and 2 buttons from a Panasonic DVD player:
# Example kira_codes.yaml entry
- name: PanaOne
  code: "K 2432 0D31 06EB 0196 01F3 0194 0538 01B4 01D3 01B4 01D1 01B4 01D3 01B4 01D3 01B3 01D3 01B3 01D3 01B4 01D3 01B3 01D3 01B3 01D3 01B4 01D3 01B3 01D3 01B4 0518 01B4 01D3 01B3 01D3 01B4 01D1 01B7 01D1 01B7 01D1 01B4 01D3 01B4 0518 01B4 01D3 01B4 01D1 01B7 0518 01B4 01D3 01B3 01D3 01B4 01D1 01B7 01D1 01B4 01D3 01B4 01D1 01B7 01D1 01B7 01D1 01B4 01D3 01B4 01D1 01B7 01D1 01B4 01D3 01B4 0518 01B4 01D3 01B4 01D1 01B7 01D1 01B7 01D1 01B4 01D3 01B4 01D1 01B7 01D1 01B4 01D3 01B4 01D1 01B7 01D1 01B4 0518 01B7 2000"
  device: DVD
  type: kira

- name: PanaTwo
  code: "K 2432 0D30 06EE 0192 01F6 0192 053A 0192 01F3 0194 01F3 0194 01F3 0192 01F6 0192 01F3 0194 01F3 0192 01F6 0192 01F3 0194 01F3 0192 01F6 0192 01F3 0194 053A 0192 01F3 0194 01F3 0194 01F3 0194 01F3 0192 01F3 0194 01F3 0194 053A 0192 01F6 0192 01F3 0194 053A 0192 01F3 0194 01F3 0194 01F3 0194 01F3 0192 01F6 0192 01F3 0194 01F3 0192 01F3 0194 053A 0194 01F3 0194 01F3 0192 01F6 0192 053A 0192 01F3 0194 01F3 0194 01F3 0194 053A 0192 01F3 0194 01F3 0194 01F3 0194 01F3 0192 01F6 0192 01F3 0194 053A 0192 2000"
  device: DVD
  type: kira
Visit the Kira module configuration page and be sure to make the following changes according to your module use:
If this is to be the only use of the Kira module then set the TARGET IP address to be that of your Home Assistant installation. Uncheck the “auto find” option box if present. Click on save and reboot the module.
If the Kira module is to used in conjunction with another module be for IR over IP then leave (or set) the TARGET IP address to that of the other Kira module and in this instance set the COMPUTER IP address to the IP address of your Home Assistant installation. Check the option box to “send to alternative device” if present. Click on save and reboot to make the changes effective.
Note that once you changed the COMPUTER IP you will longer be able to use the Kira utiltiy on your PC to capture IR codes.
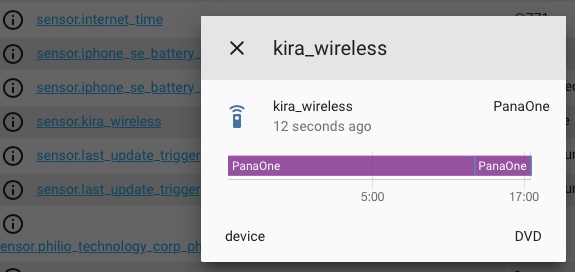
Next within Home Assistant go to Developer tools -> States and scroll down the list until you see sensor.kira_(whatever you called it). Aim your remote at the Kira device and press the buttons you stored the code for. If all is well you should see the state change to match the name you gave to the code.
Example automation using these IR codes to toggle a Sonoff plug.
# Example kira_sensor
- id: "1583339338363"
  alias: "Panasonic On"
  description: Turn on sonoff s20 relay
  trigger:
  - entity_id: sensor.kira_wireless
    platform: state
    to: PanaOne
  condition: []
  action:
  - device_id: 3628b4f34df943b3b721ead954cf3ca7
    domain: switch
    entity_id: switch.plug2_relay
    type: turn_on
- id: "1584035716024"
  alias: "Panaxonic Off "
  description: Turn off sonoff s20 relay
  trigger:
  - entity_id: sensor.kira_wireless
    platform: state
    to: PanaTwo
  condition: []
  action:
  - device_id: 3628b4f34df943b3b721ead954cf3ca7
    domain: switch
    entity_id: switch.plug2_relay
    type: turn_off
Code types
When creating an entry in kira_codes.yaml, a few different kinds of codes can be used.
- kira: This is the native wire protocol used by Kira modules. These can be captured using the free Kira utility available from the manufacturers website.
- pronto: Pronto codes are supported.
- nec: If the device uses NEC IR codes and the manufacturer has published them, they can be used here.
NOTE: NEC codes by themselves contain enough information to recognize an IR sequence, but not enough to reconstruct it. Codes of this type are receive-only (usable by sensors but not remotes).