Blog
2022.6: Gaining new insights!
 Franck Nijhof
👋 Hi there, Home Assistant Core 2022.6!
The June release brings insights! Insights on how you are doing with your energy usage, and insights into what all the devices in your home are up to!
But that is not all June has to bring. Besides this release and the release party, we have two additional events lined up for you this month!
On June 15, we will be hosting a Matter in Home Assistant workshop!
The workshop will show you what we’ve been up to and allow you to actually test it out by adding your first Matter device to your own instance! I’m excited for this one; I’ve ordered the parts listed in the workshop details for myself 🤗.
The day after, June 16, the second event: Let’s get loud!
This event is all about a new approach to home audio and music in an open solution that values the Open Home. Join this event for the latest news and audio demos from Home Assistant, ESPHome, Raspiaudio, and… something new!
Also: Hi Jacqueline Raaflaub! 👋 Jacqueline has joined Nabu Casa; she will help out with support and assist in moderating our community. We are excited to have you, and welcome!
Anyways, this Home Assistant Core release is a nice release with a couple of new features and lots of cleanups under the hood. Together with the upcoming events, this is going to be one exciting month!
Enjoy the release (and upcoming events)!
../Frenck
Read on →Matter in Home Assistant workshop announcement
 Paulus Schoutsen
The workshop instructions can be found here.
Home Assistant SkyConnect interest form
Matter is a new smart home standard that is scheduled to launch in fall. Across the industry, companies like Hue, IKEA, Google and Apple are working together to try and solve connectivity, ease of setup and interoperability once and for all. Development is happening as part of the Connectivity Standards Alliance (CSA) of which we (Nabu Casa) are also a participating member.

We’ve been hard at work on Matter support for Home Assistant. The Home Assistant Yellow hub will come with a radio that supports Thread, required to talk to low power Matter devices. We also have some tricks up our sleeves for devices used to run Home Assistant without such a radio, like Raspberry Pi’s. We want to show what we’re up to and allow you to test it out.
On June 15 @ 12:00 PDT / 21:00 CET we will be hosting our free Matter in Home Assistant workshop.
The workshop will be held on YouTube. Go to the listing to set a reminder to be notified when we start.
The workshop will contain two parts. In the first part we will talk about what Matter is and how it will work in Home Assistant. In the second part we will walk you through how to add experimental Matter support to your Home Assistant installation and integrate your first Wi-Fi based Matter device.
The workshop will be free but you will need a couple of things if you want to be able to follow along with the second part:
- Home Assistant OS 8.0 or newer, 64-bit version only (x86-64 or aarch64). Matter relies on an add-on and Bluetooth.
- Home Assistant Community Store installed
- Espressif ESP32-C3-DevKitM-1 ($9 @ Mouser, €17 @ Conrad) or M5Stamp C3 ($6 @ M5Stack)
- Bluetooth. If you use a Raspberry Pi to run Home Assistant you’re set. If you have a Home Assistant Blue or another device without Bluetooth, get a Bluetooth USB adapter that is supported by Home Assistant OS (like this one).
Even if you can’t follow along, it will still be an informative session!
It is possible to get the experimental Matter support working with other Home Assistant installation methods and other dev kits, but we won’t be covering those in our workshop.
Home Assistant OS Release 8
 Stefan Agner
Home Assistant OS 8.0 stable is available now!
Highlights:
- Use of GRUB2 for UEFI based systems
- Support for additional Wi-Fi and Bluetooth devices
- New image: Generic AArch64 for UEFI based AArch64 VMs and boards
- New image: Home Assistant Yellow
For existing installations, no manual intervention is needed! You can safely update without reading these rather technical release notes.
Table of contents
Operating System Changes
GRUB2 for UEFI based systems
For Generic x86-64, OVA and the new Generic AArch64 Home Assistant uses GRUB2 as boot loader now. GRUB2 (GRand Unified Bootloader) is the de-facto standard boot loader used by most Linux distributions. The main reason for switching from Barebox to GRUB2 was the missing AArch64 UEFI boot support in Barebox. We also expect GRUB2 to be more stable especially on Desktop style x86-64 systems as it gets used by much more users since generic Linux distributions use GRUB2. Although, we actually hit a bug in GRUB2 during the RC phase, let’s hope this was a one-off. 🤞
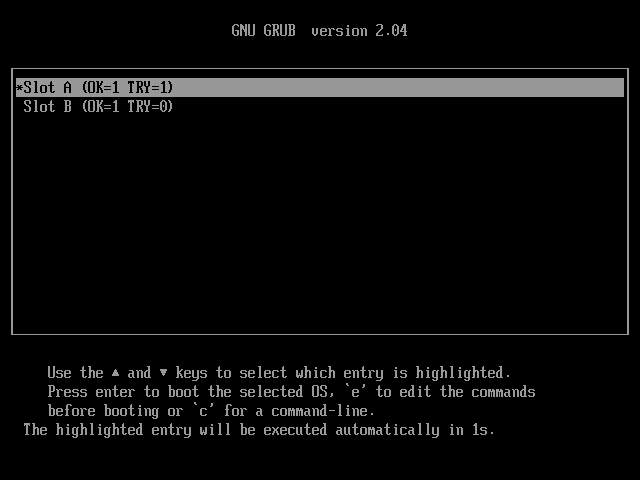
The boot menu shows the two boot slots. Typically you don’t have to change selection here, unless you intentionally want to boot the previously installed Home Assistant OS version.
Note: Upgrading from any version 7.x is safe, but we recommend upgrading from the last version of the previous major release. This is also the best tested upgrade path. From any release with GRUB2 it is only safe to downgrade to 7.6! Downgrading to releases before 7.6 can be done by downgrading to 7.6 first.
Under the Hood
Under the hood, the OS was updated to the latest upstream Linux 5.15 kernel as well as Buildroot 2022.02.1. The latest Buildroot release brings new versions of various core components like systemd 250, NetworkManager 1.34.0 and Docker 20.10.14.
Additional networking drivers and settings prepare Home Assistant OS to host the OpenThread Border Router add-on.
Other Changes
- IP set support for advanced firewalling (also used by the OTBR add-on).
- Support for NTP configuration via DHCP.
- Google Coral support is now using Google’s latest driver. This enables additional Coral device support such as PCI Dual Edge TPU.
- Legacy wext backend for wpa_suppilcant is now enabled to support more Wi-Fi devices.
Device Support
Raspberry Pi
All Raspberry Pi versions use the latest LTS Linux Kernel 5.15 and firmware (tag 1.20220331) from the Raspberry Pi team. These are the same versions as the Raspberry Pi OS is using currently.
Home Assistant Yellow
This is the first release that supports Home Assistant Yellow. Since Home Assistant Yellow uses the Raspberry Pi Compute Module 4, the support is based on the regular Raspberry Pi support currently. The Yellow image is using the same kernel and firmware version. The Yellow board also supports booting directly off of an NVMe device for those using a CM4 Lite (without eMMC storage).
Generic x86-64
Besides the move to GRUB2 Generic x86-64 received quite some additional device support. The Wi-Fi devices 3945ABG/BG/4965AGN and 22000 series are now supported.
Other Changes:
- Support 32-bit UEFI boot. This is required by older Intel Atom systems. Note that only the boot loader is 32-bit, everything else uses the same 64-bit binaries as 64-bit UEFI boot.
- Driver and firmware for Broadcom BNX2/BNX2X network interfaces are included.
Generic AArch64 support
@Doridian contributed support for generic AArch64 systems which use the UEFI boot flow. It should support real boards as well as virtual machines. So far it has been successfully tested on KVM Virtual Machines.
2022.5.3: Ukraine Alarm integration, get alerted for attacks by air or artillery
In February 2022, Russia invaded Ukraine. The countries have been at war ever since. Ukrainian citizens can at any moment be caught in crossfire or be deliberately targeted by the Russian army. Ukraine introduced the Ukraine Alarm service to help citizens be notified when fighting is happening nearby.
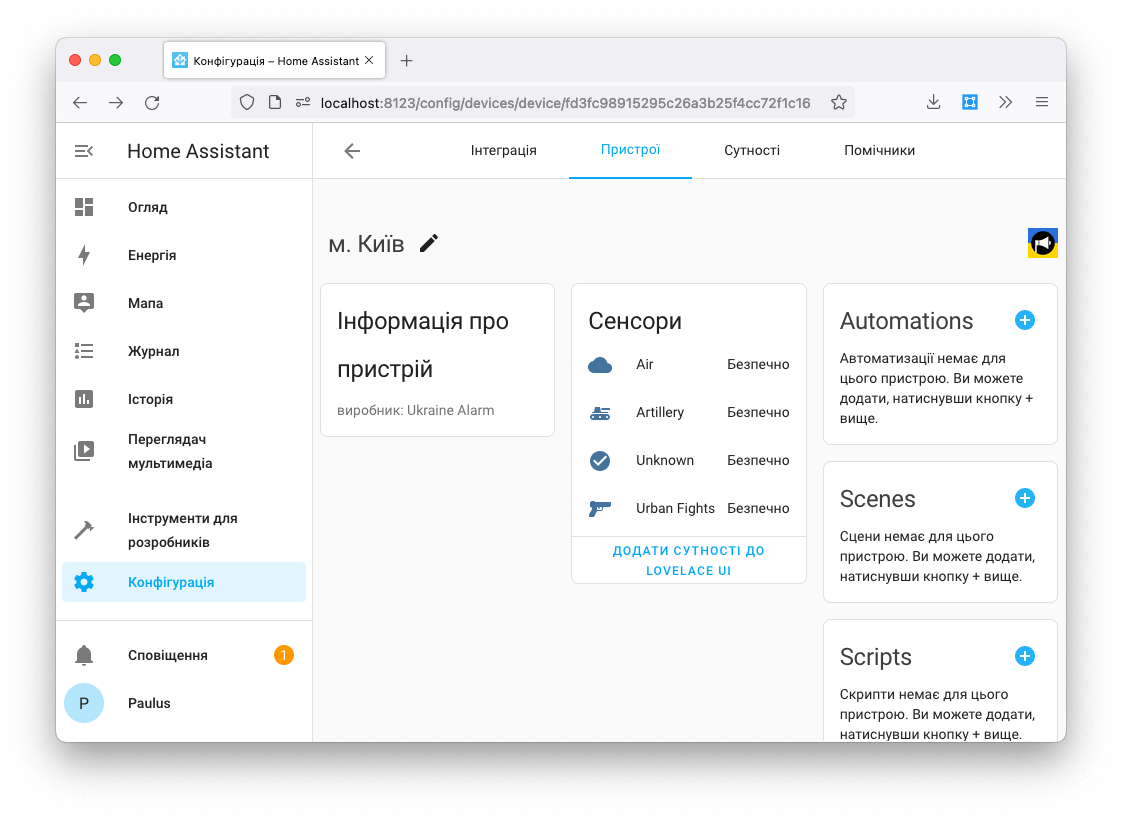
Today we’re doing a special release of Home Assistant to make the new Ukraine Alarm integration available to everyone. It was contributed by Paul Annekov. This integration will track the alerts for the users’ region and represent it as safety binary sensors. These sensors can be used in automations so it’s possible to notify the people in your home that there is danger.
Use this My button to add Ukraine Alarm to your Home Assistant:

Бережіть себе,
Paulus
(English screenshots below the Ukranian screenshots)
 Read on →
2022.5: Streamlining settings
Home Assistant Core 2022.5!
And, as often said: “All things seem possible in May!”. Well, possibilities we have for you this last month of spring.
The most visible thing this release is the next iteration of the settings menu, of which the result, to me personally, makes tons of sense. It took me a bit to get used to, but honestly I like it! 🤩
Meanwhile, at Nabu Casa, they released annual subscriptions for Home Assistant Cloud worldwide (except for Canada, the UK, and the EU, they will follow soon with local currency support).
I’m also very excited to present you with a whole lot of new powerful automations and scripts features! Some for the UI, but there are some real game changers in there that our YAML community will love! 🤖
Enjoy the release!
../Frenck
Read on →Introducing the Home Assistant Creator Network!
 Zack Barett
Hey Everyone! Today we are announcing our new program called the Home Assistant Creator Network! We are super excited to start talking closely with creators to ensure everyone has the best information possible. We are looking to invest in our community and support the effort being put into keeping our users informed. This is a way for Home Assistant to reward these creators that are positively engaging with our users.
 First Members of the Creator Network!
What is the Creator Network?
The creator network will be a group of creators that are active and engaged with our community with consistent content that builds the archive for Home Assistant. These creators are creating content for YouTube, Twitter, Instagram, TikTok, etc. with the goal of helping people use Home Assistant. This can be through tutorials, unbiased product reviews, creating cool stuff and more.
We are looking forward to growing this network to be a group of creators that work together with each other and the Home Assistant Developers. One of the biggest ways we are doing that is monthly calls with the network to discuss releases and upcoming changes.
Visit the Home Assistant Creators Network for more information and how to apply.
Hey Insteon users!
The US smart home company Insteon abruptly went dark and turned off its cloud. While Insteon products talk locally, the app and voice assistant integrations do not. Without this, users are not able to control and configure their hub and automations don’t run.
If you’re one of the impacted Insteon users, this post is for you.
The good news is that Home Assistant is able to talk to your Insteon devices via the Insteon hub or modem. You will be able to pair new devices and set up links as you’re used to.
The other good news is that Home Assistant works 100% local. There is no cloud necessary for any part of it to function and no one can remotely shut it down.
 Overview of supported Insteon modems & hubs
There are many different ways to run Home Assistant. The easiest and best way is to buy a dedicated device to run Home Assistant. Alternatively, if you have a server at home and are familiar with the technology, you can try our virtual machine or Docker container installations.
Once you have Home Assistant up and running, see the documentation for the Insteon integration on how to set it up. It works with the 2413U USB and 2412S RS242 flavors of PLM and the 2448A7 USB stick. It has also been tested to work with the 2242 and 2245 Hubs.
Tom Harris leads the development of the Insteon integration in Home Assistant and he is putting the final touches on a new Insteon page for the Home Assistant interface. This page makes it easier to manage your Insteon network, just like you would have done via the Insteon application. It’s expected to be available in 1-2 weeks.
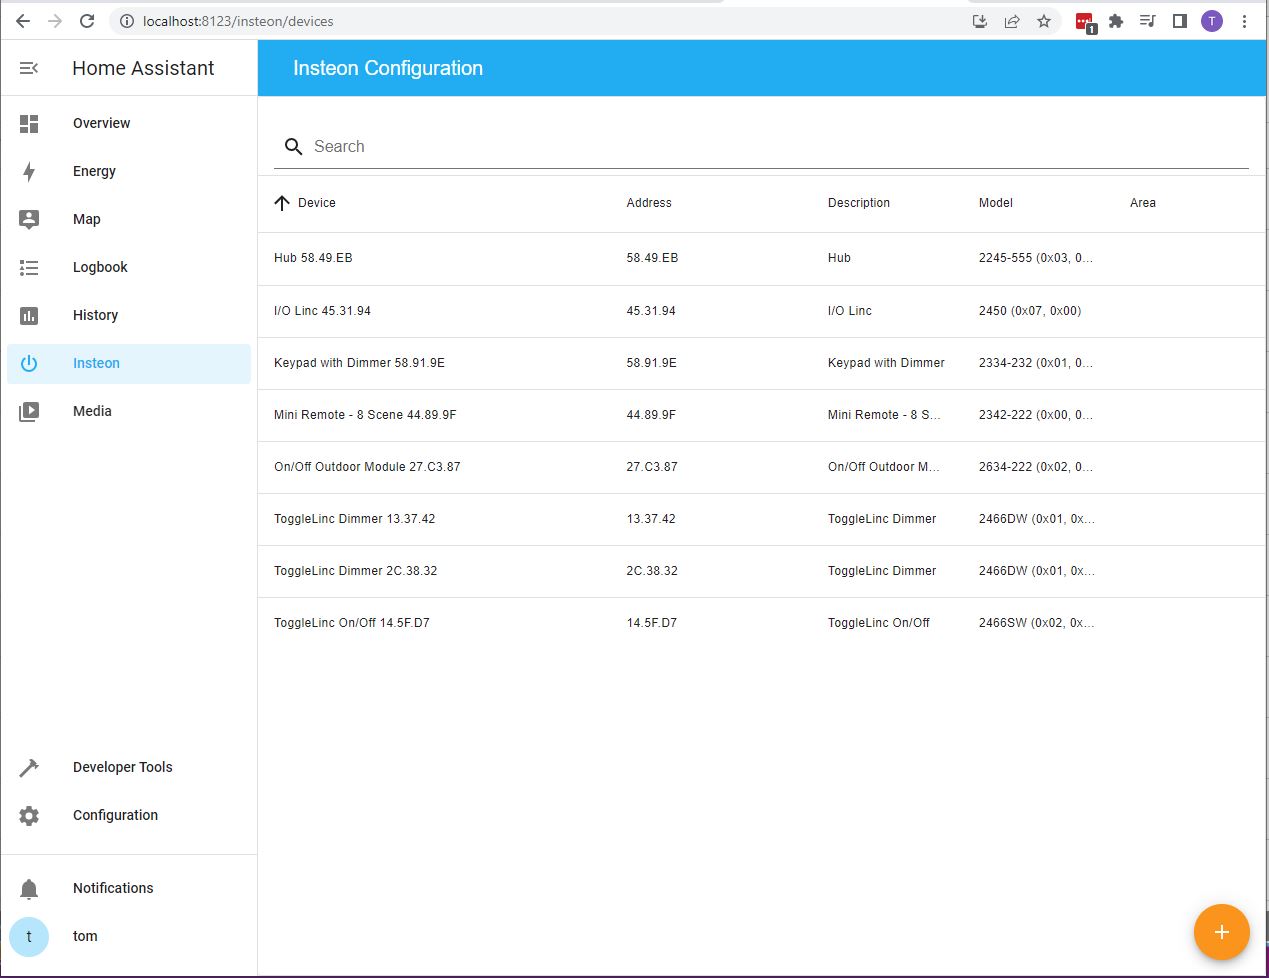 Screenshot of the upcoming Insteon page
Home Assistant is an open and friendly community which is happy to help new users. Join us on Discord chat or on our forums if you get stuck.
If you’re looking to connect with other Insteon users, we recommend the /r/Insteon community on Reddit.
To stay up to date on the latest releases of Home Assistant, follow us in Twitter, Facebook or subscribe to our newsletter.
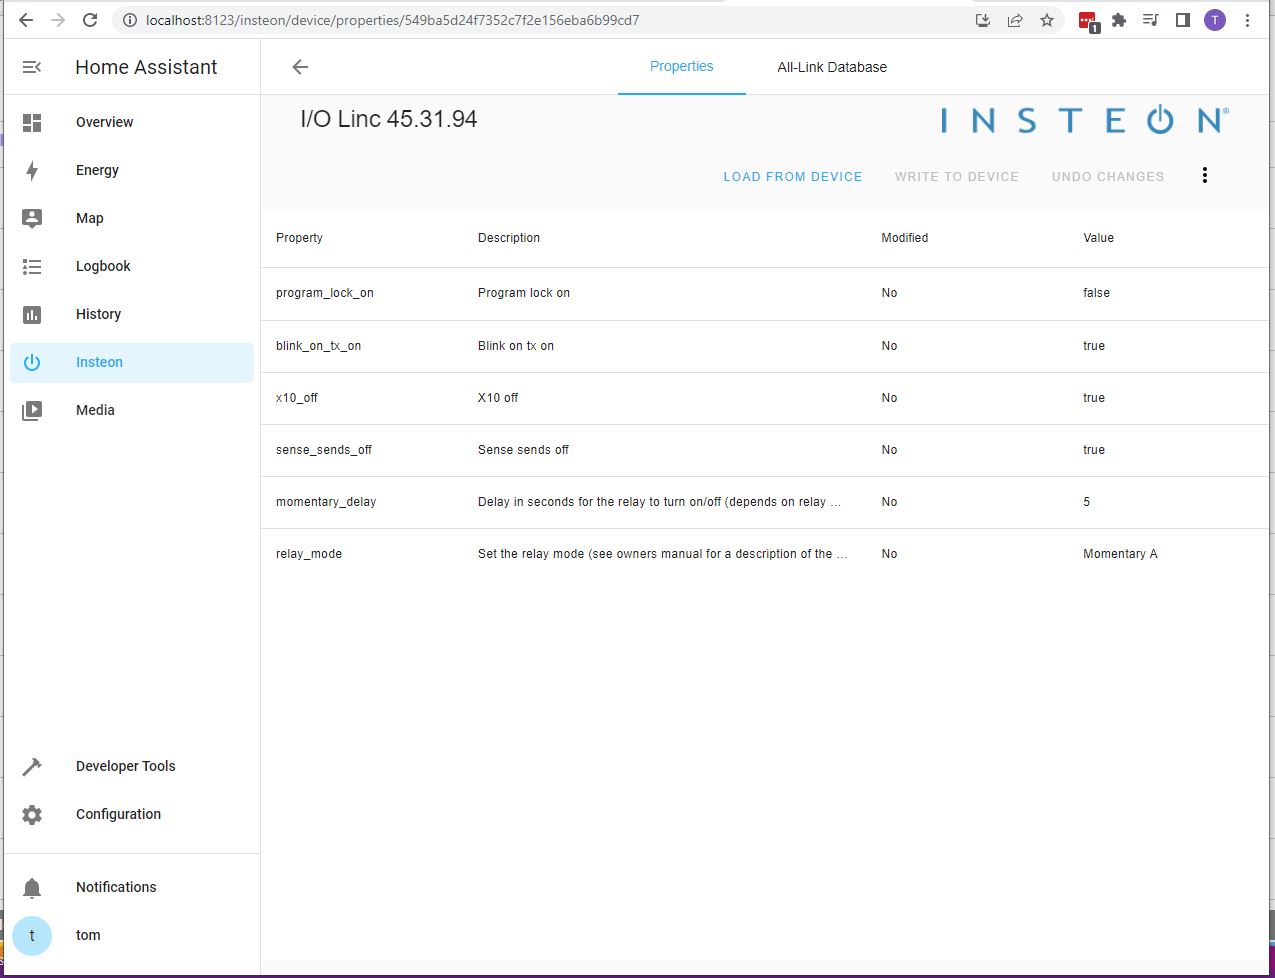 Another screenshot of the upcoming Insteon page
Buying a device to run Home Assistant (April 2022 edition)
Home Assistant is a home automation platform with a focus on privacy and local control. It can function fully without an internet connection. Home Assistant is easy in day-to-day use, and we’ve been spending a lot of time streamlining this experience.
Due to the global chip shortage and supply chain issues, it’s currently very difficult to get a device that runs Home Assistant. We’re fixing that by creating Home Assistant Yellow, a device with Home Assistant pre-installed. Bad news: Home Assistant Yellow is not ready yet and won’t be shipping until later this year.
There is currently a big wave of people interested in running Home Assistant (thanks Insteon) and so I thought it would be a good time to list the best options as of April 2022 to get a device that runs Home Assistant.
Home Assistant comes in different flavors. As a new user, you want to use our operating system. It is what powers Home Assistant Yellow and turns the device into a user-friendly home automation hub that is easy to maintain.
The best device that runs Home Assistant that is in stock is the ODROID-N2+ Home Assistant Bundle from Ameridroid. This bundle contains the ODROID-N2+ which is what also powers our Home Assistant Blue. It comes with Home Assistant pre-installed so it’s ready to go. It’s in stock today.
The ODROID-N2+ can also be bought from other stores or directly from the manufacturer, Hardkernel. These configurations will not come with Home Assistant pre-installed and require following the Home Assistant installation guide.
If you don’t want to start using Home Assistant right now, we recommend our Home Assistant Yellow. It is our own take on the best hardware to run Home Assistant. It supports Zigbee, will support Matter and with its M.2 slot, it’s future proof.
By far the most popular way that people run Home Assistant is on a Raspberry Pi 4. Due to supply chain issues there is a huge shortage of Raspberry Pis and every time they are in stock they sell out quickly. Your best bet to get one is to use rpilocator.com, a website that tracks Raspberry Pi stock across all approved resellers.
If you follow them on Twitter, you can enable a notification whenever they tweet a new stock alert by clicking the bell icon on their profile. Note about Adafruit: you will need to configure two-factor authentication on your account before you can purchase a Raspberry Pi (it’s to keep bots out).
We get commissions for purchases made through some links in this post.
2022.4: Groups! Groups! Groups!
👋 I’m not sure where to start with this release; It’s April, and I can assure you: This release is no joke. Seriously, it is packed with features and incredible new things 🤯.
The release focuses on adding features to the user interface by bringing in user experiences and features that were previously only available to users using YAML configuration and making them now accessible for all! It is a great step forward in streamlining all the user experiences.
I could not fit more in these release notes, but there is more to tell! Zack and Paulus promised to add a couple of great (and exclusive) announcements to the newsletter! The newsletter has, by the way, been renamed: Building the Open Home. Be sure to check it out!
I want to invite you to read the (long) release notes below. I’m sure there is a lot in there you will like and love ❤️.
Let me know what you think the killer feature of this release is?
Enjoy the release!
../Frenck
Read on →Content Trust with Home Assistant & Codenotary CAS
 Pascal Vizeli
We started to update how Home Assistant does content trust using Codenotary CAS.
With content trust, we can ensure that your system only runs containers/software as released by the original author. The author, in this case, can be the Home Assistant project, but also, for example, an add-on developer. This is an important security aspect, as it protects your instance from running possibly malicious software. Content trust verifies that the software you download, install or upgrade is exactly the same as it was released by its creator and ensures nobody messed with it along the way.
Codenotary CAS is built around a decentralized, cryptographically coherent and verifiable database technology called immudb. It is used to store all these trusted content signatures.
With immudb we will be able to host parts of the trusted content signatures data ourselves (we don’t do this yet). It could even be made available as a Home Assistant add-on that users can install locally. Important to know is that CAS does not upload any user data for verification, it’s all done locally, just the way we like it. When you install or update part of your system that is signed, it checks the CAS database to ensure that the image has not been revoked (similar to SSL with the CRL) and verifies that the download content, which we deliver over multiple public endpoints, is the same as the update that your system just has downloaded.
While rolling out the new system we ran into some issues which caused users unable to install updates for ~12 hours on March 11; for which we want to apologize. Thanks to the help from Codenotary engineers we were able to get it fixed in a quick and orderly fashion.
Pascal